---
title: "How to Add Underline Overlay Effect on Text in WordPress?"
url: https://nexterwp.com/docs/add-underline-overlay-effect-on-text-in-wordpress/
date: 2024-12-05
modified: 2026-08-18
author: "Aditya Sharma"
description: "Do you want to add unique underline text effects in WordPress? Adding custom underlines to your text not only enhances the design but also helps you highlight important sections, making..."
image: https://nexterwp.com/wp-content/uploads/2024/12/How-to-Add-Underline-Overlay-Effect-on-Text-in-WordPress_-1024x519.jpg
word_count: 291
---

# How to Add Underline Overlay Effect on Text in WordPress?

## Key Takeaways

- Nexter Blocks Advanced Typography block adds an underline overlay effect on text in WordPress, and the post says it is part of Nexter Blocks that must be installed and activated.
- Advanced Typography block lets the user choose Normal or Multiple in the Select Option section, then enter text and open Advance Underline Options under the Style tab.
- Select Underline offers three choices, None, Classic, and Overlay, and Overlay Style provides predefined overlay styles with separate Normal and Hover tabs for further customization.

Do you want to add unique underline text effects in WordPress? Adding custom underlines to your text not only enhances the design but also helps you highlight important sections, making them stand out and improving readability.

With the Advanced Typography block from Nexter Blocks, you can easily add an image reveal effect on text in WordPress.

*To check the complete feature overview documentation of the Nexter Blocks Advanced Typography block,[ click here](https://nexterwp.com/docs/add-advanced-typography-in-wordpress/).*

***Requirement  - This block is a part of the Nexter Blocks, make sure it's installed & activated to enjoy all its powers.***

[LIVE BLOCK LINK](https://nexterwp.com/nexter-blocks/blocks/wordpress-hotspot-pinpoint-image/)

To do this, add the Advanced Typography block to the page and follow the steps - 

1. In the **Advanced Typography** tab, select **Normal** or **Multiple** from the **Select Option** section.

Let’s select Normal.

2. Then add the text in the **Text** field.

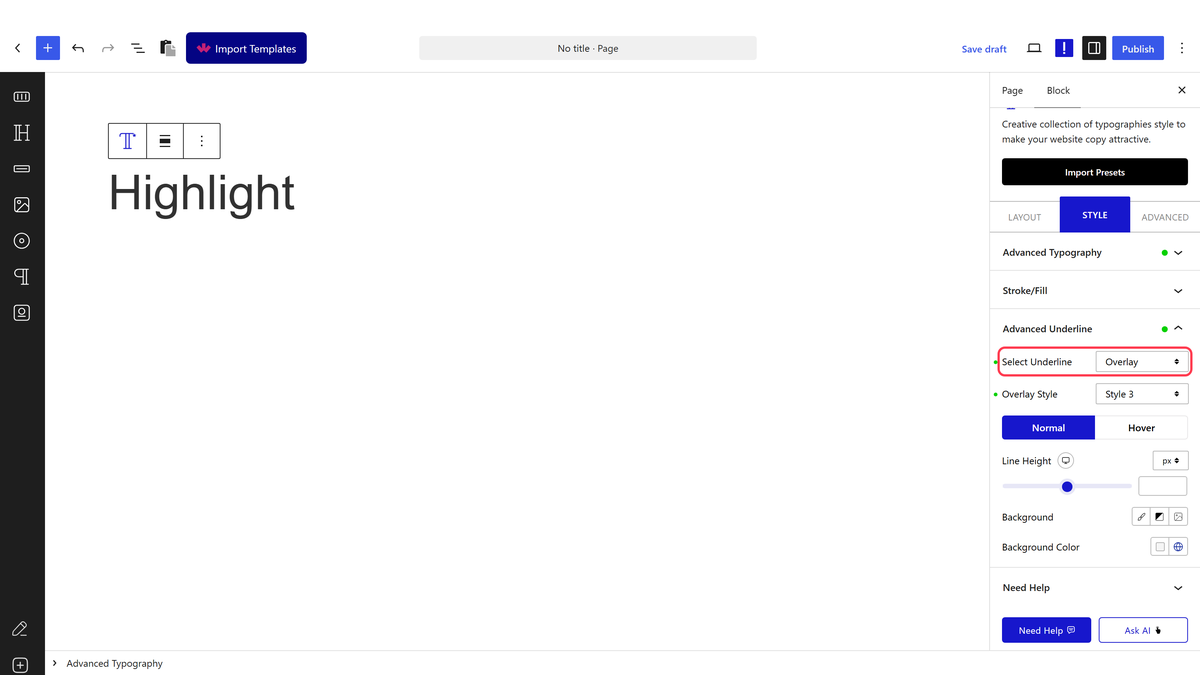
3. Then go to the **Advance Underline Options** tab under the **Style** tab.

> *Note: In the Multiple option you’ll find the Advance Underline Options in each text repeater item.*

4. From the **Select** **Underline **dropdown, you have to select the underline type. Here you’ll find three options - 

- **None** - This will not add any underline. 

- **Classic** - With this option, you can add some classic underlines like underline, overline and line through for normal and hover states. You can also add different underline styles as well. 

- **Overlay** - With this option, you can add unique underline overlay effects.

Select the option as per your requirements, let’s select Overlay here.

5. From the **Overlay Style** dropdown, you can select different predefined overlay styles.

Then, from the Normal and Hover tab, you can customize the style further.

> *Note: Depending on the selected style you’ll find different options for normal and hover states.*

## Frequently Asked Questions

**Q: Why is the underline overlay effect not showing in WordPress?**
A: The most common blocker is that the Advanced Typography block is part of Nexter Blocks, so it has to be installed and activated first. The effect itself lives under the Advance Underline Options tab, and the underline type must be set to Overlay. If you leave it on None or Classic, you will not get the overlay treatment. That matters because the overlay styles only appear after the correct underline type is selected.

**Q: What do I need before adding an underline overlay effect to text?**
A: The key requirement is Nexter Blocks, because the Advanced Typography block comes from that package. Once it is installed and activated, the block gives you the text field, underline controls, and overlay styling options in one place. That setup matters if you want to build text effects without code, since the tutorial is centered on using the block rather than custom CSS.

**Q: Can I use the underline overlay effect for different text layouts in WordPress?**
A: The Advanced Typography block supports both Normal and Multiple from the Select Option section, so it works for a single text line or repeated text items. In Multiple mode, the Advance Underline Options appear inside each text repeater item, which is useful when each piece of text needs its own styling. That makes the effect flexible for headings or grouped text where one style would not fit everything.

**Q: What is the difference between Classic and Overlay underline styles?**
A: Classic is for standard underline effects like underline, overline, and line through on normal and hover states, plus other underline styles. Overlay is for unique underline overlay effects instead of those traditional line treatments. That distinction matters because Classic is better when you want familiar text decoration, while Overlay is the choice when you want a more visual highlight effect.

**Q: How do I change the look of an underline overlay effect after selecting it?**
A: The Overlay Style dropdown gives you predefined overlay styles, and then the Normal and Hover tabs let you refine how each state looks. That split matters because hover behavior can feel very different from the default state, so a style that looks good at rest may need adjustment when hovered. The page also notes that available options depend on the selected style.

**Q: Where can I find more details about Advanced Typography in Nexter Blocks?**
A: Nexter Blocks provides a complete feature overview for the Advanced Typography block through its documentation link: [click here](https://nexterwp.com/docs/add-advanced-typography-in-wordpress/). The tutorial also includes a [LIVE BLOCK LINK](https://nexterwp.com/nexter-blocks/blocks/wordpress-hotspot-pinpoint-image/) for seeing the block in action. That helps if you want to compare the written steps with how the block behaves in practice.