A well-designed pricing table not only enhances the visual appeal of your website but also simplifies the decision-making process for potential buyers by clearly outlining the features and costs associated with each option.
With the Pricing Table block from Nexter Blocks, you can easily add beautiful pricing tables to your WordPress website.
Required Setup
- Make sure the default WordPress Block editor is active.
- You need to have the Nexter Blocks plugin installed and activated.
- Make sure the Pricing Table block is activated, to verify this visit Nexter → Blocks → and Search for Pricing Table and activate.
- This is a Freemium block, to unlock the extra features, you need the PRO version of Nexter Blocks.
Learn via Video Tutorial
How to activate the Pricing Table Block?
Go to
- Nexter → Blocks
- Search the block name and turn on the toggle.

Key Features
- Multiple Layout – You can select from multiple predesigned layouts (free and pro).
- Previous Price – You can easily show a previous price in the pricing table.
- Ribbon – You can easily add a ribbon tag to highlight a pricing table.
- Tooltip (Pro) – You can add a tooltip to a pricing table content.
- Show More Options – You can easily limit the initial content by adding a show more option to a pricing table.
- Scale Effect (Pro) – You can easily add a zoom effect to highlight a pricing table.
How to Use the Pricing Table Block?
Add the Pricing Table block to the page.
Then click on the Design from Scratch button to design the layout from scratch.

Note: By clicking on the Import Pre-Designed Template button, you can import a preset template and customize it as per your requirements.
Style
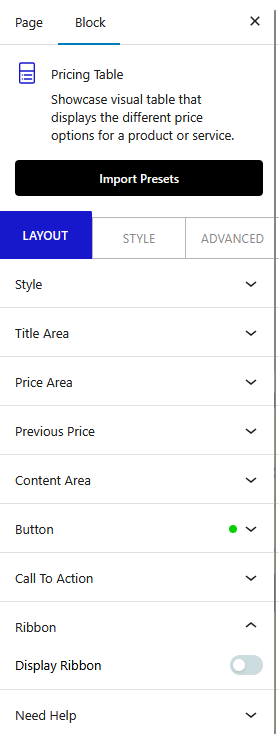
From the Layout section, you can select a pre-defined style (free and pro) for the pricing table.

Title Area
From the Title Layout dropdown, you can select a style for the title.
You can edit the title from the Title field.
In the Subtitle field, you can add a subtitle.
Then from the Icon Type section, you can add an icon, image or SVG above the title in the pricing table.
- None – To add nothing above the title.
- Icon – To add an icon from different icon libraries.
- Image – To add an image above the title.
- SVG – To add a custom SVG image above the title.
From the Alignment section, you can align the title.
Price Area
From the Price Layout section, you can select a pre-defined style (free and pro) of the price text.

In the Prefix Text field, you can add a currency symbol or any text before the price amount.
Then in the Price Amount field, you have to add the actual price.
You can add a text after the price in the Postfix Text field. Ideal for adding the frequency of the payment like per month, per year etc.
Previous Price
By enabling the Display Previous Price toggle, you can add a previous price, ideal for showing the differences between the old and new prices.

Similar to the Price Area tab, you can add a prefix text, price and postfix text in the Prefix Text, Price Amount and Postfix Text fields.
Content Area
In this tab, you have to add the pricing table content.
From the Content Type section, you have to select how you want to add the content. Here you’ll find two options –
- Text Content – With this option, you’ll find a text editor to add the content.
- Stylish List – With this option, you can add content using repeater items.
Note: For each option, you’ll find two pre-defined styles for the content section.
Select the option as per your requirements. Let’s select Stylish List here.
Note: You’ll find extra options with the Stylish List option.
You can select a pre-defined style from the Price Layout section.
Then you’ll find three repeater items by default under the Features section, open one item.
In the List Description section, you can add the description.
From the Select Icon section, you can select the icon library and add an icon to the description list item.
Then, from the Icon Color section, you can change the icon color for normal and hover states.
By enabling the Tooltip Options (Pro) toggle, you can add a tooltip to the list item.
You can also add an extra icon to the content item by enabling the Extra Icon toggle.
Following this process you can edit the other repeater items.
You can click on the + Add Features button to add more items.
From the Read More Toggle, you can limit the initial item visibility by adding a show-all option.
Button
By enabling the Button toggle, you can add a button to the pricing table.

From the Style section, you can select a pre-defined style.
In the Button Text field, you can add the button text.
You can add a link to the button in the Button Link field.
Note: The icon related options are available for Style 2 only.
From the Icon Type section, you can add an icon to the button.
Then, from the Icon Position section, you can place the icon before or after the button text.
You can adjust the icon spacing size from the Icon Spacing and Icon Size sections.
Call to Action
From the Content field, you can add a call to action content below the button.

Ribbon
By enabling the Display Ribbon toggle, you can add a ribbon to the pricing table.
Note: This will only add one pricing table item, to create multiple pricing table items you have to use the Pricing Table widget multiple times.
How to Style the Pricing Table Block?
To style the Pricing Table block, you’ll find all options in the Style tab.
Title Area – From here, you can style the title.

Previous Price Style – From here, you can style the previous price text.
Price Area – From here, you can style the price text.
Content Area – From here, you can style the pricing table description text.
Content Background – From here, you can style the pricing table description area.
Tooltip Options (Pro) – From here, you can style the tooltip.
Button – You’ll see this tab, only when the button toggle is enabled. From here, you can style the button.
Ribbon – You’ll see this tab, only when the ribbon toggle is enabled. From here, you can style the ribbon.
Background Options – From here, you can style the pricing table background for normal and hover states, add different hover animations and more.
Extra Options (Pro) – From here, you can add a zoom effect to highlight a pricing plan.
Advanced options remain common for all our blocks, you can explore all it options from here.
