As a WordPress user, you might want to add custom code snippets to your website for various purposes, such as adding tracking codes, customizing the appearance of your site, or adding new functionality. Fortunately, WordPress provides a way to add code snippets without having to modify the theme or plugin files directly.
With the Nexter Extension, you can easily add HTML, CSS, JS, and PHP code snippets to your website without modifying the original code. This makes it easy to add custom functionality, modify the appearance of your website, or make other modifications without having to learn how to code from scratch.
Required Setup
- You need to have the Nexter Extension plugin installed and activated.
- This is a freemium feature to unlock the extra features, you need the PRO version of the Nexter Extension.
Adding New Snippet
To add a new code snippet using the Nexter Extension plugin, follow the steps –
From the Dashboard, go to Nexter > Code Snippets > Add New Snippet.
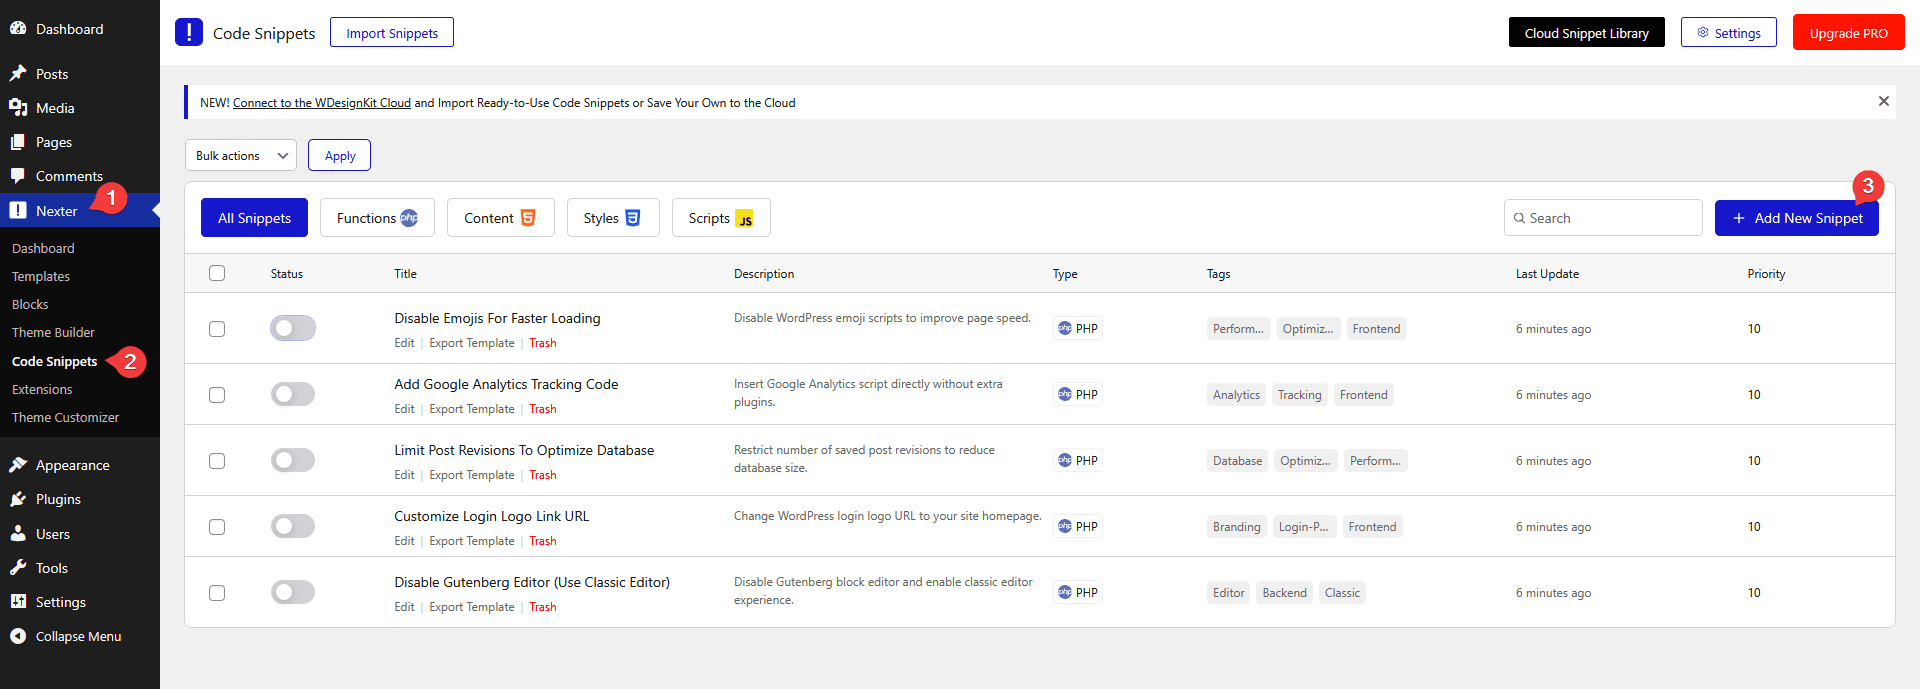
On the next page, add the snippet name in the Snippet Name field.

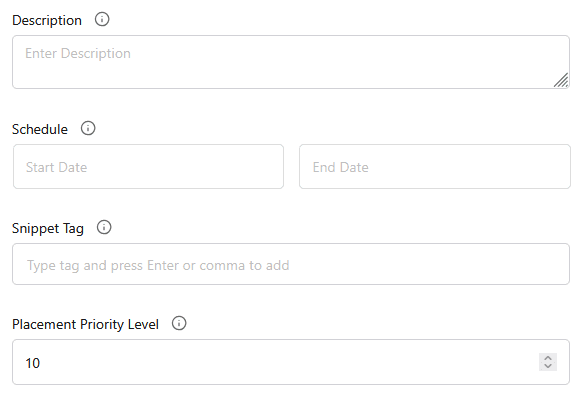
After that, you can add some basic details of your snippet and schedule when the code snippet will be active.
Description – Write a private description for yourself or other editors about this snippet.
Schedule (Pro) – From the Start Date and End Date fields, you can set the start and end date for the code snippet.
Snippet Tag – Add tags for your snippet to group similar ones together.
Placement Priority Level – Set a number to decide the order in which snippets run. Lower numbers run first, higher numbers run later. All snippets start at priority 10 by default. For example, set it to 5 if you want it to run before others.
Then you have to select the code type from the dropdown in the code preview section. You can select PHP, HTML, CSS and JavaScript code.
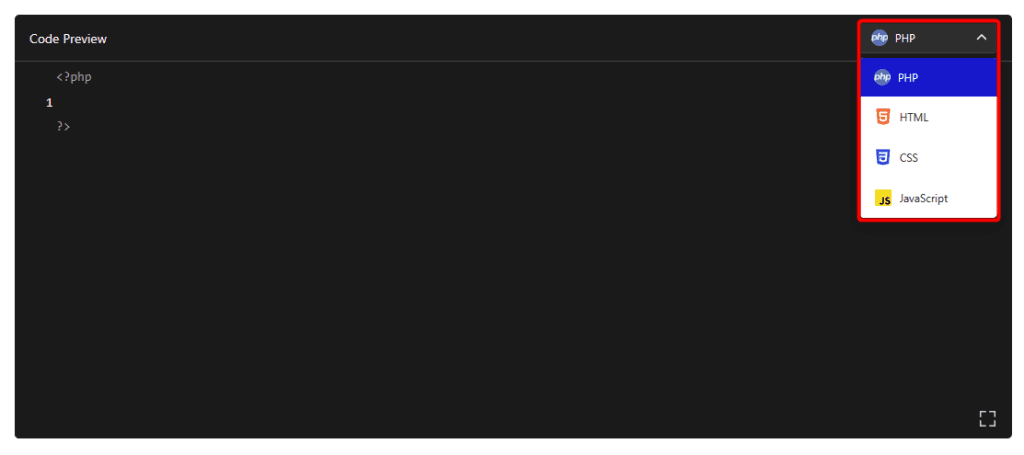
Based on your selected code type, you have to add the actual code in the code editor.
It has a code validator for PHP code. If there are any errors in your PHP code, you’ll get a notification and the code snippet will be disabled.
Placement Method
Once you’ve added your code, you have to select how you want to add the code.
There are two methods –
- Automatic Placement – To automatically add and execute the code from a list of locations.
- Insert via Shortcode (Pro) – To add the code via shortcode anywhere on the site.

For Automatic Placement, you have to select the exact placement from the Snippet Placement section.
In the Snippet Placement, you’ll find a list of predefined locations to choose from.
The following are the available locations –
Site Wide
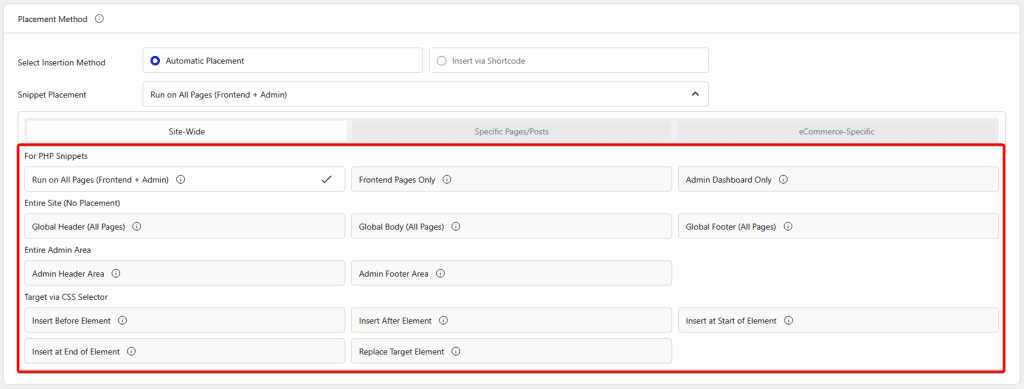
- For PHP Snippets – From here, you can add a PHP code snippet in the front end and the WordPress admin area.
- Run on All Pages (Frontend + Admin) – Run this PHP snippet on every page (frontend and backend).
- Frontend Pages Only – Run this PHP snippet only on the frontend of the site.
- Admin Dashboard Only – Run this PHP snippet only in the WordPress admin area.
- Entire Site (No Placement) – From here, you can add the code snippet to the entire site.
- Global Header (All Pages) – This will place the code snippet in the header of the entire site.
- Global Body (All Pages) – This will place the code snippet in the body of the entire site.
- Global Footer (All Pages) – This will place the code snippet in the footer of the entire site.
- Entire Admin Area – From here, you can add the code snippet in the WordPress admin area.
- Admin Header Area – This will place the code snippet in the WordPress admin header area.
- Admin Footer Area – This will place the code snippet in the WordPress admin footer area.
- Target via CSS Selector – From here, you can target an HTML element with a CSS selector. You have to target the HTML element via CSS class, CSS ID or attribute. When multiple elements match the CSS selector, specify which one to target (0 targets all matches, 1 targets the first match, 2 targets the second match, and so on.)
- Insert Before Element (Pro) – This will place the code snippet before the selected HTML element.
- Insert After Element (Pro) – This will place the code snippet after the selected HTML element.
- Insert at Start of Element (Pro) – This will place the code snippet at the start of the selected HTML element.
- Insert at End of Element (Pro) – This will place the code snippet at the end of the selected HTML element.
- Replace Target Element (Pro) – This will replace the selected HTML element with the code snippet.
Specific Pages/Posts
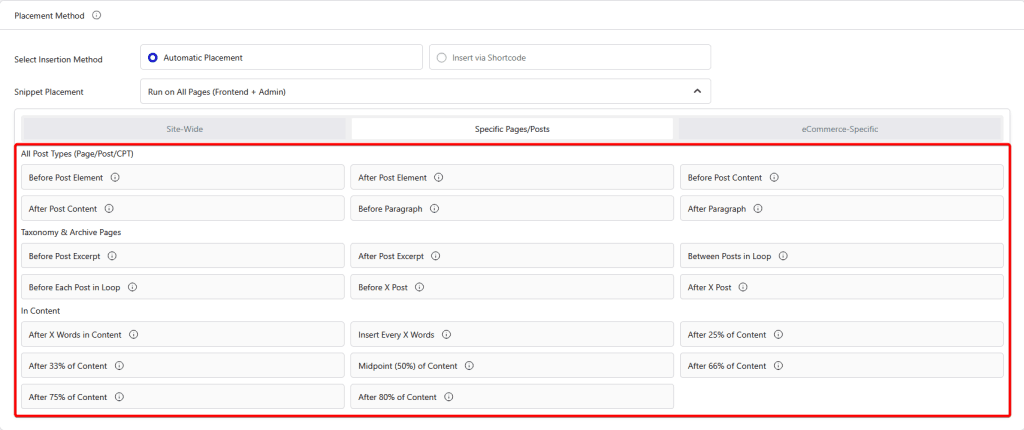
- All Post Types (Page/Post/CPT) – From here, you can add code snippets to all post types.
- Before Post Element – This will place the code snippet before the entire post content.
- After Post Element – This will place the code snippet after the entire post content.
- Before Post Content – This will place the code snippet before the main content area.
- After Post Content – This will place the code snippet after the main content area.
- Before Paragraph – This will place the code snippet before a specific paragraph.
- After Paragraph – This will place the code snippet after a specific paragraph.
- Taxonomy & Archive Pages – From here, you can add code snippets to taxonomy and archive pages.
- Before Post Excerpt – This will place the code snippet before the post excerpt in the listing.
- After Post Excerpt – This will place the code snippet after the post excerpt in the listing.
- Between Posts in Loop – This will place the code snippet between the post listings.
- Before Each Post in Loop – This will place the code snippet before the individual posts in the archive pages.
- Before X Post – This will place the code snippet before a specific post number.
- After X Post – This will place the code snippet after a specific post number.
- In Content – From here, you can add code snippets to the content.
- After X Words in Content (Pro) – This will place the code snippet after a specified number of words.
- Insert Every X Words (Pro) – This will place the code snippet at intervals of a specified word count.
- After 25% of Content (Pro) – This will place the code snippet after the first 25% of the content.
- After 33% of Content (Pro) – This will place the code snippet after 33% of the content.
- Midpoint (50%) of Content (Pro) – This will place the code snippet in the middle of the main content.
- After 66% of Content (Pro) – This will place the code snippet after 66% of the content.
- After 75% of Content (Pro) – This will place the code snippet after 75% of the content.
- After 80% of Content (Pro) – This will place the code snippet after 80% of the content.
eCommerce-Specific
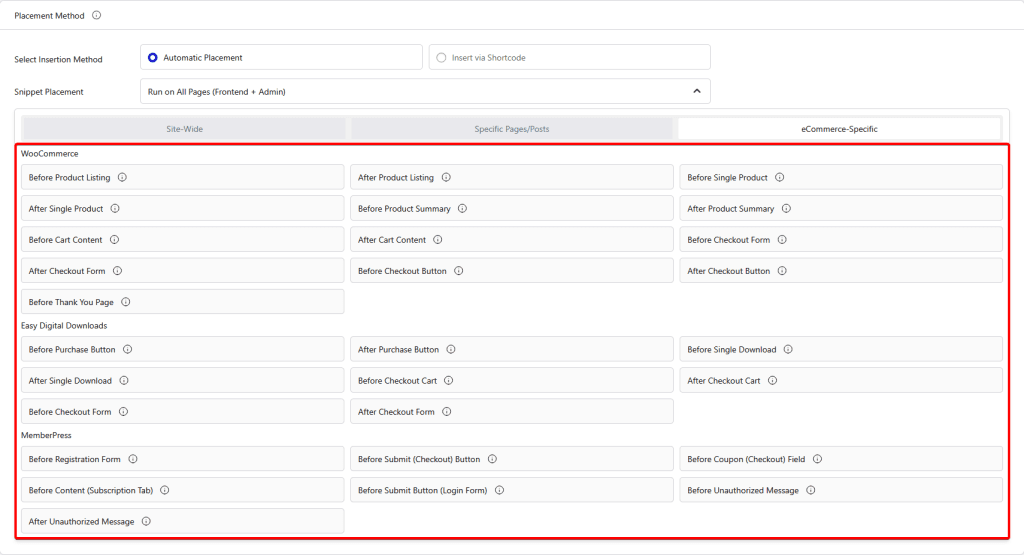
- WooCommerce – From here, you can add code snippets to various places in WooCommerce.
- Before the List of Products – This will place the code snippet before the product listing.
- After the List of Products – This will place the code snippet after the product listing.
- Before the Single Product – This will place the code snippet before the single product.
- After the Single Product – This will place the code snippet after the single product.
- Before the Single Product Summary – This will place the code snippet before the product summary in a single product.
- After the Single Product Summary – This will place the code snippet after the product summary in a single product.
- Before the Cart – This will place the code snippet before the cart content.
- After the Cart – This will place the code snippet after the cart content.
- Before the Checkout Form – This will place the code snippet before the checkout form.
- After the Checkout Form – This will place the code snippet after the checkout form.
- Before Checkout Payment Button – This will place the code snippet before the checkout payment button.
- After Checkout Payment Button – This will place the code snippet after the checkout payment button.
- Before the Thank You Page – This will place the code snippet before the thank you page.
- Easy Digital Downloads – From here, you can add code snippets to various places in Easy Digital Downloads.
- Before the Purchase Button – This will place the code snippet before the purchase button.
- After the Purchase Button – This will place the code snippet after the purchase button.
- Before the Single Download – This will place the code snippet before the single download.
- After the Single Download – This will place the code snippet after the single download.
- Before the Cart – This will place the code snippet before the cart content.
- After the Cart – This will place the code snippet after the cart content.
- Before the Checkout Cart – This will place the code snippet before the checkout cart.
- After the Checkout Cart – This will place the code snippet after the checkout cart.
- Before the Checkout Form – This will place the code snippet before the checkout form.
- After the Checkout Form – This will place the code snippet after the checkout form.
- MemberPress – From here, you can add code snippets to various places in MemberPress.
- Before the Registration Form – This will place the code snippet before the registration form.
- Before Checkout Submit Button – This will place the code snippet before the submit button in the checkout page.
- Before Checkout Coupon Field – This will place the code snippet before the checkout coupon field in the checkout page.
- Before Account First Name – This will place the code snippet before the first name in the account page.
- Before Subscriptions Content – This will place the code snippet before the content in the subscription tab.
- Before Login Form Submit – This will place the code snippet before the submit button in the login form.
- Before the Unauthorized Message – This will place the code snippet before the unauthorized message.
- After the Unauthorized Message – This will place the code snippet after the unauthorized message.
Note: If WooCommerce, Easy Digital Downloads, or MemberPress aren’t installed and activated, their related options will be disabled. Install and activate each plugin to enable its options.
Dynamic Conditional Logic
Then, from the Dynamic Conditional Logic section, you can set powerful rules to show a snippet. You can create groups of conditions where all must be true, or use “OR” groups to add alternative sets of conditions.
To add dynamic conditional logic, first enable the toggle.

Then you can set conditions based on the following –

- User Conditions – Set display conditions based on various user conditions.
- User Login Status – Display content based on whether a user is logged in or logged out. For example, show exclusive content to logged-in members only.
- User Role Type – Target users based on their assigned WordPress role (e.g., Administrator, Editor, Subscriber). This helps in showing different content to different role types.
- Custom User Meta Field (Pro) – Display content based on the value of a specific custom user meta field. Useful for advanced personalization when you store extra data about users. You can manually enter the meta field value and target using the “contains/does not contain” operator.
- Type of Device (Pro) – Show or hide content depending on whether the visitor is using a desktop or mobile device. Ideal for device-specific layouts.
- Browser Name – Target users based on the browser they are using (e.g., Chrome, Firefox, Safari). This is helpful if you want to optimize or limit features to certain browsers.
- Operating System (OS) – Display content based on the user’s operating system (e.g., Windows, macOS, Android, iOS).
- Cookie Key Name (Pro) – Show content based on the presence of a specific cookie name in the browser. Great for tracking or session-based personalization. You can manually enter the cookie key name and target using the “exists/does not exist” operator.
- Cookie Value Match (Pro) – Target users by matching a specific cookie’s value, allowing for more precise content control. You can manually enter the cookie value and target using the “contains/does not contain” operator.
- Visitor Country (Pro) – Display content based on the visitor’s country, detected through IP geolocation. Useful for location-based offers or regulations.
- Visitor Continent (Pro) – Show or hide content depending on the visitor’s continent. Handy for broader regional targeting.
- Session Variable Name (Pro) – Display content based on a specific PHP session variable name. Great for advanced session-based personalization. You can manually enter the session variable name and target using the “contains/does not contain” operator.
- Content Location Conditions – Set display conditions based content location.
- Target Page Type – Show or hide content depending on the type of page being viewed, such as the homepage, single post, archive, search results, or 404 page.
- Target Post Type – Display content based on the post type, such as a blog post, page, product, or any custom post type you’ve created.
- Taxonomy Archive Page – Target archive pages that list posts from a specific taxonomy, like category, tag, or a custom taxonomy.
- Type of Taxonomy – Show content depending on the taxonomy type (e.g., category, tag, or a custom taxonomy group).
- Taxonomy Name (Term) (Pro) – Display content based on a specific taxonomy term name, such as a category like “News” or a tag like “Featured.” The term name will automatically show as you type.
- Full Page URL (Pro) – Target a page based on its complete URL, allowing exact matching for very specific conditions. You can manually enter the page URL and target using the “contains/does not contain” operator.
- Post Meta Field (Custom Key) (Pro) – Show or hide content based on the value of a custom meta field for a post. Great for advanced, data-driven targeting. You can manually enter the post meta field and target using the “contains/does not contain” operator.
- Post Publication Status (Pro) – Display content based on whether a post is published, pending review, scheduled, in draft mode, or trashed.
- Specific Posts or Pages – Target content to appear only on selected posts or pages that you manually choose.
- Assigned Page Template (Pro) – Show content depending on the WordPress page template assigned to that page.
- Author (Pro) – Display content based on the post’s author, useful for author-specific layouts or promotions.
- URL Path (after domain) (Pro) – Target content using the path in the URL after the domain name, such as /shop/products/. You can use /path for an exact match or /path/* for a wildcard pattern, then target using the “contains/does not contain” operator.
- HTTP Referrer URL (Pro) – Show content based on the referring website from which the visitor arrived. You can type the referrer’s URL (or part of it) and use the “contains” option to match it easily. If your site uses caching, this might not work reliably. It’s best used on pages that are never cached, like your cart or checkout page.
- Visitor User Agent String (Pro) – Target content based on the complete browser user agent string for detailed browser/device detection. You can use wildcards for flexible pattern matching and use the “contains/does not contain” operator.
- URL Query Parameter (Pro) – Display content based on the presence or value of specific query parameters in the URL (e.g., ?promo=summer). Then use the “exists/does not exist” operator to match.
- eCommerce Conditions – Set display conditions for e-commerce.
- Specific WooCommerce Page – Display content based on a particular WooCommerce page, such as the shop, cart, checkout, or my account page.
- WooCommerce Customer Order Count – Target customers based on the total number of orders they’ve placed in your store (e.g., first-time buyers or repeat customers). You can use the “greater than/less than” operator to easily match.
- WooCommerce Customer Lifetime Spend – Display content based on the total amount a customer has spent across all their orders in your store. You can use the “greater than/less than” operator to easily match.
- WooCommerce Current Cart Total – Show content depending on the current total value of items in the customer’s cart. You can use the “greater than/less than” operator to easily match.
- WooCommerce Specific Product in Cart – Display content if a specific product is currently in the user’s cart.
- Specific EDD Page – Show content based on a particular Easy Digital Downloads page, such as the checkout, purchase confirmation, or purchase history page.
- Specific MemberPress Page – Display content based on a particular MemberPress page, such as membership sign-up, account, or payment page.
- Specific MemberPress User – Show content based on the membership status of a logged-in user in MemberPress (e.g., active, expired, or pending).
- Advanced Conditions –
- Specific Date (Pro) – Display content on an exact calendar date, such as a holiday, event, or launch day. You can use the “before/after” operator to easily match.
- Specific Date & Time (Pro) – Show content at a specific date and exact time, perfect for time-sensitive offers or countdowns. You can use the “before/after” operator to easily match.
- Specific Day of the Week – Target certain weekdays, such as showing special Monday deals or weekend-only messages.
- Time of Day (Hour/Minute) (Pro) – Display content during a specific time window each day, down to the hour and minute. You can use the “before/after” operator to easily match.
- Triggered Snippet Condition (Pro) – Show or hide a snippet based on whether another snippet has been loaded or not.
- Visitor IP Address (Pro) – Target specific users based on their IP address or range using CIDR notation, useful for whitelisting or blocking access. You can use the “contains/does not contain” operator to easily match.
Multiple Rules
You can click on the Add button to add multiple rules, which means that both rules have to be true to apply the display conditions on the snippet.

Condition Group
You can click on the Add New Condition Group button to add a new group of rules. In a group of rules, even if one group of rules is true, then the display conditions will apply to the snippet.

The group of rules can be very useful if you want to use the same rules multiple times.
For example, if you want to show the same code snippet to a logged-in user with the Author role and a logged-out user viewing on the desktop, the rules will look like the above.
Saving & Activating the Snippet
Once everything is done, the last step is to save and activate the snippet.
In the top-right, you’ll find a toggle to turn the snippet on or off, and a button to create or update it.

If you save it as active, it will automatically run (based on your settings) or be available as a shortcode.
Note: It will be active by default.
If you set it to inactive, it will stop running and the shortcode will no longer show anything. This is useful if you want to make changes without removing the shortcode from your page.
This is how you can create a code snippet.
Enable/Disable Code Snippets
If you don’t see the Code Snippets menu under the Nexter Extension menu, then it might be disabled. Nexter Extension provides an option to enable or disable the Code Snippets, so you can disable it altogether in case you are not using it.
To enable/disable the Code Snippets, go to Nexter > Code Snippets.
Then, from the Code Snippets section, you can enable or disable the toggle to enable or disable the Code Snippets.
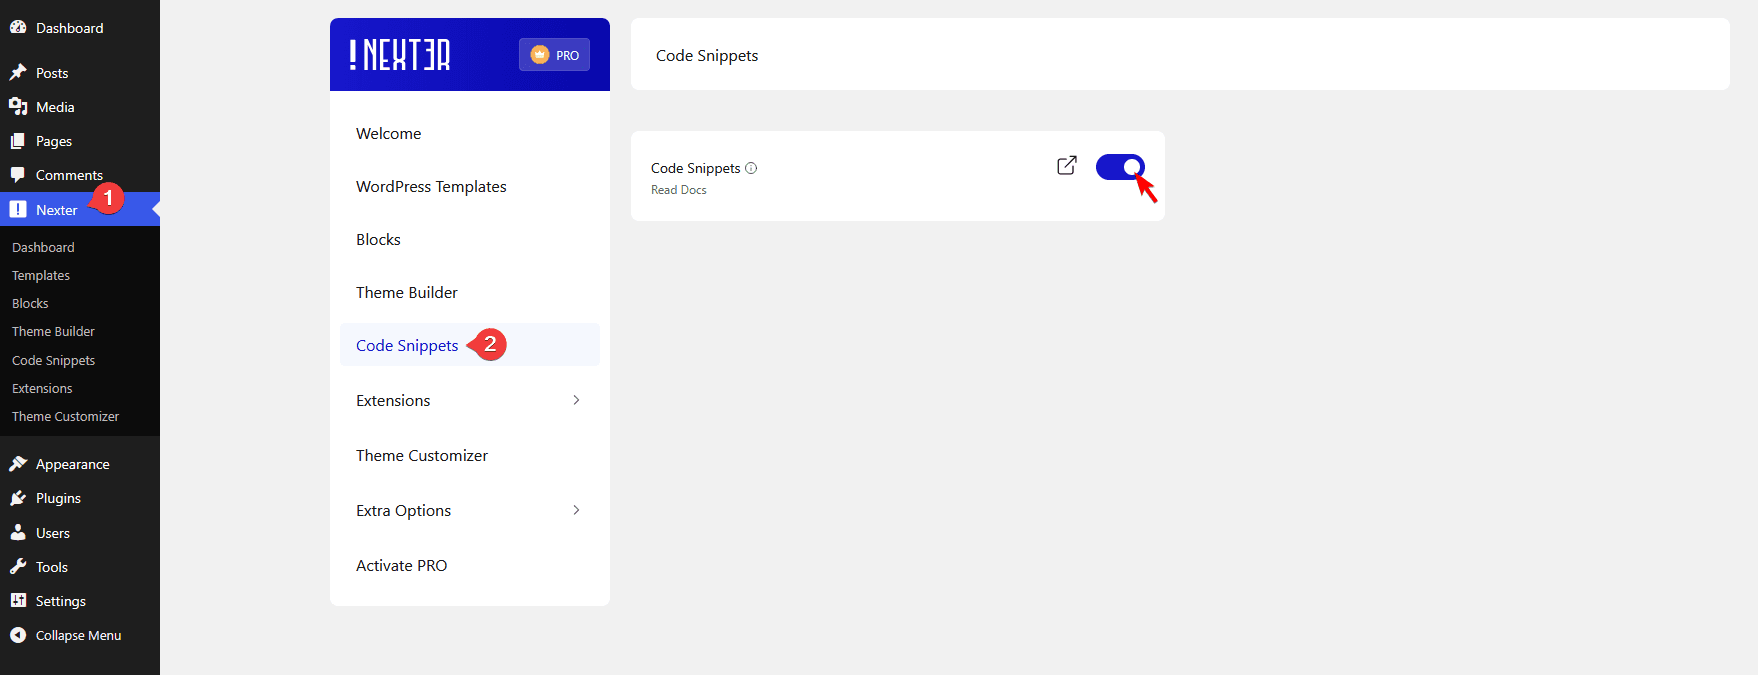
Note: It will be enabled by default.
Show/Hide Snippets List from Admin Bar
You can also show or hide the Snippets List from the admin menu toolbar in the front end.
When enabled, you can check which snippet is running on a specific page from the Snippets List.
To show or hide the Admin Bar Info, go to Nexter > Code Snippets.
Then click the Settings button, which will open a popup.
From here, you can show or hide the Snippets List from the admin menu toolbar in the front end by enabling or disabling the Admin Bar Info toggle.


