












The Data Table block in Nexter Blocks lets you add fully-featured tables to any WordPress page or post. Use it for product comparisons, pricing tables, spec sheets, or any content where structured rows and columns help visitors scan and compare information.
Unlike shortcode-based table plugins, the Data Table block from Nexter Blocks works inside the WordPress block editor. You can add images, icons, search, sorting, and entry filtering directly from the block settings.
Required Setup
- Make sure the default WordPress Block editor is active.
- You need to have the Nexter Blocks plugin installed and activated.
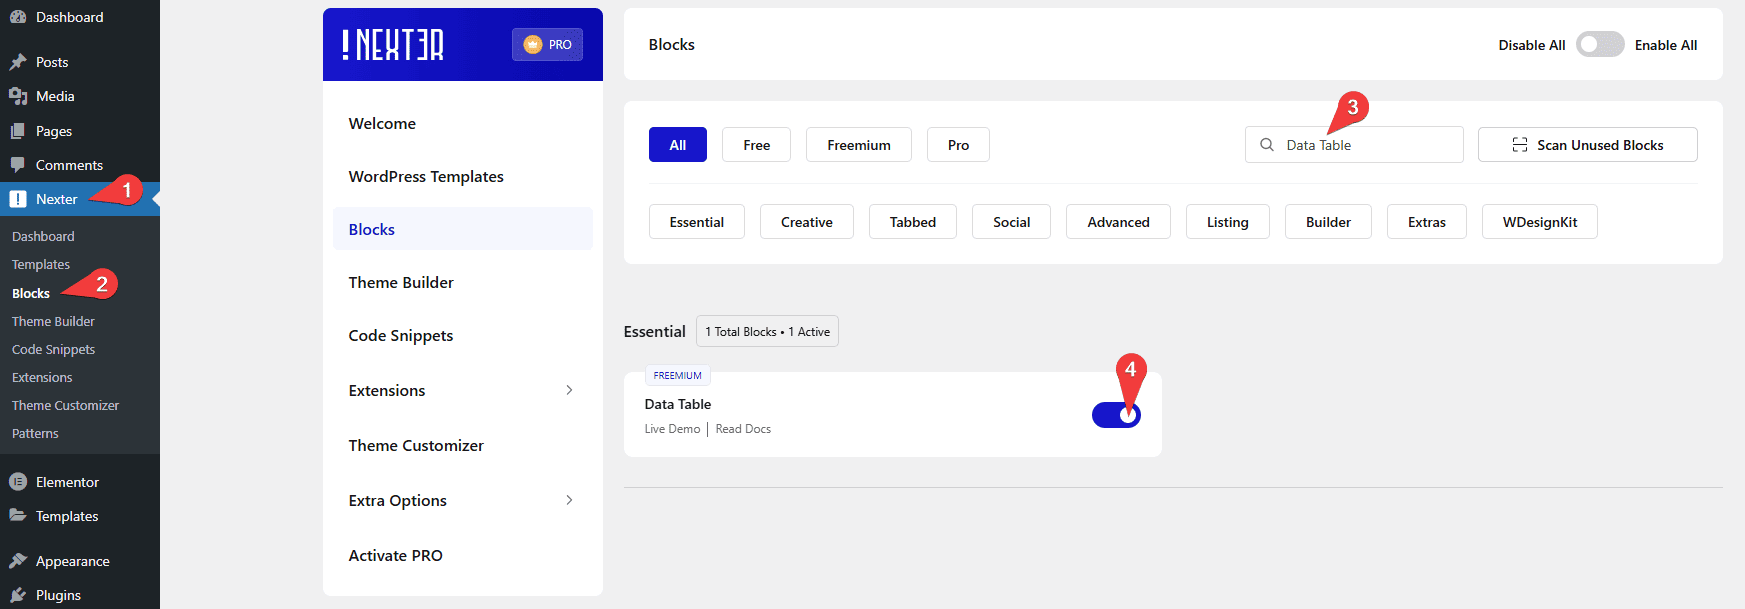
- Make sure the Data Table block is activated, to verify this visit Nexter → Blocks → and Search for Data Table and activate.
- This is a Freemium block to unlock the extra features, you need the PRO version of the Nexter Blocks.
Learn via Video Tutorial

How to activate the Data Table Block?
Go to
- Nexter → Blocks
- Search for the block name and turn on the toggle.
Key Features
- Multiple content sources – There are multiple ways to add content to the table, Standard (Free), CSV File (Pro) and Google Sheet (Pro).
- Image / Icon (Free) – You can add icons or images to the table content.
- Button (Free) – You can add buttons inside your table.
- Mobile Responsive (Free) – Make your table mobile responsive so it adapts to any screen size.
- Sorting (Free) – Sort table column data using the sortable feature.
- Search (Pro) – Add a search feature so visitors can search table content.
- Entry Filter (Pro) – You can limit the initial visible table rows with the entry filter.
How to Add Content in the Data Table Block?
Add the Data Table block to the page.
Then click on the Design from Scratch button to design the layout from scratch.

Note: By clicking on the Import Pre-Designed Template button, you can import a preset template and customize it as per your requirements.
A dummy table is created automatically. You can edit the existing data or delete it and start from scratch.
First, choose the table content source from the Type section under the Table tab. You will find three options:
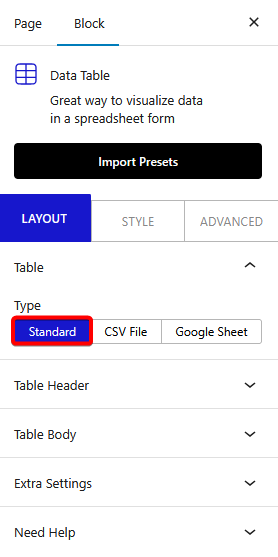
Standard (Free) – Add the table content manually. Use this for static tables where you control each cell directly in the block editor.
CSV File (Pro) – Import a CSV file into your table. Use this when you have existing spreadsheet data to display.
Google Sheet (Pro) – Import Google Sheets data into your table. Use this when you want the table to update automatically when the sheet changes.
The steps below use the Standard option.
From the Table Header tab, add the table header. Once you open the tab, the first item you will see is a Row. It is the row of the table header.
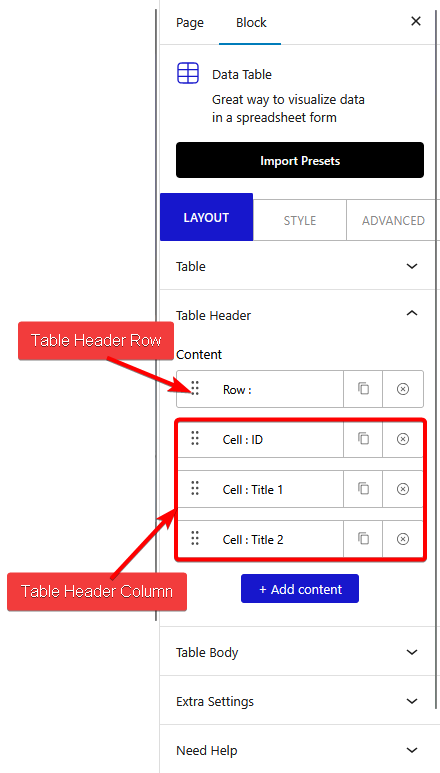
Note: To add a row in the table header or body, you have to initiate a row first.
Open the item. You will see an Action section with two options:
Start New Row – To initiate a new table row.
Cell Content – To add content in the table cell.
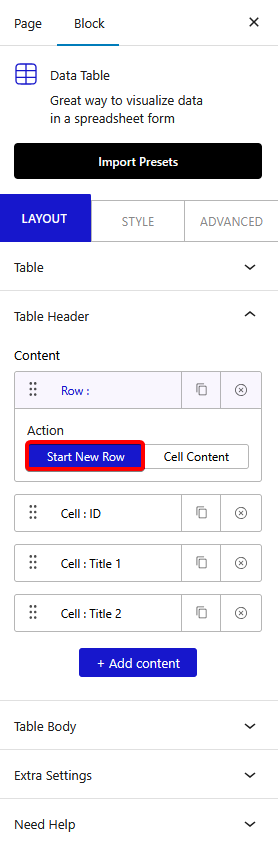
It must be set to Start New Row.
Open the first Cell: ID item to edit the header cell content. You will see the Action section is set to Cell Content because it is a content cell.
In the Content tab, add text in the Text field.
From the Icon tab, add an image or icon to the table content. See how to insert images in table content in WordPress.
From the Advanced tab, manage the Column Span (colspan), Row Span (rowspan), column width, and individual cell color and background color.
Note: The column width set here will apply to all the cells of that particular column.
Follow the same process to edit the other table header cells.
Click the + Add content button to add more cells to the table header.
Note: You can add a row as well but ideally, a table header should have only one row.
To add or edit the table body content, go to the Table Body tab. It works the same as the Table Header section.
The Table Body will have a row first. Make sure the Action section is set to Start New Row.
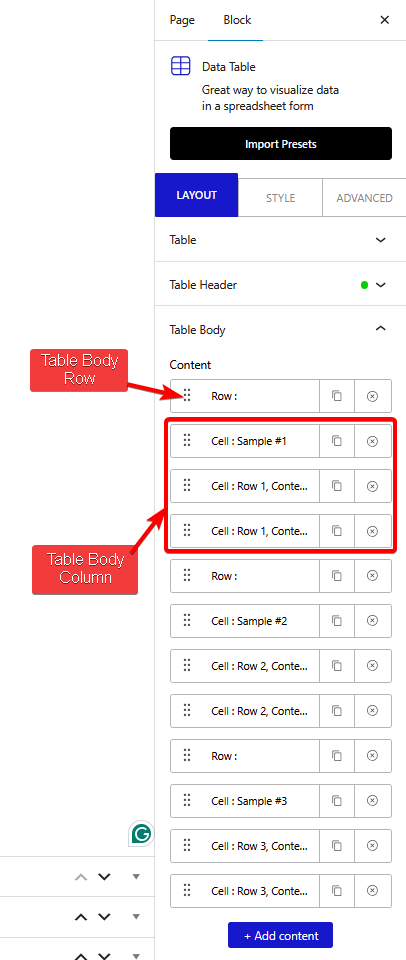
Open the item you want to edit and make sure the Action section is set to Cell Content.
From the Content tab, add the content for the cell in the Text field. You can also add a link to the cell from the URL field.
Turn on the Button toggle to add a button in the cell. See how to add a button in a WordPress table.
From the Icon tab, add an image or icon to the table content. See how to insert images in table content in WordPress.
From the Advanced tab, manage the content alignment, Column Span (colspan), Row Span (rowspan), and use the Mark this cell as a Table Heading? dropdown to convert the cell into a table heading.
Follow the same process to edit other table body cells.
Click the + Add content button to add more rows and cells in the table body.
Note: To add a row in the table header or body, you have to initiate a row first.
Note: Make sure the number of columns in the table header and body is the same.
Table Extra Settings
The Data Table block in Nexter Blocks has advanced features available under the Extra Settings tab. Each option has a dedicated doc.
- Search – Add a search feature to search the content of a table.
- Sorting – Sort table column data using the sortable feature.
- Entry Filter – Limit the initial visible table rows with the entry filter.
- Mobile Responsive – Make your table mobile responsive.
How to Style the Data Table Block?
All styling options for the Data Table block are available under the Style tab.
Note: Depending on the table content source styling options will vary.
Table Header – Controls content alignment, typography, color, row background color, padding, and border for the table header.
Note: The text color and row background color set from an individual cell will override the text color and background color set from the table header tab.
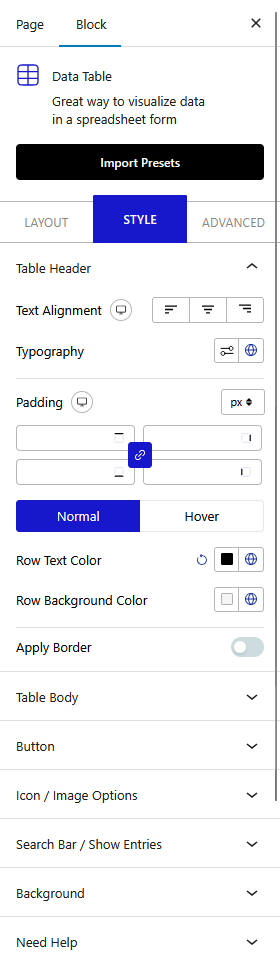
Table Body – Controls content alignment, vertical alignment, typography, color, row background color, padding, and border for the table body. Add a stripe effect (Pro) for alternating row colors.
Button – Controls padding, width, typography, color, background color, and border for buttons inside table cells.
Icon / Image Options – Controls the size, color, position, and spacing for icons and images used in the table.
Search Bar / Show Entries (Pro) – Controls the style of the search bar and entry filter. Settings include sorting icon color, label color, input text color, typography, background color, padding, and border. You can also set the width and bottom space for the search bar and show entry field separately.
Background – Controls the overall table margin, padding, background, and border.
Advanced tab options are common across all Nexter Blocks blocks. For the full settings reference, see Add advanced tab in WordPress.