Do you want to show content dynamically in WordPress? By incorporating dynamic content into your WordPress website, you can create a more engaging and tailored experience for your visitors.
With the Dynamic Content extension from the Nexter Blocks, you can easily show different dynamic content like user data, custom field data etc. to make dynamic WordPress websites.
Required Setup
- Make sure the default WordPress Block editor is active.
- You need to have the Nexter Blocks plugin installed and activated.
- This is a premium feature you need the PRO version of the Nexter Blocks.
Learn via Video Tutorial:
How to Activate the Dynamic Content?
There are no additional activation steps to enable the dynamic content. Whenever you use any block from the Nexter Blocks, you’ll get the Dynamic Content option in different parts of the block.
Key Features
- Post data – You can easily show different post related data, such as post title, slug etc.
- Archive data – You can easily show different archive data, such as archive title, URL etc on an archive template.
- Author data – You can easily show different author related data, such as author name, ID, posts etc.
- Comment data – You can easily show different comment related data, such as comment count and status.
- Site data – You can easily show different site related data, such as site title and tagline.
- WooCommerce data – You can easily show different WooCommerce related data, such as product title, price etc.
- Custom field data – You can easily show custom field data created with different plugins like ACF, Tooltips, MetaBox, JetEngine etc.
Adding Dynamic Content in WordPress Gutenberg? (ACF, Tooltips, MetaBox, JetEngine, Pods)
To add dynamic content, add any regular block from the Nexter Blocks to the page.
Add Dynamic Content
For instance, let’s add the Heading block from the Nexter Blocks.
Click on the cylindrical icon at the end of the Title field.
Note: You’ll find this option at different places for different blocks, but wherever you see the cylindrical icon you can add dynamic content.
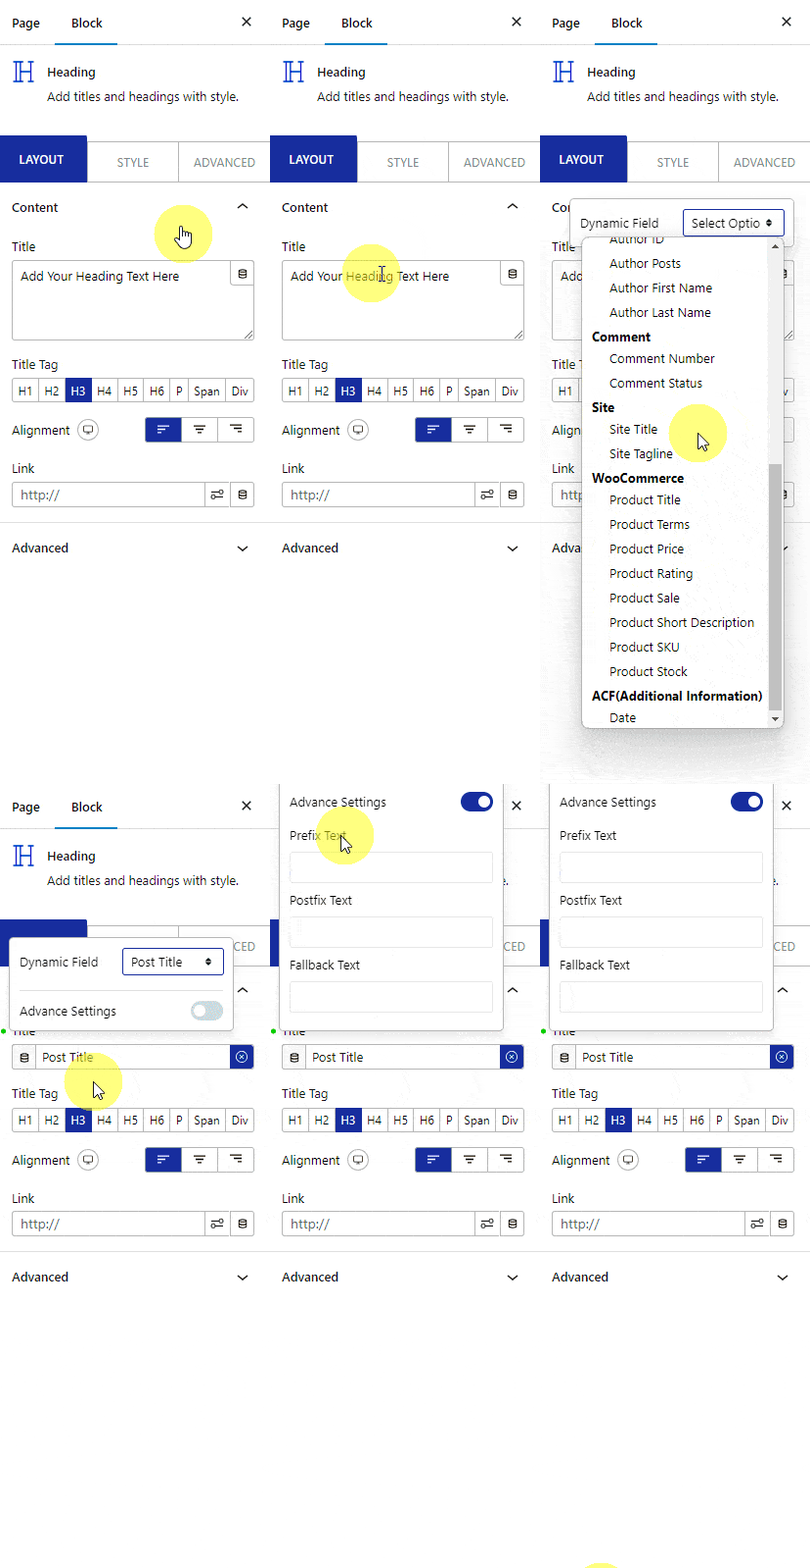
Then, from the Dynamic Field dropdown, you have to choose the data you want to add. Here you’ll find different options.
Note: The options will vary based on field type (content, image, URL etc.) and plugins installed (WooCommerce, custom field plugins etc.)
Post: To show different post related data.
- Post Title – To show post title.
- Post Slug – To show post slug.
- Post Excerpt – To show the post excerpt.
- Post Date – To show the post publish date based on the timezone set in WordPress.
- Post Date GMT – To show the post publish date based on GMT(Greenwich Mean Time).
- Post Modified – To show the post modified date based on the timezone set in WordPress.
- Post Modified GMT – To show the post modified date based on GMT(Greenwich Mean Time).
- Post Type – To show the post type.
- Post Status – To show the post publish status.
Archive: To show archive related data on an archive template.
- Archive Title – To show the archive title on an archive template.
- Archive Description – To show the archive description on an archive template.
- Archive Url – To show the archive URL on an archive template.
Author: To show author related data.
- Author Name – To show the author name.
- Author ID – To show the author ID.
- Author Posts – To show the number of posts by the author.
- Author First Name – To show the author’s first name.
- Author Last Name – To show the author’s last name.
Comment: To show comment related data.
- Comment Number – To show the number of comments on a single post template.
- Comment Status – To show the comment status on a single post template.
Site: To show site related data.
- Site Title – To show the site title.
- Site Tagline – To show the site tagline.
If you are using the WooCommerce plugin you’ll see different WooCommerce related options.
WooCommerce: To show different WooCommerce related data on a single product template.
- Product Title – To show the product title.
- Product Terms – To show the product category or tag.
- Product Price – To show the product price.
- Product Rating – To show the product rating.
- Product Sale – To show the sale tag on a discounted product.
- Product Short Description – To show the product short description.
- Product SKU – To show the product SKU.
- Product Stock – To show the product stock status.
If you are using custom field plugins like ACF,Tooltips, MetaBox, Pods, JetEngine. you’ll see relevant options.
Custom field – To show custom field data created with different custom field plugins like ACF, Tooltips, MetaBox, Pods & JetEngine. The section name will vary based on the installed plugin and the custom field group name. The option names will vary based on the custom field names.
Select the option as per your requirements.
Then by enabling the Advance Settings toggle you can add a prefix, postfix and fallback text to the data.
Note: For some options, you’ll find some additional settings.
Add Dynamic URL
Similarly in the Link field, you can add dynamic links by clicking the cylindrical icon.
Here, you’ll find different link related options –
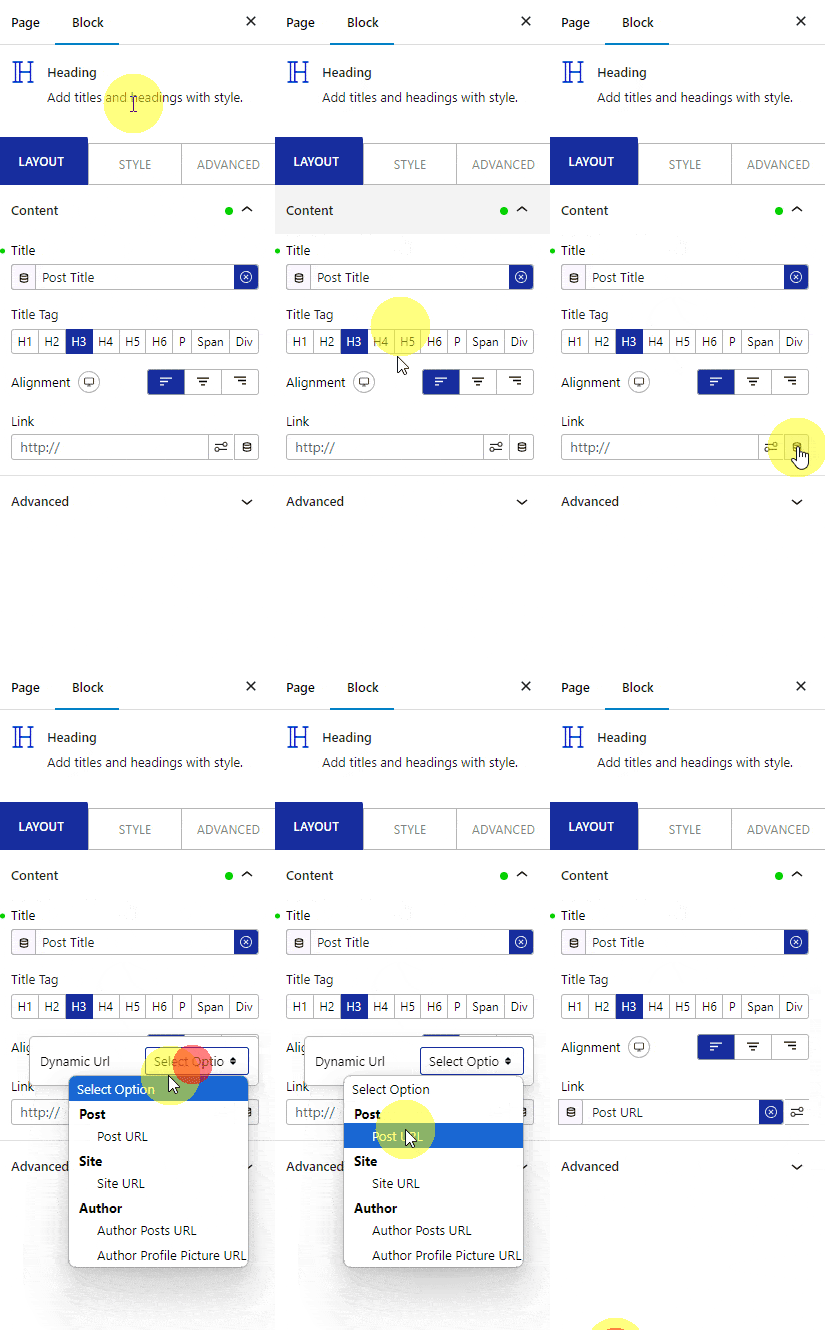
Post: To add post related URL.
- Post Url – To add post URL.
Site: To add site related URL.
- Site Url – To add site URL.
Author: To add author related different URL
- Author Posts Url – To add the author’s post page URL.
- Author Profile Picture Url – To add the author’s profile picture URL.
By enabling the Advance Settings toggle, you can add a fallback URL as well.
Add Dynamic Image
You can also add a dynamic image to an image field of a block.
For instance, let’s add the Image block from Nexter Blocks.
Click on the cylindrical icon at the end of the Image field.
Here, you’ll find different image related options –
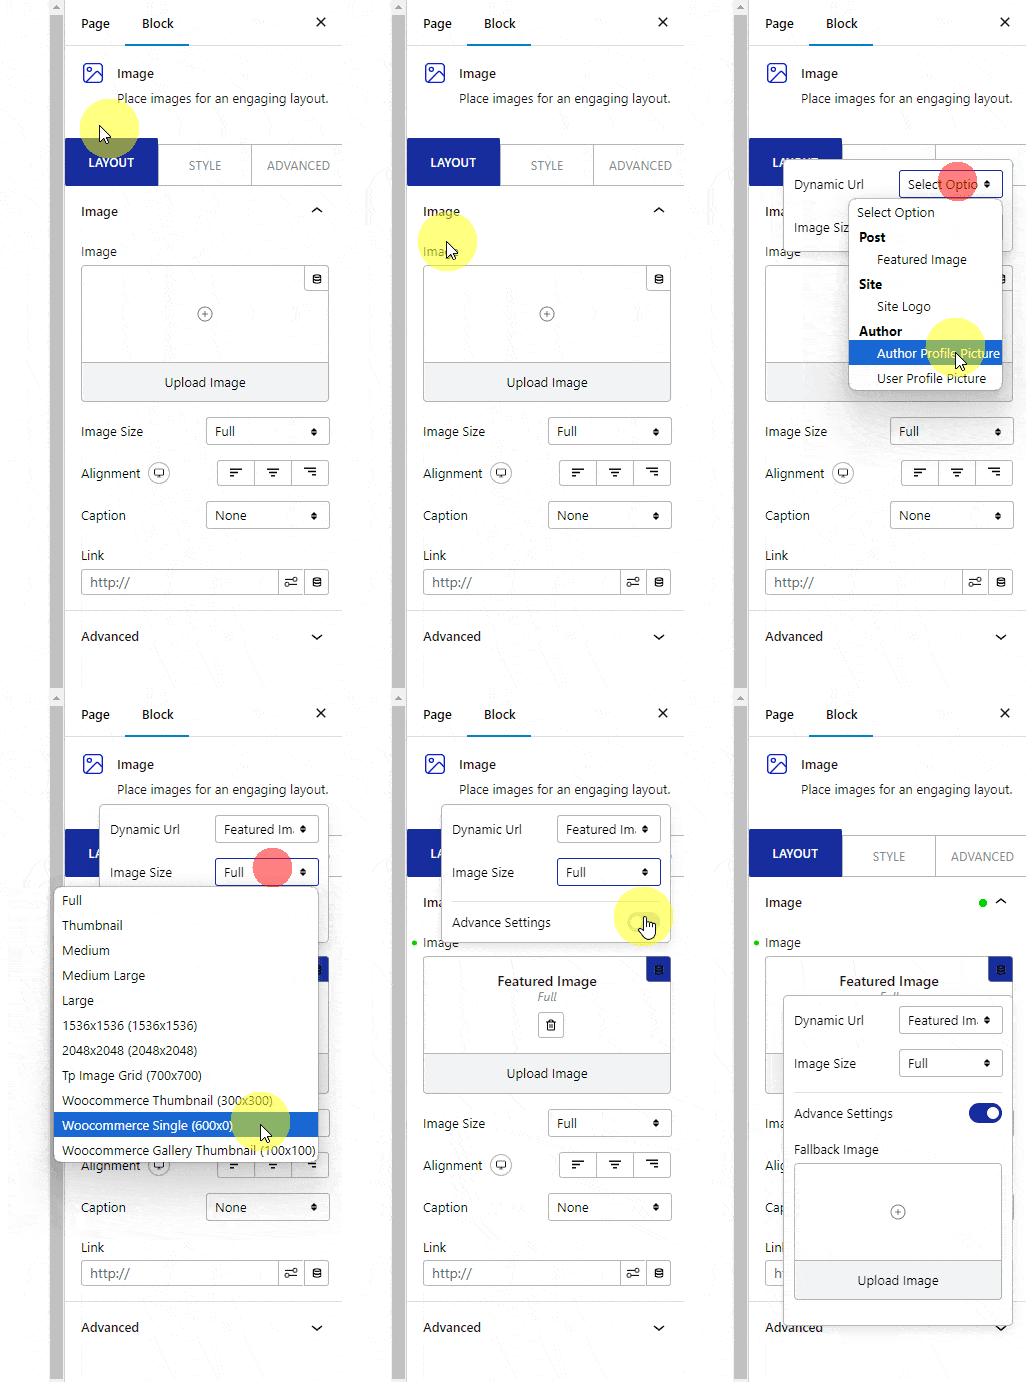
Post: To add post related image.
- Featured Image – To add the featured image of the post.
Site: To add site related image.
- Site Logo – To add site logo.
Author: To add author related image
- Author Profile Picture – To add the post author’s profile image on a single post template.
- User Profile Picture – To add the logged in user’s profile image.
From the Image Size dropdown, you can set the image size.
Then by enabling the Advance Settings toggle, you can add a fallback image as well.
This is how easily you can add different types of dynamic content in WordPress.


