Are you looking to add a search feature to your WordPress website? Adding a search feature to your WordPress website can greatly enhance user experience, making it easier for visitors to find the information they are looking for.
With the Search Bar block from the Nexter Blocks, you can easily allow users to search from posts, pages, products, or custom post types in WordPress.
Required Setup
- Make sure the default WordPress Block editor is active.
- You need to have the Nexter Blocks plugin installed and activated.
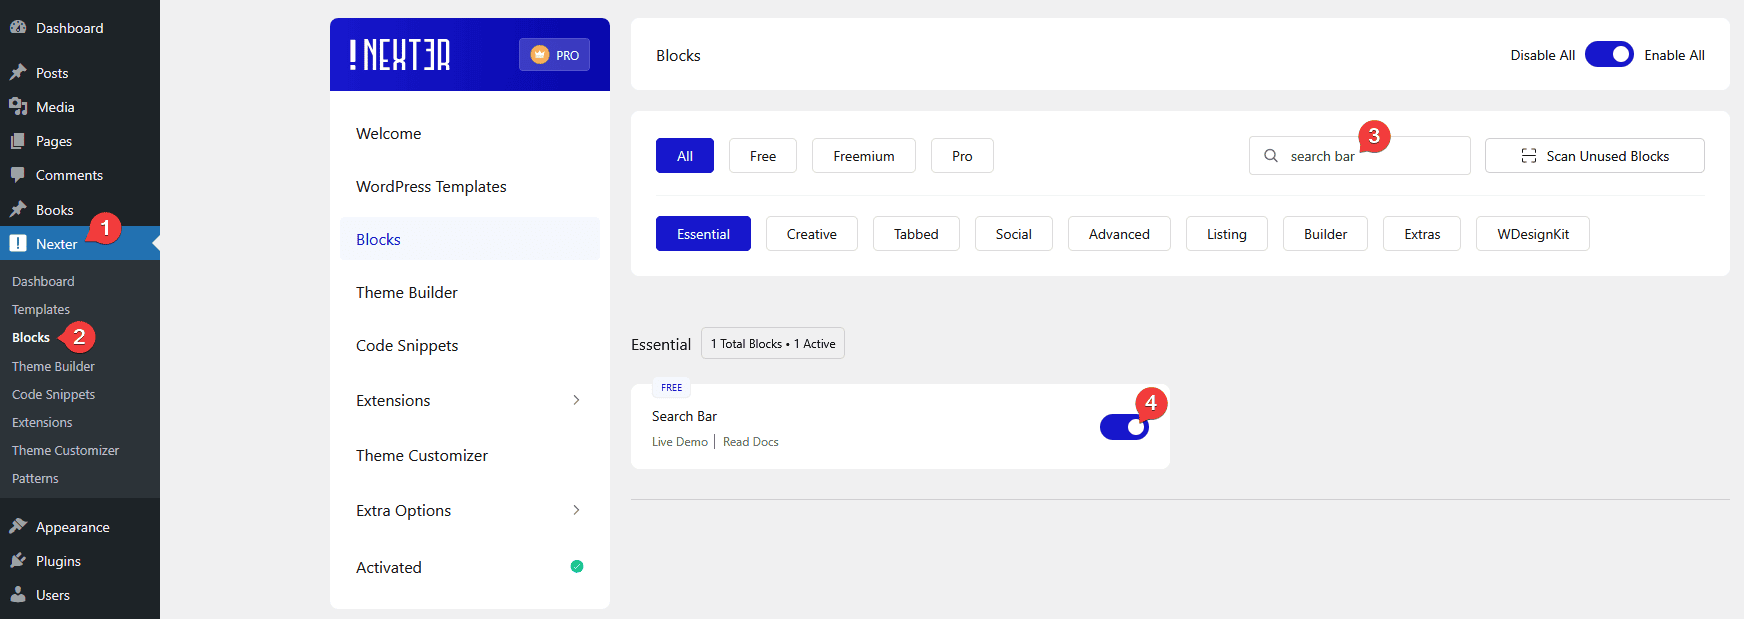
- Make sure the Search Bar block is activated, to verify this visit Nexter → Blocks → and Search for Search Bar and activate.
Learn via Video Tutorial
How to activate the Search Bar Block?
Go to
- Nexter → Blocks
- Search the block nameandturn on the toggle.

Key Features
- Ajax Search – You can easily add an Ajax search feature.
- Multiple Post Types – You can search from different post types such as post, page, products, and custom post types.
- Search Specific Post Type – You can also search from a specific post type.
- Search by Taxonomy – You can search from different taxonomies such as post category, post tag, product category, product tag, and custom taxonomy.
- Limit Search by Taxonomy Term – You can limit search by a taxonomy term.
- Search Based on Custom Fields – You can easily search posts based on custom fields.
- Keyword Suggestion – You can add custom keyword suggestions to your search bar.
How to Use the Search Bar Block?
To use the Search Bar block, add the block on the page or template.
Search Bar Fields
Open the item under the Search Bar.
From the Source section, you have to select the source where the search will function. Here, you’ll find two options –

Post – For searching different post types such as post, page, product, and custom post type.
Taxonomy – For searching different taxonomies such as post category, post tag, product category, product tag, and custom taxonomy.
Post
When you select Post, from the Select Post dropdown, you have to select from different post types. Here you’ll find a few options –
Posts – With this, you can search for normal blog posts.
Pages – With this, you can search pages.
Custom Post Type – With this, you can search for custom post types.
Note: The option name will depend on the custom post type name and the number of items will depend on the number of custom post types you have.
Products – With this, you can search for products.
Note: You must have WooCommerce installed for the product options.
You can select multiple post types together as well.
Taxonomy
When you select Taxonomy, from the Select Taxonomy dropdown, you have to select from different taxonomies. Here, you’ll find a few options –
Categories – With this, you can search by different post categories.
Tags – With this, you can search by different post tags.
Custom Taxonomy – With this, you can search by different custom taxonomies.
Note: The option name will depend on the custom taxonomy name and the number of items will depend on the number of custom taxonomies you have.
Product categories – With this, you can search by different product categories.
Product tags – With this, you can search by different product tags.
Note: You must have WooCommerce installed for the product options.
In the Label field, you can add a label name for the select dropdown.
In the Placeholder field, you can add a placeholder text for the select dropdown.
For the Taxonomy option, you can show all the search results on load by enabling the All Result toggle.
From the Show Count toggle, you can show the number of posts an item has in numbers for both Post and Taxonomy options.
You can click on the +Add Item button to add multiple sources.
Search Input
From the Search Input tab, you can enable or disable the search input from the Disable Input toggle.
From here, you can also manage the label text, placeholder text, icon type, and alignment of the search input field.

Result Area
From there, you can manage the Ajax search results. Here, you’ll find a few options –

Note: This option is only available when you have turned on AJAX Search from the Extra Option tab.
Result Style – From here, you can make the search result style horizontal or vertical or you can create a custom layout using a reusable block/pattern to show the results.
Note: Make sure to use post related blocks in the reusable block/pattern to show the search results properly.
Posts Per Page – From here, you can set the number of items per page that will show in the search result.
Columns – While selecting style 2 from the Result Style, you can set the number of columns for posts that will show in the search result.
Result Visibility Settings – From here, you can manage which elements of the post will be visible in the search result.
- Enable Title – To show or hide post title.
- Enable Content – To show or hide post content.
- Enable Thumb – To show or hide post featured image.
- Enable Price (Woo) – To show or hide WooCommerce product price.
- Enable Short Description – To show or hide post short description.
- Enable Total Count – To show or hide the result count.
- Total Result Text – From here, you can customize the result text.
Text Limit – From here, you can limit title and content by word or character separately.
- Title Limit – By enabling this option, you can see title limit adjust options.
- Limit On – From dropdown, you can limit title and content by word or character separately.
- Display Dots – From here, you can set the number of dots that will show in the search result.
- Content Limit – By enabling this option, you can see content limit adjust options as well title limit options.
Result area link – From here, you can enable or disable the result items links.
- Result Link Enable – By enabling this option, you can see title result link adjust options.
- Result Link Target – From dropdown, you can set open link target.
ScrollBar – By enabling, you can add a scroll bar to the Ajax search result area by setting a height.
Standard Search

Search Type – From here, you can choose the search type. Here, you’ll find two options –
- Default – This will keep the search in the default mode.
- Full Match – With this option, results will only show on the exact match.
Generic Filters – From here, you can set on which part the search will be performed. Here, you’ll find few options –
- Search in Title – This will search the item title.
- Search in Excerpt – This will search the item excerpt content.
- Search in Content – This will search the item content.
- Search in Permalink – This will search the item slug or permalink
- Search in Category – This will search the item category.
- Search in Tags – This will search the item tag.
ACF Filters – From here, you can search items based on custom field data.
- ACF Key – you can set the ACF key for item which is based on custom field data.
Load More/Lazy Load
Note: This option is only available when you have turned on AJAX Search from the Extra Option tab.
Loading Options – From here, you can add options to load more items on the Ajax search result area. Here, you’ll find three options –
- Pagination – With this, you can add an Ajax pagination to the search result.
- Load more – With this, you can add an Ajax load more button to the search result.
- Lazy Load – With this option, you can add an Ajax lazy load to the search result.
Query
From the Taxonomies dropdown, you can limit the search by a taxonomy by selecting a taxonomy.
Here, you’ll find a few options –
Categories – With this, you can search by different post categories.
Tags – With this, you can search by different post tags.

From the Include Terms dropdown, you can limit the search to specific terms only.
You can also exclude terms from the search from the Exclude Terms dropdown.
Extra Option
In the Extra Option tab, you’ll find some powerful options.

AJAX Search – From here, you can turn your search into an Ajax search. Learn more.
Prefilled Suggestions – From here, you can add custom keyword suggestions to your search.
Only for specific CPT – From here, you can limit the search to a specific post type such as post, page, product, or custom post type.
Search Button – From here, you can enable or disable the search button from the Search Button section. You can also manage the search button text and icon.
Back End Visibility – From here, you can preview the search result in the backend, you can use that for styling purposes.
How to Style the Search Bar Block?
To style the Search Bar block, you’ll find all the styling options under the Style tab.

Label – From here, you can manage the style of the field label.
Search Box – From here, you can manage the style of the search field.
Select Dropdown – From here, you can manage the style of the dropdown.
Button – From here, you can manage the style of the search button.
Result Box – From here, you can manage the style of the search result area.
Results Heading – From here, you can manage the style of the search result heading.
Results Content – From here, you can manage the style of the search result items.
Overlay Option – From here, you can manage the style of the search overlay background.
Background Option – From here, you can manage the style of the search area background.
Scroll Bar – By enabling Scroll Bar toggle, from the Result Area under the Layout tab, you can manage the style of the scroll bar.
Error Option – From here, you can manage the style of the result not found text and background.
Advanced options remain common for all our blocks, you can explore all it options from here.


