Knowing How to Change Menu in WordPress is essential for keeping your website’s navigation smooth and user-friendly.
When you’re redesigning your menu or the entire website for a fresh look, a well-structured navigation menu will guide visitors to the right pages and help them explore your site with ease.
But where do you start? If you’re wondering how to update the menu in WordPress, the platform offers multiple ways to edit, customize, and style your menu, even if you have zero coding experience.
In this guide, we’ll cover step-by-step methods to modify, design, and enhance your WordPress menu effortlessly.
Let’s get started.
What is a WordPress Menu?
A WordPress menu is a collection of links that helps visitors navigate your website. It usually appears in the header, footer, or sidebar and can include pages, posts, categories, and custom links.
Menus play a key role in user experience and SEO. A well-structured menu ensures that visitors find what they need quickly, reducing bounce rates and improving engagement.
While the default WordPress menu works well enough for most websites, there might be a time when you want to make the menu more unique.
Perhaps you want to change the color and font to go with your overall branding, include visual elements to make it more appealing, or arrange your content into a dropdown or mega menu.
Whatever your goal is, WordPress offers simple ways to customize the website menu for an enhanced look.
How to Change the Menu in WordPress
Changing the menu in WordPress is a simple process, but the steps can vary depending on whether you’re using the classic menu editor or a block theme. Here’s how you can do it using the classic block editor and WordPress menu settings-
1. On your WordPress dashboard, go to Appearance > Menus.
2. You will see a list of existing menus at the top under “Select a menu to edit.“
3. Click on it and choose the menu you want to edit.
4. On the left menu, you can choose between Pages, Posts, Custom Links, or Categories to add menu links.
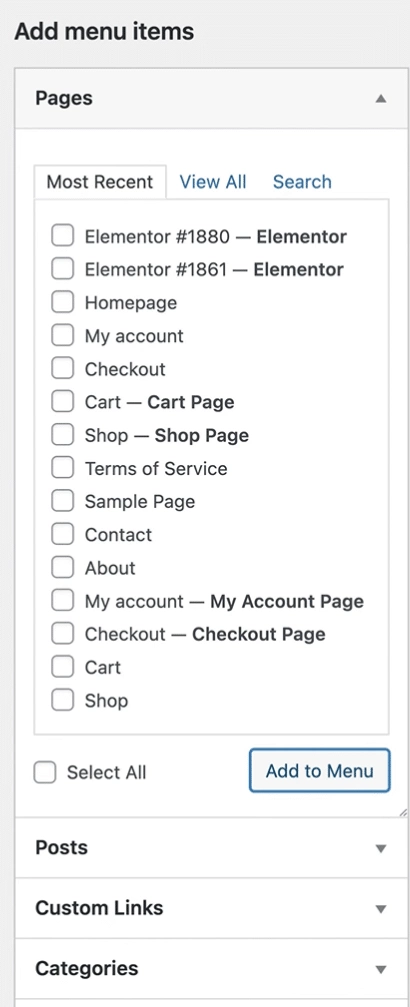
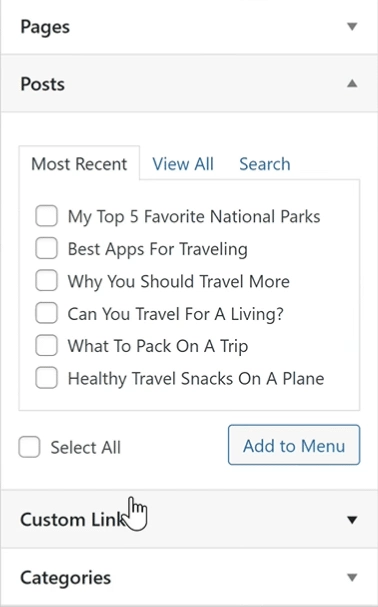
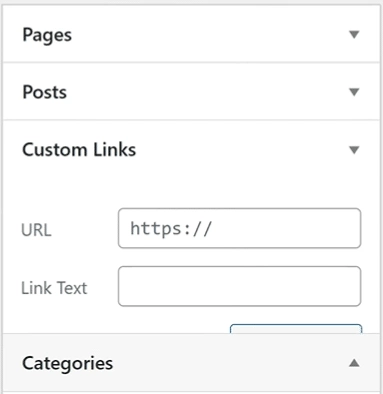
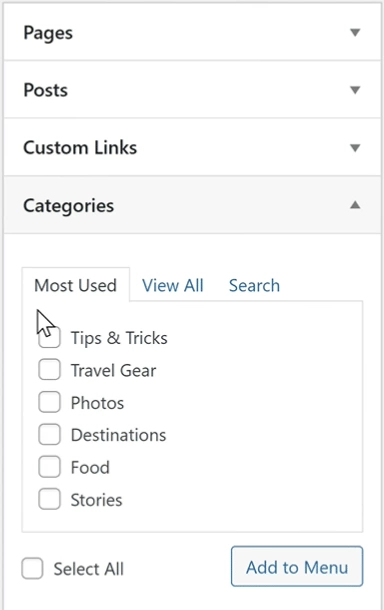
5. Choose Pages, and you can see a list of menu items that you can add to your website pages. Simply select the checkbox and click on the Add to Menu button.
6. Now, rearrange the items by dragging them to the desired position on the page.
7. Click on the Save Menu button.
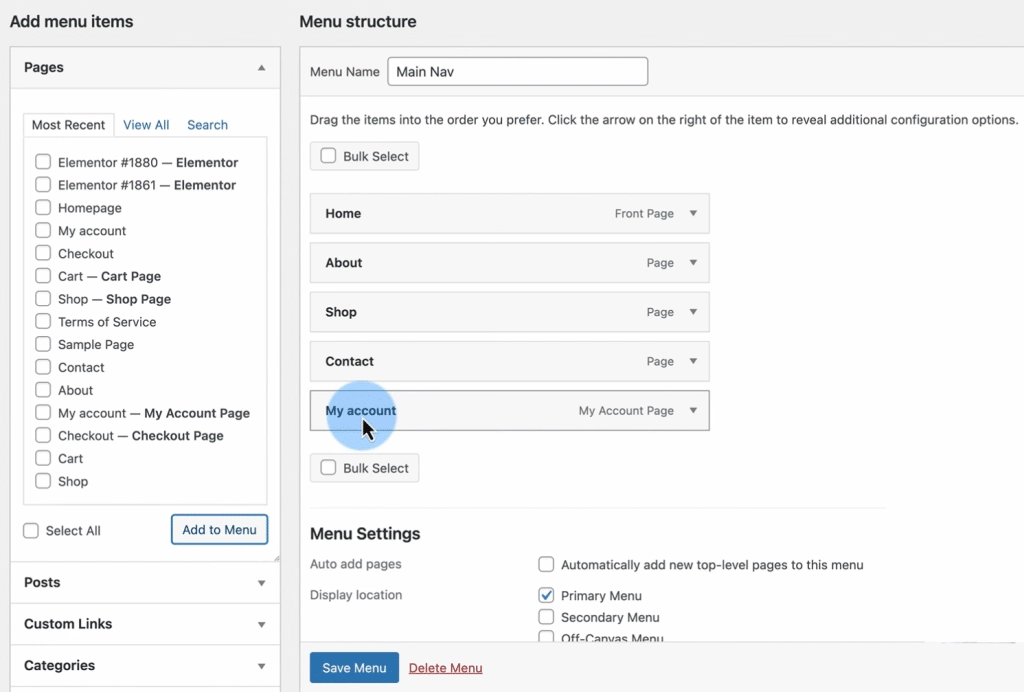
And that’s it. You can easily edit the WordPress header menu based on your requirements.
Customizing Menu Design and Styling
Now that you’ve edited the menu items for your website, what about its styling? Fortunately, WordPress offers a built-in Theme Customizer tool for classic WordPress theme users.
The Theme Customizer offers you complete control over the design and customization of your menu, from background colors to text and styling. Here are the step-by-step instructions for customizing your menu design in WordPress-
Step 1: Open the Theme Customizer
To open the Theme Customizer, go to your WordPress dashboard and navigate to Appearance > Editor.
Step 2: Customize the Menu
Within the editor, you’ll see the options to customize different aspects of your theme, which can vary depending on the theme you’re using.
For most WordPress themes, you will find a separate Menu section to customize the menu items and a Style section to modify the design. But it can be different for different websites.
Based on your theme settings, you can click on Styles or Styling Colors to customize the overall theme, color palette, and typography of the website menu.
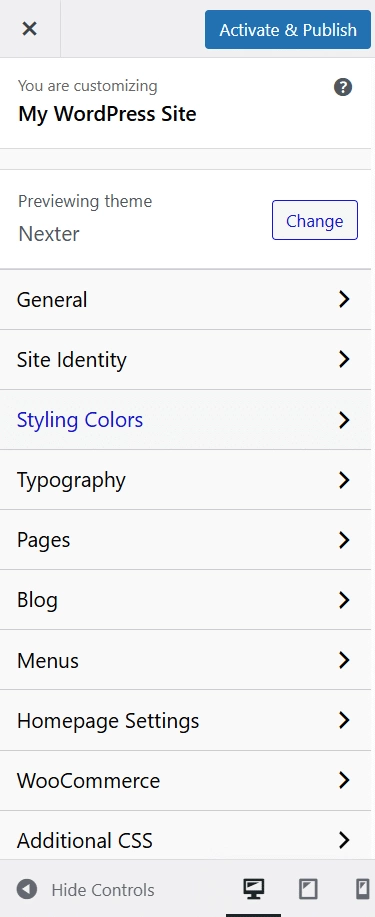
At the same time, if your theme doesn’t offer these customizations or you want to level up, you can easily customize the menu design using CSS.
Not sure which WordPress theme is perfect for your website content and style? Understand How to Choose a WordPress Theme based on 10 Key Factors.
Creating a Dropdown or Mega Menu in WordPress
If your website has multiple pages, a dropdown or mega menu functionality helps organize content neatly under parent categories. This improves navigation and gives your menu a clean, clutter-free look.
For larger sites, a mega menu is a good way to display multiple columns of links, making everything accessible at a glance.
The result is enhanced user experience, seamless navigation, and improved SEO. So, if you’re looking to edit the navigation menu in WordPress, adding a dropdown or mega menu is an excellent option.
Here’s how you can add a dropdown or mega menu to your website-
Step 1: Open the menu editor
Go to your WordPress Dashboard and navigate to Appearance > Menus.
Here, select the existing menu you want to edit.
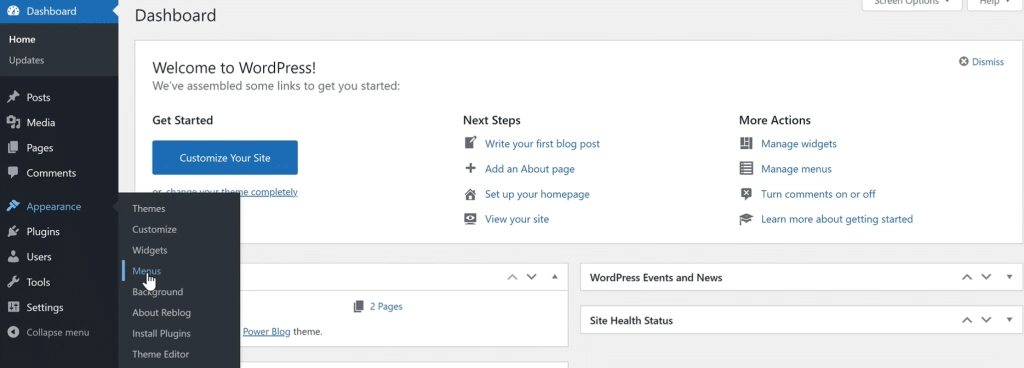
Step 2: Arrange the dropdown menu items
Now, go to the Menu Structure, where your menu items are listed. This is a drag-and-drop interface that you can use to rearrange the menu items or even turn them into mega menus with dropdowns.
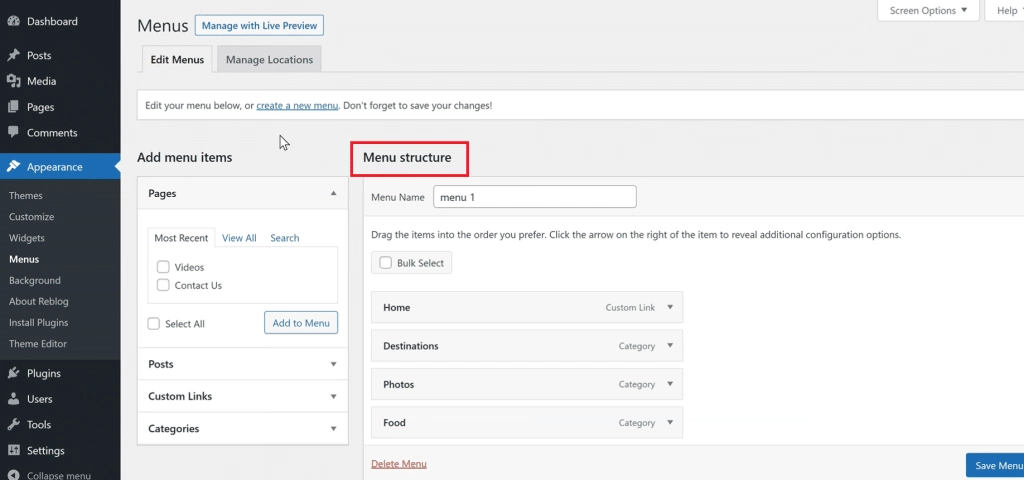
Simply click and hold on the menu item that you want to display as a sub-item. Drag your mouse to the parent item and release the item by placing it slightly to the right of the parent category.
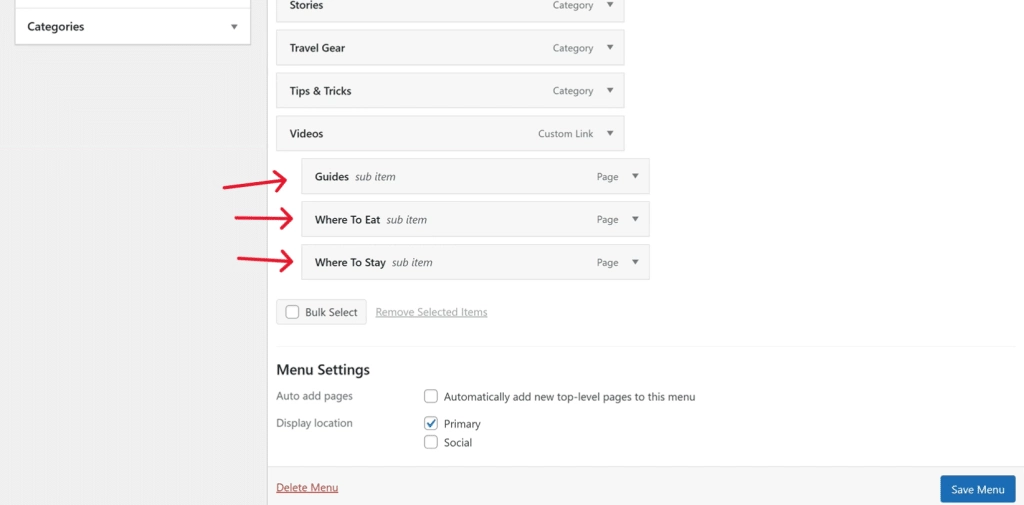
For instance, if you wish to display a curated Resources section on your website as opposed to only the Blog section, you can simply drag and drop the Blog menu item and change it to a sub-item under the Resources section on your mega menu.
You can also create different levels (sub-sub-sections) by nesting items one under the other. For example, a Case Studies section under your Blog, which is already a sub-item of the Resource section.
Finally, you also have the option to rearrange the order of different menu sub-items under the mega menu.
Step 3: Save the menu
Once you’re happy with the changes, click on Save Menu to see the changes live.
Creating a mega menu in WordPress is easy with its built-in settings. But what if you want more flexibility and control over the menu items, placement, or design, such as adding a custom sidebar menu?
Nexter Blocks is an excellent plugin to create custom mega menus for your website. With the plugin, you can-
· Create multi-level menus with images and icons
· Choose from horizontal, vertical, or circular menu layouts
· Add animations and hover effects without coding
· Use sticky headers to keep the menu visible while scrolling
· Customize the menu fully to align it with your branding
With Nexter Blocks, you can design fully responsive mega menus with just a few clicks, ensuring a smooth browsing experience for your visitors.
How to Change WordPress Menu with Plugins
While the default WordPress menu customization options are useful, plugins unlock advanced styling options to create a website menu that stands out.
Using a plugin for menu customization gives you far more flexibility than WordPress’s built-in options. They provide greater flexibility, an intuitive interface, and pre-built options, making menu customization faster and more accessible, especially for non-technical users.
With a WordPress menu plugin, you can-
· Create highly interactive menus and add animations, hover effects, and dropdown transitions.
· Build mega menus with multi-column layouts, images, icons, and widgets.
· Design mobile-friendly menus with slide-in or off-canvas styles.
· Enjoy full control over the customization of individual menu items
Suppose you’re looking for a reliable plugin in WordPress to change the navigation bar and menu.
In that case, Nexter Blocks stands out for its extensive customization options and flexibility in modifying the WordPress menu’s design and functionality, all within the Gutenberg editor.
The dynamic plugin offers access to a wide range of features, from sticky menus, mega menus, and animations to custom layouts and responsive styling options so that you can create functional menus easily.
Let’s see the step-by-step process to edit the WordPress header menu using the Nexter Blocks-
Step 1: Install and activate the Nexter Blocks
To get started, go to your WordPress dashboard and navigate to Plugins > Add New.
In the search bar, look for Nexter Blocks. Install and activate the plugin.
Once the plugin is activated, go to Nexter Blocks > Nexter on your WordPress dashboard. Search for the Navigation Menu and click on the toggle to enable it.
Click on Save Settings.
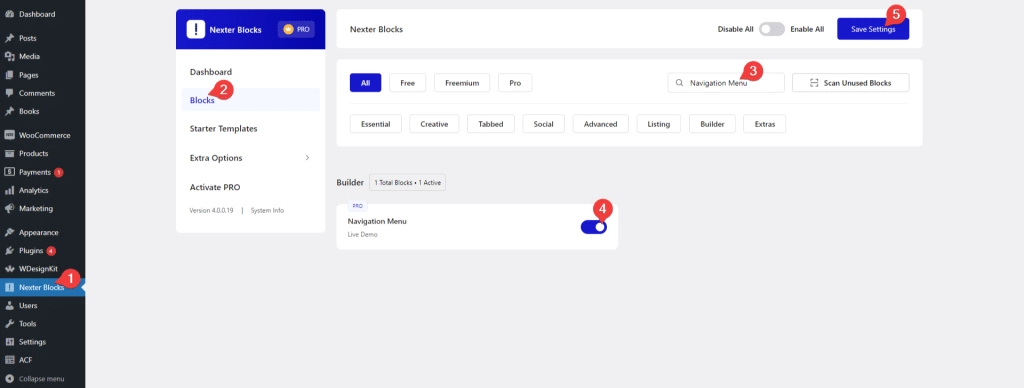
Step 2: Add the Navigation Menu
Now, back on your WordPress dashboard, open the page with the website menu that you want to edit. Click on ‘+’ icon and in the search tab and look for the Navigation Menu block to add it to your existing header template.
With the block active on the editor, you can see the settings on the right.
Here, you can edit the following elements-
- Navigation Content: Under the Layout tab in the Navigation Content section, you can select between a WordPress Menu (create a menu using the default WP editor) or a Manual Menu (create a custom menu)
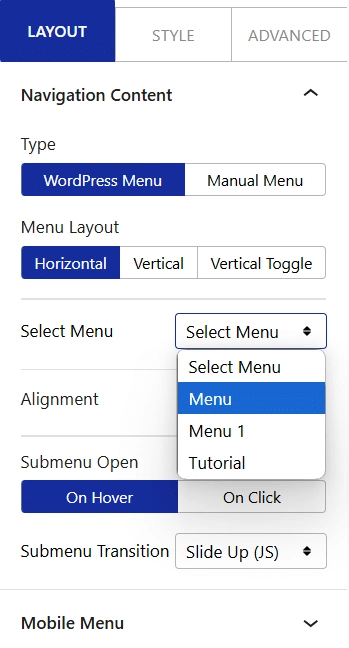
- Menu Layout: Once you choose the layout, say, WordPress Menu, you can choose the menu layout- Horizontal, Vertical, or Vertical Toggle and select the menu type from the Select Menu option.
- Dropdown Menu: The plugin also lets you change your WordPress menu into a dropdown list that opens on Hover or Click.

- Mobile Menu: You also have options to change how your website menu will appear for a visitor on their mobile device. Click on the Responsive Menu toggle to change the menu layout and mobile settings.

Step 3: Change the Style for Navigation Menu
Once you’re satisfied with the structure and content of your website menu, you can go to the Style tab to customize the design of the menu.
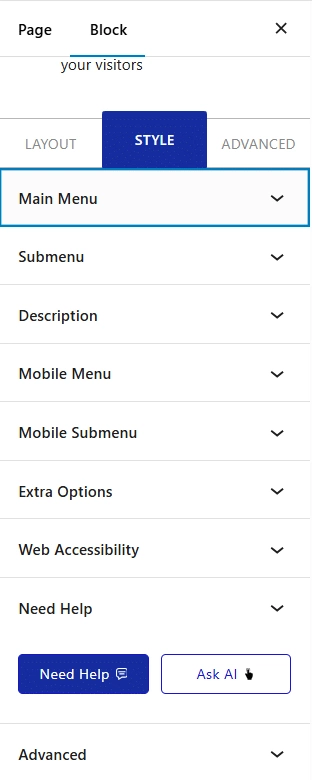
Here, you can modify background colors, typography, alignment, and more for the main menu, submenu, mobile menu, and descriptions.
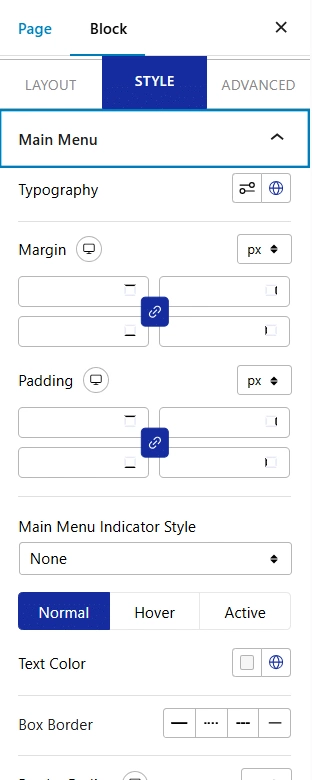
Plus, you can also add animation effects or change the menu for web accessibility.
Best Practices for Optimizing WordPress Menus
A well-structured WordPress menu does more than help visitors navigate. It also plays a key role in user experience, engagement, and even SEO. A confusing or cluttered menu can drive users away, while a clean, intuitive one encourages them to explore your site.
Here’s how to optimize your WordPress menu for the best user experience-
- Clean structure: Your menu should guide visitors effortlessly to the most important parts of your website. Instead of adding every possible link, focus on essential pages like Home, Services, About, Resources, and Contact. If you have a large site with multiple sections, use dropdowns or mega menus to keep things organized.
- Keep it simple: A menu with too many links can feel overwhelming and make it harder for users to find what they need. Stick to 5-7 items on the main menu and categorize additional links into drop-down menus. If you have a content-heavy site, you can also use a secondary menu or a well-structured footer to display links logically.
- Mobile responsiveness: With most users browsing on mobile devices, your menu must be fully responsive. A good starting place would be to use a hamburger menu to keep navigation compact. Also, make sure to test your menu on different screen sizes to ensure smooth functionality.
- Use custom links: Optimizing your menu for SEO can enhance your site’s visibility and help users find relevant content more easily. You can add descriptive keywords in the menu to achieve that.
Additionally, consider adding internal links to important blog posts or landing pages to guide visitors deeper into your site. Custom menu links also help with categorization, making navigation more intuitive.
Looking to create a well-structured mega menu for your WordPress website? Check out 5 Best WordPress Mega Menu Plugins.
Stay updated with Helpful WordPress Tips, Insider Insights, and Exclusive Updates – Subscribe now to keep up with Everything Happening on WordPress!
Wrapping Up
Customizing your WordPress menu doesn’t have to be a complicated process. If you want to make small design or structural adjustments or build a mega menu, WordPress provides flexible options for easily changing the menu.
For advanced customization, plugins like Nexter Blocks offer a powerful solution. With 90+ Gutenberg blocks, including dynamic navigation menus, you can create highly interactive menus that elevate your site’s user experience without writing a single line of code.
Ready to take your WordPress menu to the next level? Try Nexter Blocks today and unlock unlimited design possibilities!
FAQs on Changing a WordPress Menu
How do I remove an item from the WordPress menu?
To remove an item from your WordPress menu, go to Appearance > Menus, select the menu you want to edit, and find the item you want to remove. Check the box for items you want to remove and select Remove Selected Items. Save menu to update the changes your site.
Can I add a menu to the footer in WordPress?
Yes, WordPress allows you to change the menu locations, including adding one in the footer. Go to Appearance > Widgets on the WP dashboard and select the footer area. Add a Navigation Menu widget to create your custom menu. You can also use Nexter Blocks to do so.
What is the difference between a primary menu and a secondary menu?
The primary menu is the main navigation, typically placed at the top of the site. It helps users access key pages. A secondary menu is an additional navigation option, often used for links like FAQs, support, or social media. Some themes support multiple menus to improve site structure and accessibility.
Can I customize the mobile menu in WordPress?
Yes, many themes offer built-in options for mobile menus, allowing you to enable a hamburger menu, collapse items, or adjust styling. Nexter Blocks also lets you customize the mobile menu for your website with animations, custom styles, and layouts.
Can I create a custom WordPress menu without a plugin?
Yes, WordPress’s built-in menu editor lets you create custom menus without a plugin. You can add pages, categories, and custom links. However, for advanced features like mega menus, custom design, and animations, you can use a plugin like Nexter Blocks to enhance functionality.


