Introduction
If you encounter issues with Nexter Blocks plugin blocks, We recommend following this step-by-step troubleshooting process to solve the issue on your end.
1. Check if you have the Latest Version & Right System Requirements
Make sure you are using the latest versions of the following:
- WordPress
- PHP Version: Latest or at least 8.0.0
- Nexter Blocks – Pro & Free Latest Versions
2. General Settings
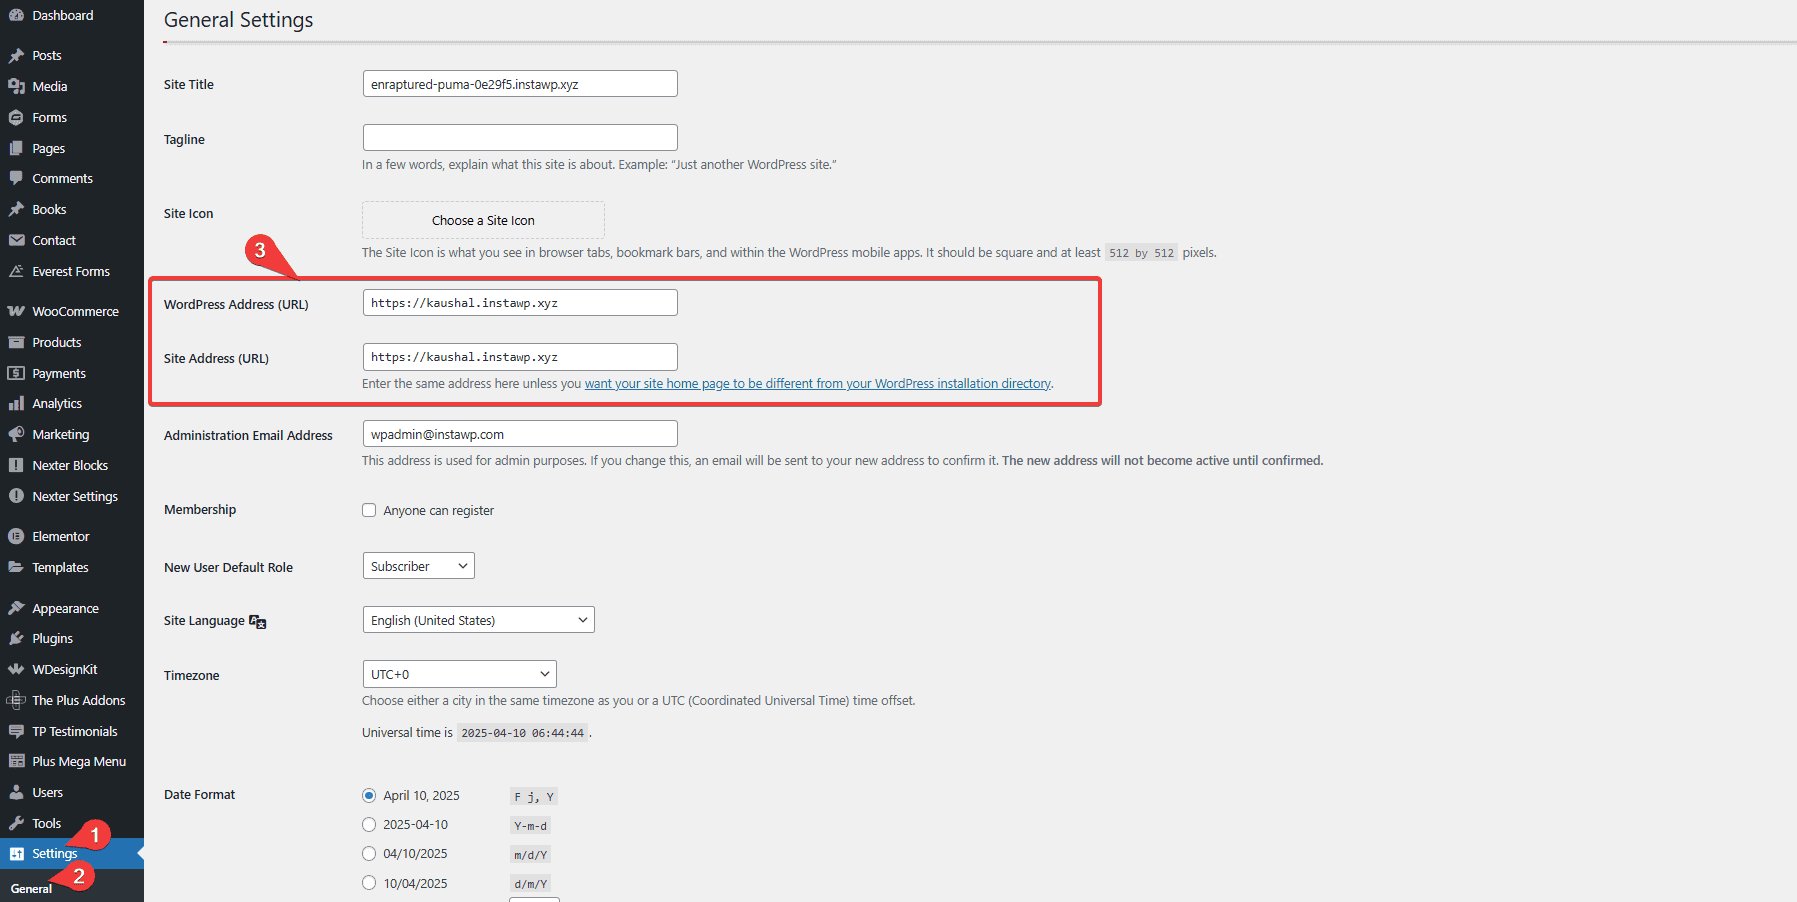
Make sure the Site Address (URL) and the WordPress Address (URL) in General Settings are the same. If they are different, it may cause issues with loading CSS and JS files.
- Go to Dashboard > Settings > General.
- Then, make sure both the Site Address (URL) and WordPress Address (URL) are the same.


3. Clear Cache
3.1. Clearing Browser Cache:
Clearing the browser cache ensures that each webpage loads as if the user is visiting it for the first time. This is particularly helpful when something loaded incorrectly initially and was cached, as clearing the cache allows for a fresh and correct load.
CTA: Refresh the browser cache by adding /?a=b at the end of the URL and do a hard reload by pressing CTRL/CMD + SHIFT + R.
Example:
Normal URL: https://nexterwp.com/
For Cache Clearance: https://nexterwp.com/?a=b
Note: Follow this process after each step and open the URL in incognito mode to refresh the page and check the issue.
3.2. Nexter Blocks ‘Performance’ option to clear the plugin cache:
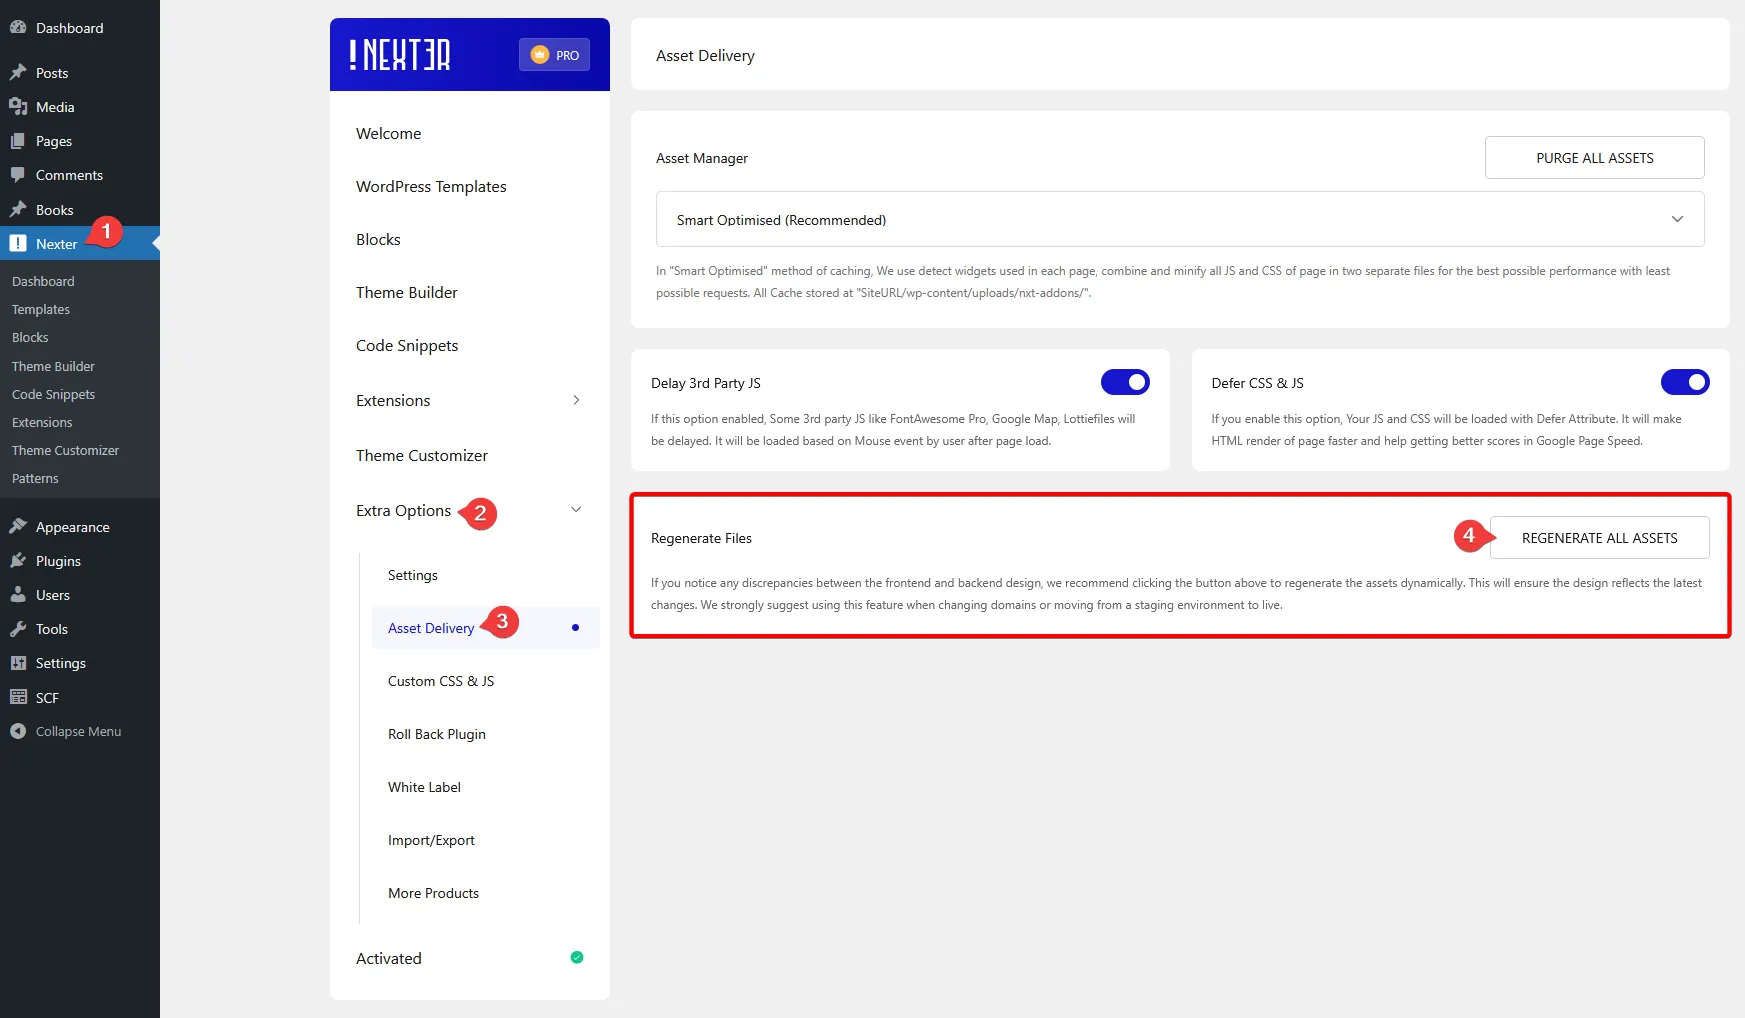
- Navigate to Dashboard > Nexter > Extra Options > Asset Delivery.
- Select Smart Optimised (Recommended).
- Click “PURGE ALL ASSETS.”
- Then, you’ll see an alert dialog box. When you press the OK button, it will remove all cached JS and CSS files from your server.
Refresh the page and check the issue. If it persists, try the alternative method below, or if there is any 3rd party caching plugin.
- Navigate to Dashboard > Nexter > Extra Options > Asset Delivery.
- Select ‘On Demand Assets‘.
- Finally, you’ll see a Successfully Saved message.
Refresh the page to check the issue. If it persists, proceed to the next step.
3.3. Deactivate the 3rd party speed optimizer/ cache plugin and check the issue.
If using Cloudflare, disable Rocket JS. For other CDNs like Rocket CDN or KeyCDN, we recommend turning them off temporarily. After doing so, recheck the website’s load to diagnose any issues effectively.
4. Regenerate Assets via Nexter Blocks Settings
Regenerate Assets can be necessary in certain situations to ensure that your website’s design and functionality are up-to-date and working properly.
- Navigate to Dashboard > Nexter > Extra Options > Asset Delivery.
- Click on ‘REGENERATE ALL ASSETS’
- Refresh the page and check the issue. If it persists, proceed to the next step.

By utilizing this feature, you can effectively clear dynamic assets, specifically CSS files, associated with each page, template, and various components of your website. This option proves beneficial in scenarios such as migrating your site to a new domain or undertaking similar tasks.
5. Check for Custom CSS or JS Codes
Check for any custom CSS or JS codes that have been added to the page or site. If you find any, remove them and recheck the issue.
6. Add the Block to a New Page.
Add the block from scratch to a new page and try to achieve a similar design/functionality.
- If the issue persists here, it may indicate a 3rd party plugin conflict.
- If the issue does not persist, then try to add the block from scratch again on the problematic page.
- If the issues persist, it could conflict with any other block or settings. To troubleshoot, remove all sections/ Containers/ blocks and check.
- Once identified, adjust settings or seek alternative solutions. If the 3rd party block is crucial, inform the support team for further guidance.
7. Troubleshooting using the Health Check –
When encountering errors on your website, whether in the admin area or on the front end, you can utilize the Health Check & Troubleshooting plugin to pinpoint which plugin or theme is causing the issues you are experiencing. This tool assists in diagnosing and troubleshooting potential conflicts, aiding in a more efficient resolution of problems. Using this plugin you can easily test in the backend without affecting any change on the live website.
For more information Click Here -> https://make.wordpress.org/support/handbook/appendix/troubleshooting-using-the-health-check/
8. Identify the Conflicting Plugin
Note: Before proceeding with this task, which may impact the live site, it is advisable to create a backup of the site or perform the task on a staging site.
- Disable all plugins except Nexter Blocks.
- Check if the issue persists. If it does, please contact the support team. If the issue does not persist, proceed to the next step.
- Enable each plugin one by one.
- After enabling each plugin, check the functionality of the Block.
- Continue this process until you identify the plugin causing the conflict.
Once identified, adjust settings or seek alternative solutions. If the plugin is crucial, inform the support team for further guidance.
9. Identify the Conflicting Theme
Activate the default WordPress Theme and check. If the issue persists, connect with the support team for further guidance.
10. Common Issues
10.1. Missing Icons
If icons are not visible, it could be because ‘Load Font Awesome PRO Icons‘ is disabled in Nexter Blocks Settings.
Solutions:
- Navigate to Dashboard > Nexter > Extra Options > Settings, enable ‘Load Font Awesome PRO Icons’
- Then, click on the settings icon, and you’ll see a popup box for the Load Font Awesome PRO Icons section.
- Next, click the Get ID link to get your Font Awesome PRO Kit ID.
- Once you have the ID, enter it into the Font Awesome PRO Kit text field.
- Finally, click the Save button.
- Now you’re connected to Font Awesome PRO Icons and can use more premium icons on your website.
10.2. Cross Domain Copy-Paste Not Working.
Solutions:
Confirm the following:
- Confirm that the block you’re trying to copy is turned on.
- Perform the copy-paste in the same normal browser window (Not a private tab).
- Verify that you’re using the latest version of the Nexter Blocks.
If the issue persists,
- Navigate to Dashboard > Nexter Blocks > Blocks and Enable all the Blocks.
- Try the copy-paste process again.
check out a more detailed Guide -> https://nexterwp.com/docs/add-cross-domain-copy-paste-for-free-in-wordpress/
10.3. Not using Google Maps on the site, it still appears in the Browser Console
Solution:
- Navigate to Nexter → Extra Options → Settings
- Then, go to the Connect Google Maps API Key section and disable the toggle
11. Contact to Support Team
Following these troubleshooting steps should help resolve the issues. If the issues persist, feel free to reach out for further assistance. Our team will help you in every possible way.
Consider sharing all the following relevant details with the support team. This information enables us to investigate the issue efficiently and offer a prompt solution.
- Your live site and page URLs that show the issue.
- Your WordPress site login access. You may use a temporary login without a password plugin. In this recommended secure method, share your access using just one link with an expiry time. It will ask you for an email address add support@posimyth.com. Using this URL, we can get access to your website as an admin and quickly solve the issue for you.
Follow this doc guide – https://nexterwp.com/docs/how-to-share-login-access-with-helpdesk-team/
- Share your console errors (You will get this by clicking on F12 from your browser and clicking on the console tab) and upload the screenshot at the helpdesk.
- System info Screenshot. You can get that from Elementor > System Info.
- A specific browser or device involved if applicable – Operating System version( Windows 10, Mavericks, etc), the model of the device( iPhone 11, Samsung Note, etc.), browser version( Safari 12.1.2, Chrome 85.0), etc., and screen resolution 1920/720 1440/900, etc.
- Detailed information describing the issue also steps to regenerate at our end.
- Possible screenshots or Screen Recording of the issue. You may use our free screen recording tool from the browser – POSIMYTH Record.
- We want to resolve your issues as quickly and effectively as possible, So please provide us with the maximum information to help you properly. Check our Support Policy.
Follow this doc guide to generate a ticket on the helpdesk – https://nexterwp.com/docs/how-to-get-technical-support-from-helpdesk-for-nexter/
Please be assured that we are committed to delivering an excellent user experience,
Our support team will address your query as quickly as possible.


