Do you want to protect your WordPress site from brute force attacks by limiting failed login attempts? Hackers often try to guess passwords by repeatedly attempting to log in, and without restrictions, they can make unlimited attempts. By setting a limit on failed logins, you can block suspicious IP addresses after a set number of incorrect tries, greatly reducing the risk of unauthorized access.
With the Nexter Extension (Free) and Nexter Extension (Pro), you can easily limit the number of failed login attempts in your WordPress site.
This is a freemium feature. If you are using the free Nexter Extension version, you can limit the number of failed login attempts, target IPs for specific headers and view logs.
With the Nexter Extension pro version, you can exclude IPs from getting blocked.
How to Limit Failed Login Attempts with the Nexter Extension Free?
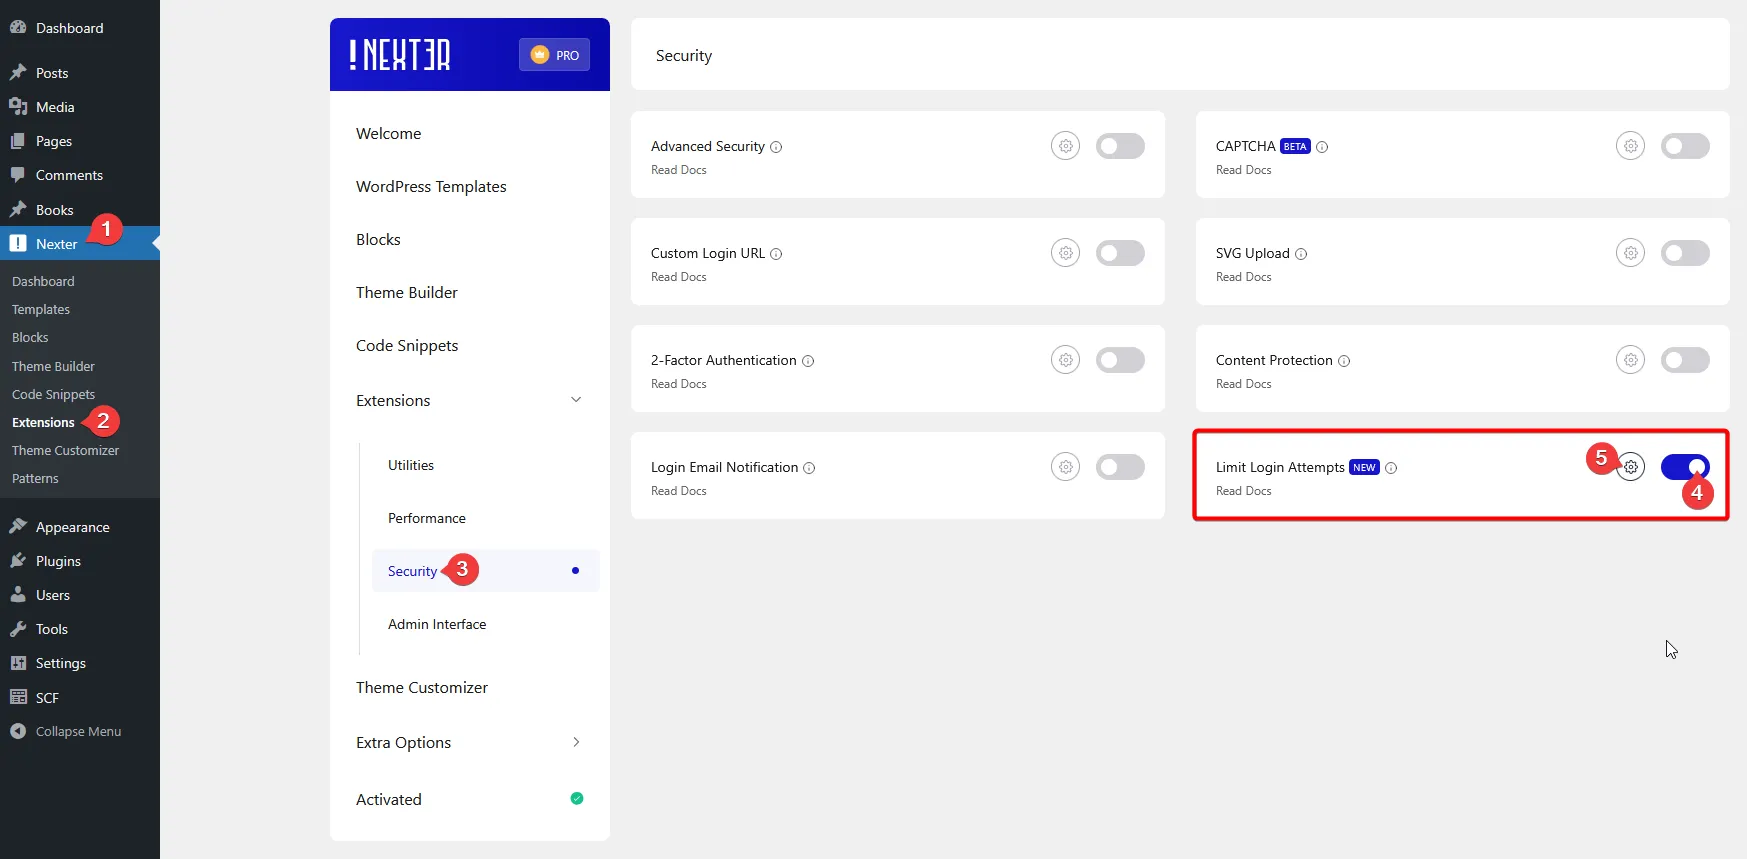
To limit the failed login attempts with the Nexter Extension free plugin, from the WordPress Dashboard, go to Nexter > Extensions > Security.
Then go to the Limit Login Attempts section, enable the toggle and click on the gear icon (⚙).

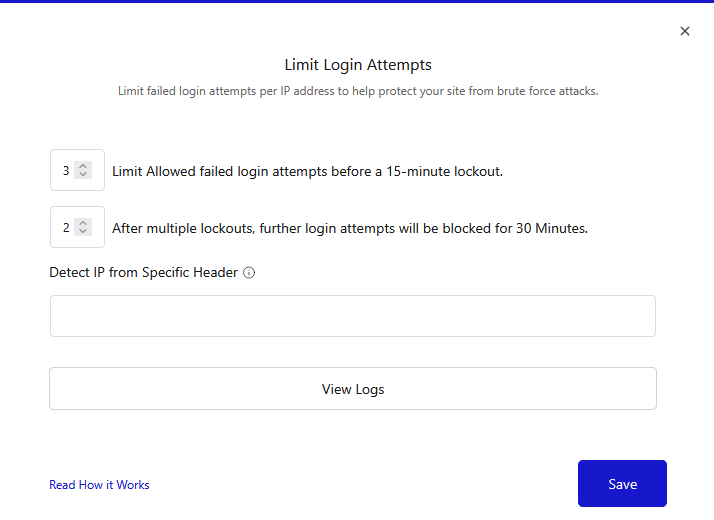
It will open the Limit Login Attempts pop-up.
In the first box, you can set the number of failed login attempts allowed before the system temporarily blocks the user’s IP address for 15 minutes.
For example, if you set this value to 3, it means that after 3 consecutive failed login attempts, the IP address will be blocked for 15 minutes.
In the next box, you can set how many times that IP address can receive a 15-minute block before the penalty increases to a 30-minute block.
For example, if you set this value to 2, it means that once a specific IP has been blocked for 15 minutes twice in a row, the next failed login attempt will trigger a 30-minute block instead.
If your site is using a proxy or security service such as Cloudflare, Sucuri, or your hosting provider’s load balancer, then you have to add HTTP_X_FORWARDED_FOR in the Detect IP from Specific Header field.
Normally, your server can see a visitor’s real IP address directly. However, when traffic passes through a proxy or security service, your server will instead see the proxy’s IP address, not the actual visitor’s IP. The visitor’s real IP is stored in a special HTTP header sent by the proxy.
Adding HTTP_X_FORWARDED_FOR in the Detect IP from Specific Header field tells the plugin to read the real visitor IP from that specific header.
If you’re not behind a proxy, leave it blank.
You can see the failed login details by clicking the View Logs button.
Once done, click on the Save button to save the changes.

Now, as per your settings, users will be blocked for a certain period after a certain number of failed login attempts.
How to Exclude IP Addresses from Being Blocked for Failed Login Attempts with the Nexter Extension Pro?
If you’re using the Nexter Extension Pro plugin, you can prevent specific IP addresses from being blocked, even if they exceed the allowed number of failed login attempts.
This feature is especially useful to ensure you don’t accidentally block yourself or other trusted people working on the site.
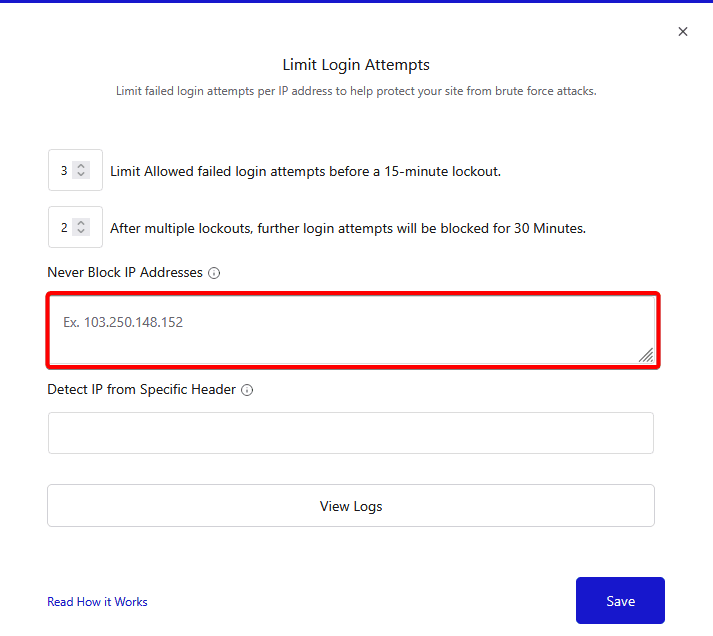
To do that, open the Limit Login Attempts pop-up.
In the Never Block IP Addresses field, you have to add the IP address. You can add multiple IP addresses on a new line.
The rest of the options are the same available with the Nexter Extension free plugin.
Once done, click on the Save button.

Now, any users connecting from the specified IP addresses will remain unblocked, no matter how many failed login attempts they make. This keeps your security tight while ensuring safe access for trusted users.


