Are you looking to add a dark mode to your WordPress website? Dark mode has become an increasingly popular feature among website users. This sleek and modern design element not only adds visual appeal but also provides a more comfortable viewing experience.
With the Dark Mode block and Global Option extension from Nexter Blocks, you can easily create and add a dark mode to your WordPress website.
Required Setup
- Make sure the default WordPress Block editor is active.
- You need to have the Nexter Blocks plugin installed and activated.
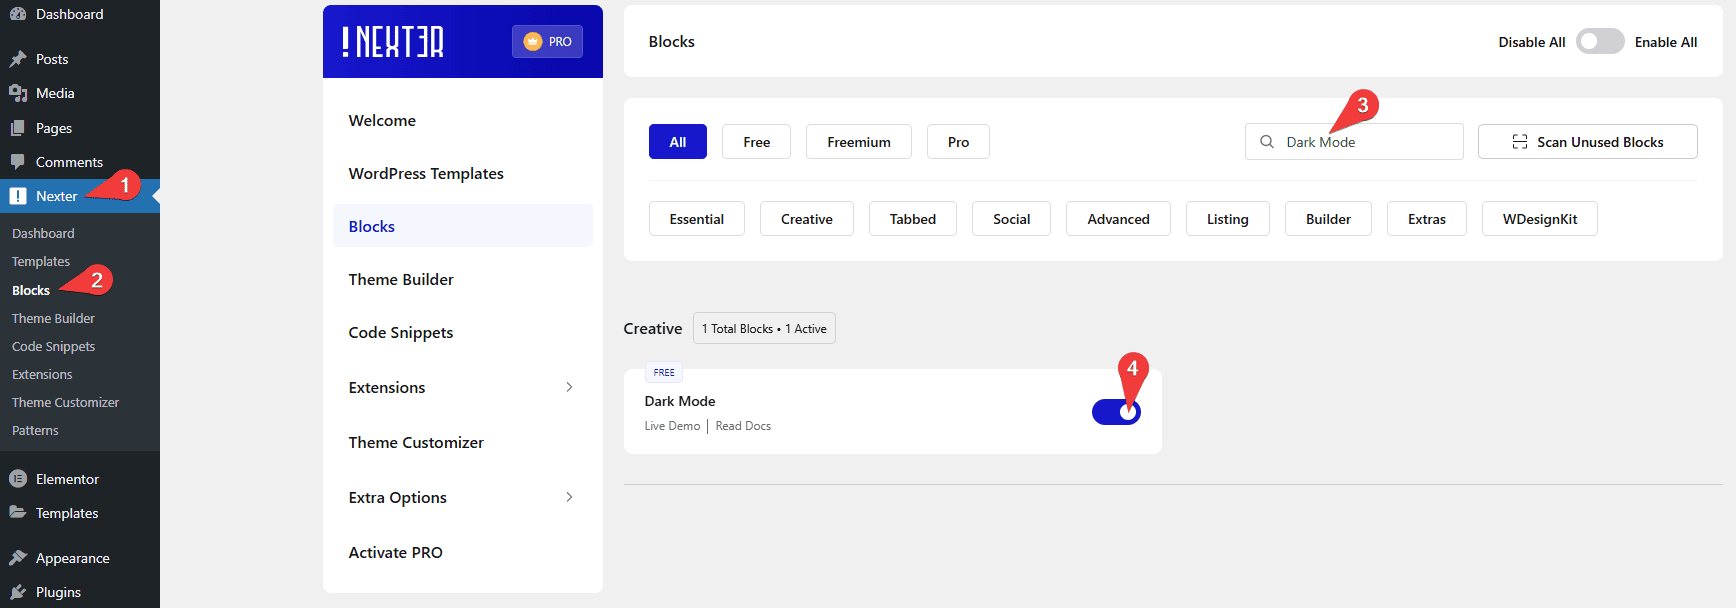
- Make sure the Dark Mode block is activated, to verify this visit Nexter → Blocks → and Search for Dark Mode and activate.
Learn via Video Tutorial
How to activate the Dark Mode Block?
Go to
- Nexter → Blocks
- Search the block name and turn on the toggle.
Key Features
- 3 Styles – You can select from 3 pre-set styles for the dark mode button.
- Save in Cookies – You can save the user’s choice in the browser cookies.
- Auto Match OS Theme – You can make it automatically match the user’s OS theme.
How to Use the Dark Mode Block?
Add the Dark Mode block from Nexter Blocks to the page.
Note: If you want to add a dark mode for the entire website, then you should add the Dark Mode block in a common template like the footer. For creating the template, you can use the Nexter theme.
Dark Mode
From the Select Style section, you can select a pre-defined style.

Note: In Style 3, you can select different toggle icons for normal and dark mode status.
Then by turning on the Save in Cookies toggle, you can remember the user’s choice, so on the next visit it will automatically open the website accordingly.
From the Auto Match OS Theme toggle, you can make it automatically match the user’s OS theme.
Position
From the Type section, you can set the button position to relative, absolute, or fixed.
Based on the selected position, you’ll find different relevant options.
Note: To have the best dark mode conversion, you should create the entire website or the page using the Nexter Blocks global options only.
Set Dark Mode Preset
To make the dark mode toggle work, you have to set a dark mode preset from the Plus Customiser. To do so, follow the steps.
1. Click on the Nexter Customiser icon at the top.
2. Then open Preset 2 from the Global Presets tab and make the necessary styling adjustments.
Note: You can make any preset as the dark mode preset.
Note: In the dark mode preset, make sure to have the same number of properties in the preset as in the active one.
Note: While switching to the dark mode preset it replaces a property by the option’s order, not by its name.
3. Then click on the setting icon of the preset and select Dark Mode.
4. Finally, click on the Save Preset button to update the global CSS file, and then make sure to update the page or template to see the changes in the frontend.
Now, when you toggle the Dark Mode button, it will smoothly switch your page or website (according to your settings) between normal mode and dark mode.
How to Style the Dark Mode Block?
You’ll find all the styling options under the Style tab to style the Dark Mode block.
Switcher – From here, you can style the dark mode switcher button for both normal and dark mode separately.

Switcher Text – You’ll see this option only when Style 1 or Style 2 is selected from the Layout tab. From here, you can style the switcher texts.
Advanced options remain common for all our blocks, you can explore all the options from here.


