Nothing is more frustrating than a WordPress website that suddenly crashes or shows an error due to something as technical as increasing the WordPress memory limit.
If you see the error message ‘Allowed memory size of x bytes exhausted’ while working on your website, it means WordPress has hit its memory limit. This prevents your site from running smoothly.
The result? Slower performance, trouble installing plugins or themes, or even frequent website crashes.
So, it becomes important to fix the issue immediately to keep your site running smoothly and provide a seamless user experience. Thankfully, you can increase the WordPress memory limit with just a few tweaks.
In this guide, we’ll explore how to increase WordPress memory limit using 5 easy methods.
What Causes the WordPress Memory Limit Error?
WordPress is built on PHP, a server-side programming language that runs on memory. To run your website, you need access to a certain amount of memory on your web servers to run various applications.
This memory is provided by your hosting provider, restricting WordPress resource allocation to run your website.
By default, WordPress has a memory requirement of 64MB, which is not enough for most websites.
As a result, your website may exceed the default memory limit due to resource-intensive operations, and you may come across a “fatal error: allowed memory size of x bytes exhausted” error message.
These issues often arise if your website is using resource-heavy plugins, contains large images, or is handling high website traffic.
Increasing your wp memory limit prevents these crashes and ensures smooth website performance.
How to Check Your WordPress Memory Limit?
Before looking for methods to increase the WordPress memory limit, check how much memory your site currently has to determine how much memory you need for a smooth-running website.
Here’s how you can check it:
A. WordPress site health tool
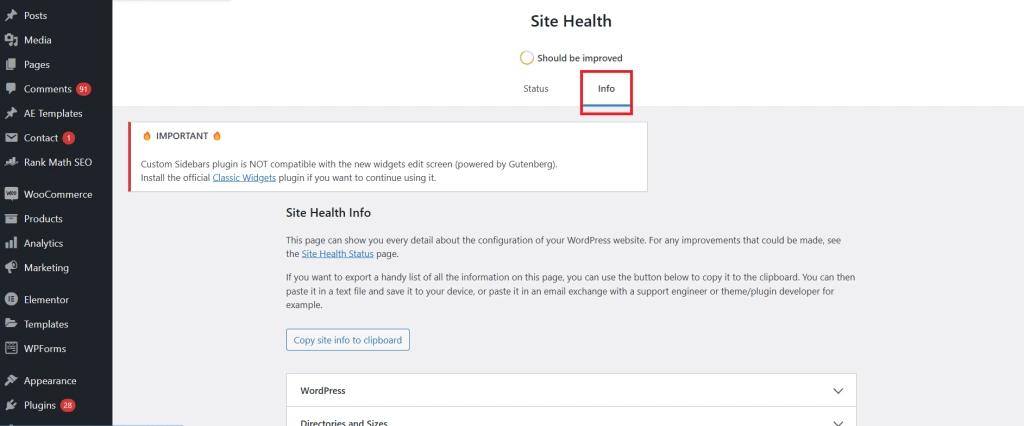
WordPress offers built-in features to check your existing WP memory limit for WordPress 5.0 or higher versions. Simply navigate to Tools > Site Health on your WordPress admin dashboard.
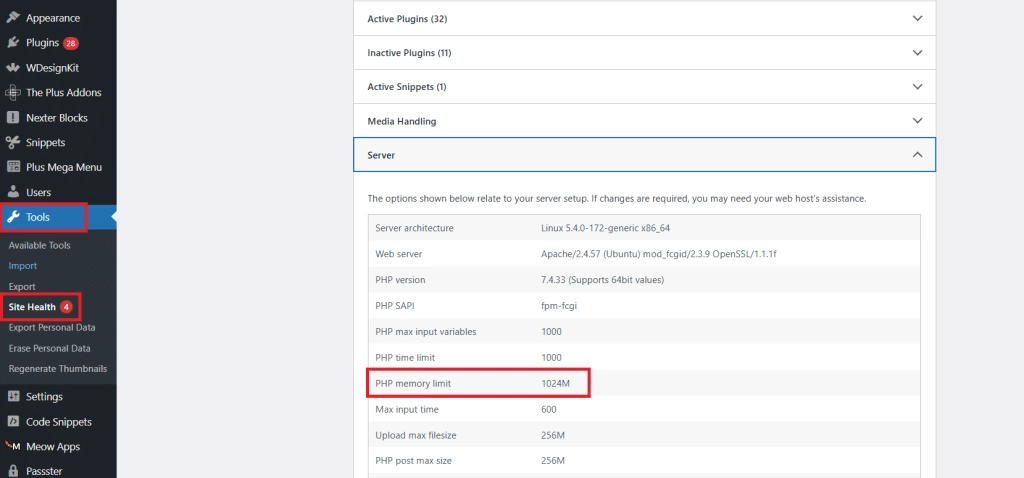
Click on the Info tab and go to the Server drop-down option.
Click on it to find the PHP memory limit listed. In this case, the WordPress PHP memory limit is 1024M.
B. WordPress hosting account
Another way to check your WordPress PHP memory limit is to access your hosting account. This information is easily available in the account control panel.
In the cPanel, go to Tools on the right panel. Under Software, click on MultiPHP INI Editor.
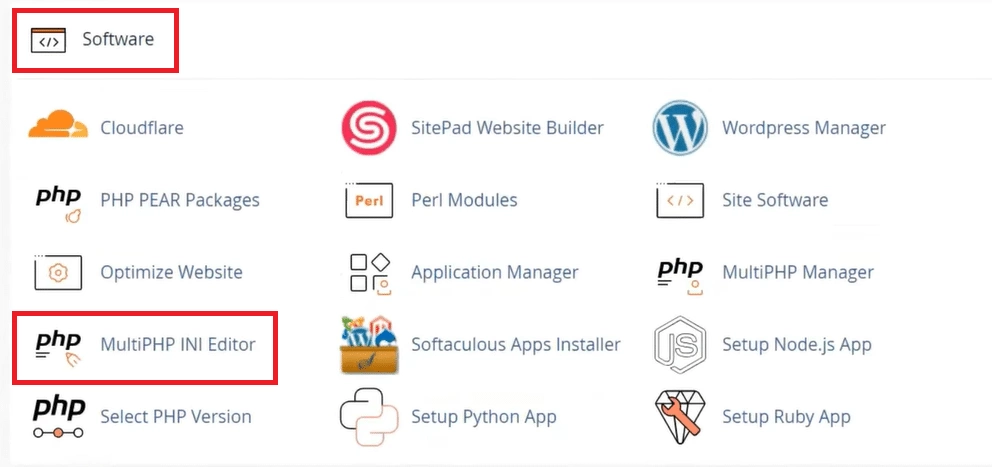
Select your domain.

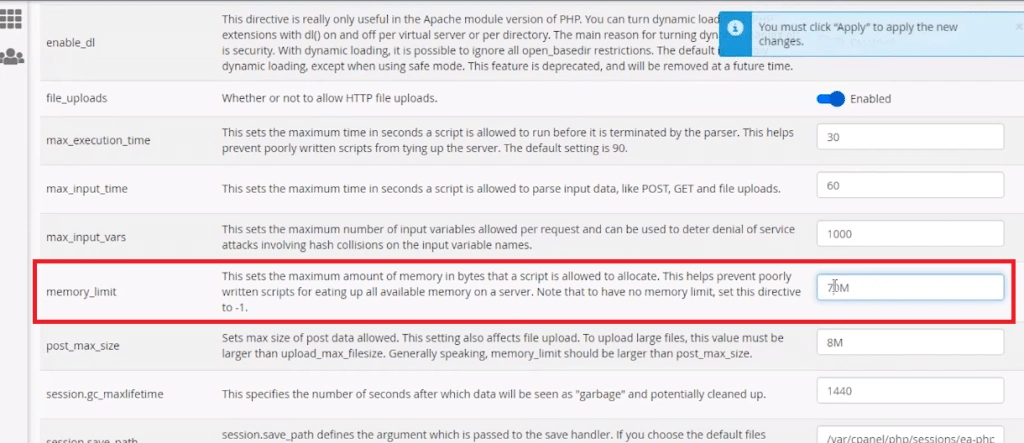
Scroll down to see the current PHP memory limit of your website.

C. wp-config.php file
A third way to check your WordPress PHP memory limit is to check your wp-config.php file, located in the root directory of your WordPress site.
To access this, connect to your site using an FTP client like FileZilla or file manager in your cPanel.
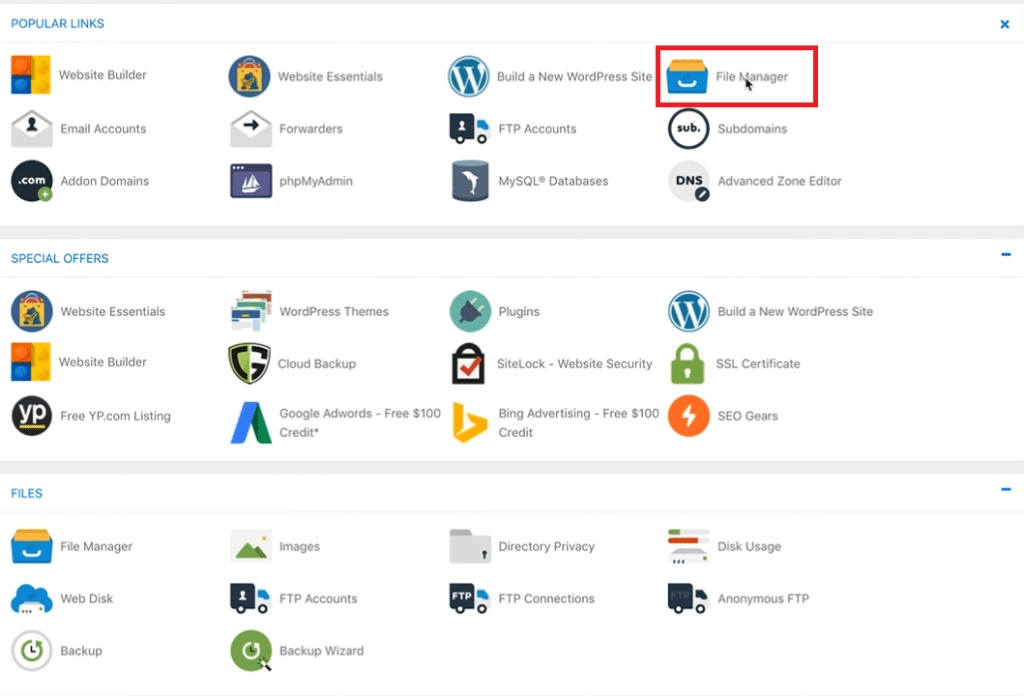
Navigate to the wp-config.php.
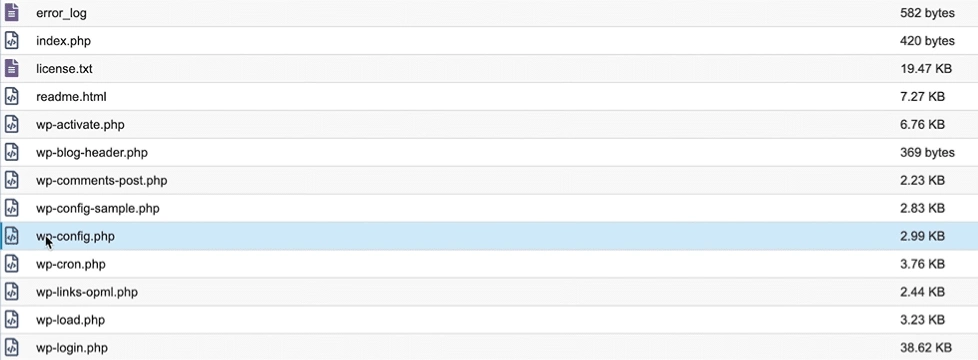
Find the following line of code:
define(‘WP_MEMORY_LIMIT’, ‘256M’);
This code defines the current PHP memory limit available for your website.
Common Signs That Indicate Your WordPress Site Needs More Memory
If your website has encountered a WordPress memory limit error, you’ll notice performance issues and errors that can disrupt your site’s functionality. Here are the most common signs that indicate you need to increase WordPress memory:
Slow website performance: If your pages are taking too long to load, especially after installing new plugins or adding more content, your site might be struggling with limited PHP execution limits.
Frequent 500 internal server errors: If you often see a “500 Internal Server Error”, your site may be hitting the memory limit. This error occurs when WordPress tries to execute a script but runs out of allocated memory before it completes the process.
White Screen of Death: Worst case scenario? You encounter a blank white screen as soon as you try to access your WordPress website, indicating a critical system error that freezes your website and prevents any interaction. This white screen of death is a major sign of WordPress fatal error and memory exhaustion.
Plugins and themes failing to install or update: If your WordPress freezes, times out, or shows an error while installing or updating plugins or themes, it’s likely running out of memory.
Dealing with a blank white screen due to a low PHP limit or critical system error? Learn How to Fix WordPress White Screen of Death with 9 tested methods.
How to Increase WordPress Memory Limit?
Before you try to fix the WordPress memory exhausted error, make sure to back up your entire website to avoid losing your work due to any unfortunate error.
Once you do that, follow any of these 5 simple methods to increase WordPress memory limit-
Method 1: Edit wp-config.php File
One of the most common ways to increase your website memory limit is to configure your wp-config.php file.
1. To access this file, connect to your FTP client or use the file manager in your web hosting’s control panel. However, before making any changes, create a backup of this file to avoid any issues with the website later.
2. Once you locate the file, edit it, and add the following line of code to extend the memory limit-
define(‘WP_MEMORY_LIMIT’, ‘256M’);
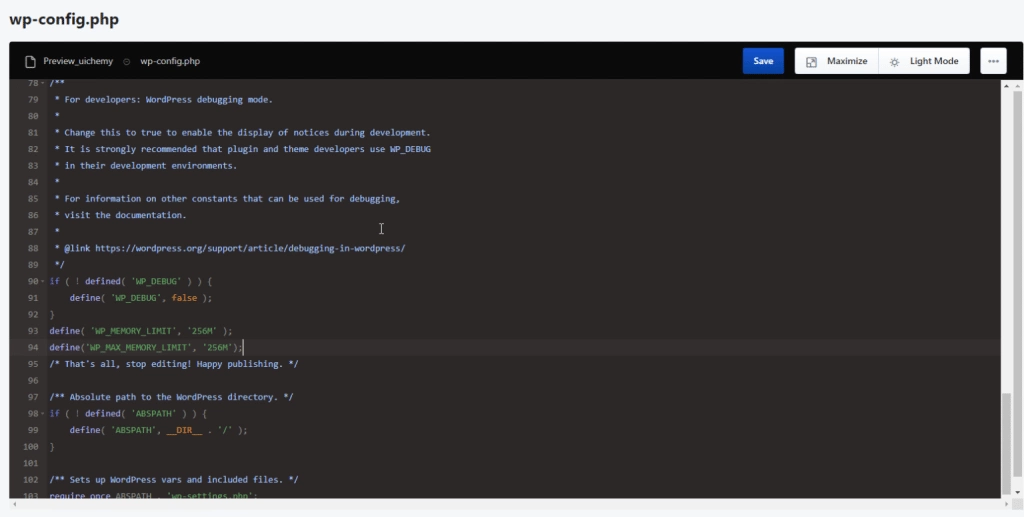
This code will set the wp memory limit to 256 megabytes, which you can also increase or decrease as needed. So, if you want to increase the memory to 512M, change the code to define(‘WP_MEMORY_LIMIT’, ‘512M’);
As a reminder, this method may not work for all hosting environments. If that is the case with you, you can contact your hosting provider for assistance or use any of the other methods mentioned next.
Method 2: Modify php.ini File (for Advanced Users)
If you are unable to modify the PHP execution limit using the wp-config.php file, use your php.ini file, which is a configuration file that controls PHP settings.
Here’s the step-by-step process to modify your php.ini file-
1. The location of your php.ini file can vary based on the server configuration. If your host uses cPanel, you can find the php.ini file there. Otherwise, you can create the file in the text editor with the following code-
<?php phpinfo(); ?>
2. Upload the file in WordPress’ root directory and access it via your web browser. Find the “Loaded Configuration File” section to get the location of the php.ini file.
3. Open the file in a text editor.
4. Use the text editor’s search function to locate the memory_limit line of code in the PHP file.
5. Change the value of memory_limit to your desired limit. So, if you want to increase the WordPress memory limit to 512M, change the value to memory_limit = 256M.
6. Save the php.ini file and upload it to your server.
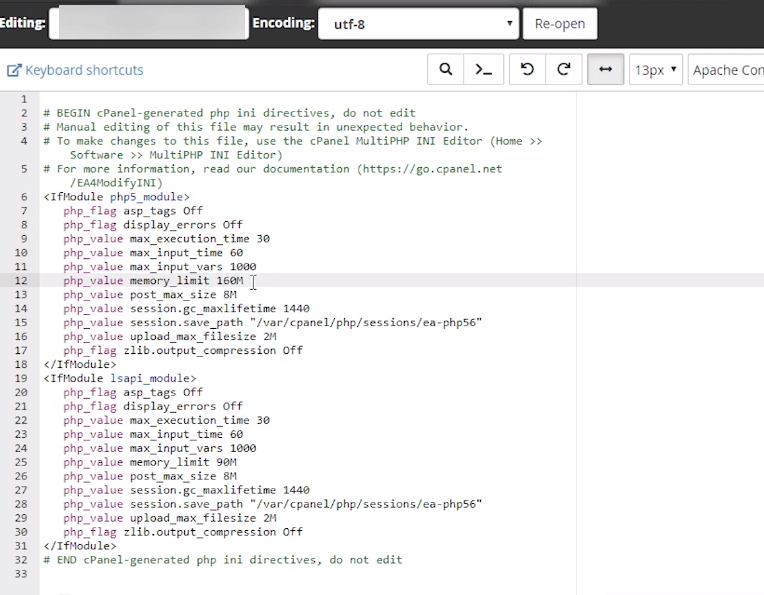
7. To verify that the new memory limit is applied, go to Tools > Site Health > Server > PHP memory limit on your WP dashboard.
Method 3: Update .htaccess File
Another way to modify the WordPress PHP memory limit is to edit the .htaccess file.
The .htaccess file is a configuration file that controls how your website acts on your server. You can edit this file to customize various settings such as Elementor memory limit.
Follow these steps to extend your WordPress memory-
1. Connect to your website using your FTP client or your cPanel.
2. Look for the .htaccess file in the site’s root directory.
3. Before editing it, make sure to download a copy of the file on your system as a backup.
4. Open the file in a text editor and add the following line of code-
php_value memory_limit 256M
5. Replace 256M with the desired memory limit that your hosting provider allows.
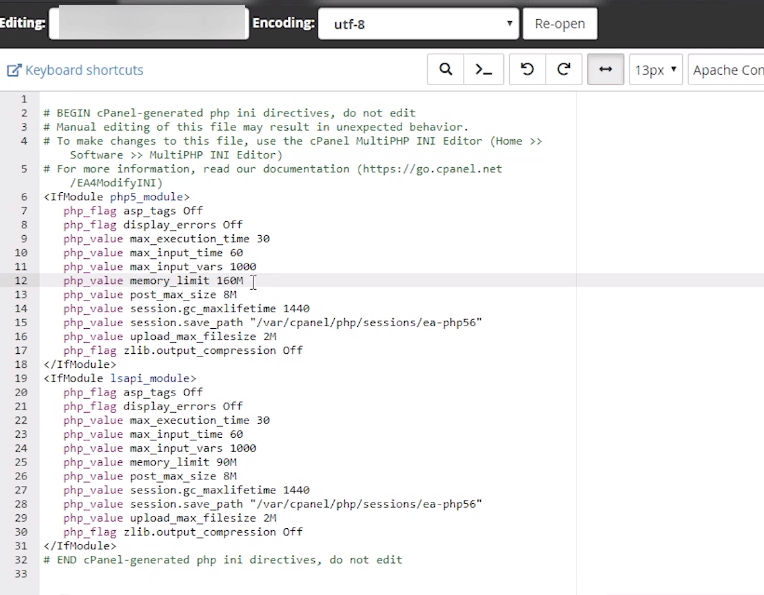
6. Save the .htaccess file and upload it to your website.
This will increase the memory limit in WordPress, which you can verify by navigating to Site Health from your WordPress dashboard.
However, one key thing to note while using this method is that not all hosting providers allow you to extend the wp memory limit using the .htaccess file. Plus, this method may also not work for all scripts. So, contact your hosting provider to understand if they allow it and get further assistance.
Method 4: Increase Memory via cPanel
If you’re using shared hosting for your website, the hosting provider may have restrictions on how much memory you can use, in which case, it can be tricky to increase the memory using the methods above.
However, many hosting providers allow you to modify the PHP memory limit through their control panel or by contacting their support.
Here, if you have access to the cPanel for WordPress, increase your PHP memory using the MultiPHP INI Editor.
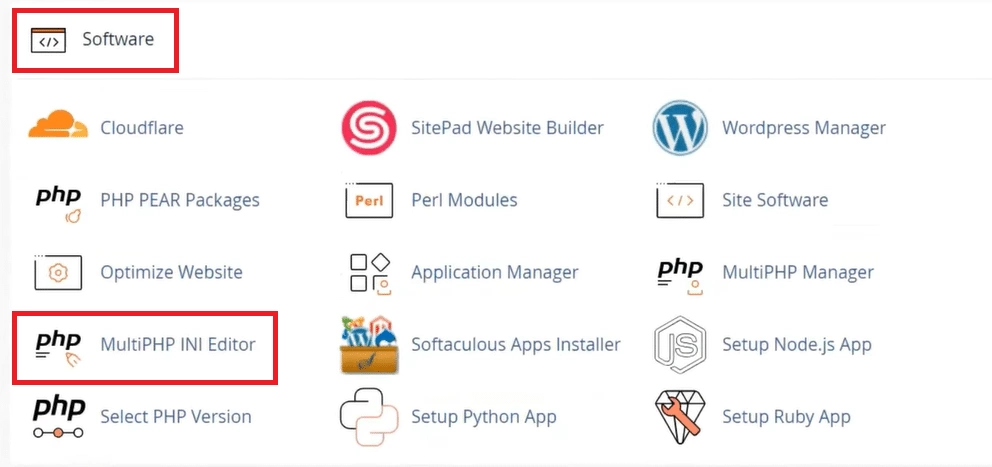
To do this, log in to cPanel and go to Software > MultiPHP INI Editor. Under Basic Mode, choose the domain you want to modify and set the wp memory to your desired value.
If you cannot access the cPanel, contact the support team to request an increase in the WordPress memory limit.
Method 5: Contact Your Web Host
If none of these methods work, your hosting provider might have a limit on PHP memory allocation. Reach out to your hosting provider’s support team to request an increase in the maximum memory.
At the same time, shared hosting plans often have strict caps on the available memory, in which case you can upgrade your hosting plan.
Best Practices to Prevent Memory Issues in WordPress
In WordPress, increasing the PHP memory limit can resolve issues in the short term, but if you don’t manage your site’s resources efficiently, you’ll keep running into the same problem.
Here are some best practices to prevent WordPress fatal error memory exhaustion and keep your site running smoothly:
1. Optimize Plugins and Themes
Every plugin and theme you install adds to your website’s memory consumption. If you’re using too many resource-heavy plugins or a poorly coded theme, your site will consume more memory than necessary.
To fix this, remove unused plugins and themes and replace bloated plugins with lightweight alternatives. In addition, switch to performance-optimized themes like Nexter, which is designed to be lightweight and fast, reducing memory usage.
2. Use a Lightweight Theme Like Nexter
Themes with excessive animations, complex layouts, and heavy scripts require more memory to load. A lightweight theme like Nexter minimizes memory consumption without compromising on design or features.
Nexter is built for speed and optimized for performance with a clean, efficient code that reduces the load on your server. It also works seamlessly with caching and performance optimization plugins, which can significantly reduce memory strain on your WordPress site.
3. Enable Caching and Use a CDN
Caching stores copies of your website’s content so it loads faster whenever a visitor accesses it without constantly pulling data from the server. This reduces the number of PHP requests and lowers memory usage.
So, it is a good idea to use a caching plugin like WP Rocket and use browser caching to store static files on users’ devices. A Content Delivery Network (CDN) is also a great option to further reduce memory load by distributing your website’s data across multiple servers worldwide.
4. Regularly Update WordPress Core, Themes, and Plugins
Outdated software can cause memory leaks, security vulnerabilities, and inefficient performance. Keeping WordPress updated is important to ensure better memory management and access to optimized code.
Is your website running on an outdated PHP version causing it slow down? Learn How to Check and Update WordPress PHP Version.
Is Upgrading Hosting the Best Solution?
If you’ve tried optimizing your WordPress site but are still facing memory issues, your hosting plan might be the bottleneck.
Not all hosting environments allow increasing memory limits beyond a certain point, and if you’re constantly dealing with slow websites, frequent errors, or downtime despite optimization efforts, upgrading or moving to a different hosting plan may be necessary.
But even when upgrading your hosting, which one should you go for: shared, VPS, or dedicated? Let’s see.
- Shared hosting: Shared hosting is web hosting where multiple websites share the same server resources, including memory, CPU, and bandwidth. However, since multiple websites share the same resources, PHP memory limits are usually capped. If your site is growing and experiencing performance issues, shared hosting may not be enough.
- VPS: A Virtual Private Server (VPS) provides dedicated memory and CPU resources while still being more affordable than dedicated hosting. You have more control over your server environment and can easily increase your PHP memory limit.
- Dedicated hosting: With dedicated hosting, you get an entire server for your website. There are no memory restrictions because all server resources belong to you. This is ideal for high-traffic sites that require large amounts of PHP memory.
Here’s an overview of how different hosting types compared when it comes to WordPress memory limit requirements-
| Hosting type | Memory limit | Best for |
|---|---|---|
| Shared Hosting | Limited memory available | Small websites, beginners |
| VPS | Customizable | Growing websites with medium-level traffic |
| Dedicated Hosting | High and customizable | High-traffic, media-heavy websites |
Planning to move to a new hosting provider for your website? Check out the 6 Best WordPress Hosting Providers.
Stay updated with Helpful WordPress Tips, Insider Insights, and Exclusive Updates – Subscribe now to keep up with Everything Happening on WordPress!
Wrapping Up
A WordPress memory limit error can slow down your website and cause frustrating errors. It will not only impact the website performance but affect the user experience as well.
In case of a low WordPress PHP memory limit, you can increase the limit by editing your .htaccess file, php.ini file, or wp-config.php files from cPanel.
Alternatively, if you cannot access these files, consider contacting your web hosting provider to get assistance or request an increase in the memory limit.
That said, increasing wp memory isn’t the only solution. Optimizing your website plays a crucial role in reducing memory consumption.
Using a lightweight plugin like Nexter Blocks ensures your site runs efficiently without needing excessive memory. The plugin offers you access to 90+ Gutenberg blocks to enhance your website design and functionality instantly.
FAQs on Increasing WordPress Memory Limit
What is the default WordPress memory limit?
The default limit is 32M for WordPress, but hosting providers may set it higher.
What happens if I don’t increase my memory limit?
If you don’t increase the website memory limit, it can slow down your website, show the Allowed memory size exhausted error, or even cause the website to crash.
Is increasing the memory limit safe?
Yes, increasing the memory limit is safe as long as you don’t exceed your hosting provider’s available resources and create a backup of WordPress files to avoid any issues later.
What is the recommended memory limit for WordPress?
The recommended memory limit for WordPress depends on your website size and requirements. While 128M is sufficient for most sites, larger or resource-intensive sites may need 256M or more.
Can I increase the memory limit on shared hosting?
It depends on your host. Some shared hosting providers allow you to increase the memory limit but have a cap on memory usage.
Why is my hosting provider not allowing me to increase memory?
Your host may not allow you to increase memory because it has limited PHP memory on lower-tier plans to prevent excessive resource usage.
Does increasing memory improve site speed?
While increasing memory does not directly improve the site speed, it can help prevent errors and improve stability for a resource-intensive website.


