If you’ve ever wondered how to create a reusable block in WordPress, you’re probably tired of repeating the same content like CTAs, testimonial layouts, pricing tables, or contact forms across multiple pages.
With the Gutenberg block editor, website creation and design have become easier. However, without reusable blocks, repeating the same design elements manually can quickly become frustrating. You end up copying and pasting, reformatting styles, or worse, rebuilding the same sections from scratch.
It’s inefficient and, honestly, not the best use of your time. Reusable blocks in WordPress offer you the ability to save different content blocks and reuse them across multiple pages and posts, saving you a lot of time and effort.
In this article, we’ll walk you through everything you need to know about Gutenberg reusable blocks, including a detailed WordPress reusable block tutorial and how to manage them.
What Are Reusable Blocks in WordPress?
Reusable blocks in WordPress are exactly what they sound like — blocks that you can save and reuse across different posts and pages. Instead of recreating the same layout or content block multiple times, you create it once, save the block in Gutenberg, and insert it wherever you need it.
So, how are reusable blocks different from regular blocks? A regular block is meant for one-time use. If you add some content or design layout on multiple pages using regular blocks, you’ll have to manually recreate or copy it each time.
With a regular block, any changes you make apply only to that specific instance. But with a reusable content block, any edits you make to one block are automatically updated everywhere else, saving you hours of manual updates.
In essence, reusable blocks come in handy when you have repetitive content elements across your site, want to maintain design consistency, or want to update changes across the website blocks in one go.
Want to add dynamic content to your WordPress website? Learn How to Add Custom Fields in Gutenberg to add dedicated metadata to your website content.
How to Create a Reusable Block in WordPress
All blocks in Gutenberg are individual content elements that you can create and save as a pattern.
Creating a reusable block in WordPress is a simple, no-code process that can save you loads of time using the Gutenberg block editor.
Or, if you want more control over the content and enhanced design flexibility, Nexter Blocks extends the Gutenberg reusable block functionality with advanced design features, reusable templates, and layout management.
Here’s a step-by-step guide on how to create a reusable block in WordPress-
Step 1: Open a new or existing page/post
On your WordPress dashboard, go to Pages/Post > Add New Page/Post or click on an existing one to edit it.
In the Gutenberg editor, click on the ‘+’ icon on the top left corner of the screen to open the block menu. From here, you can add whichever block you want to create and reuse on multiple pages or posts.
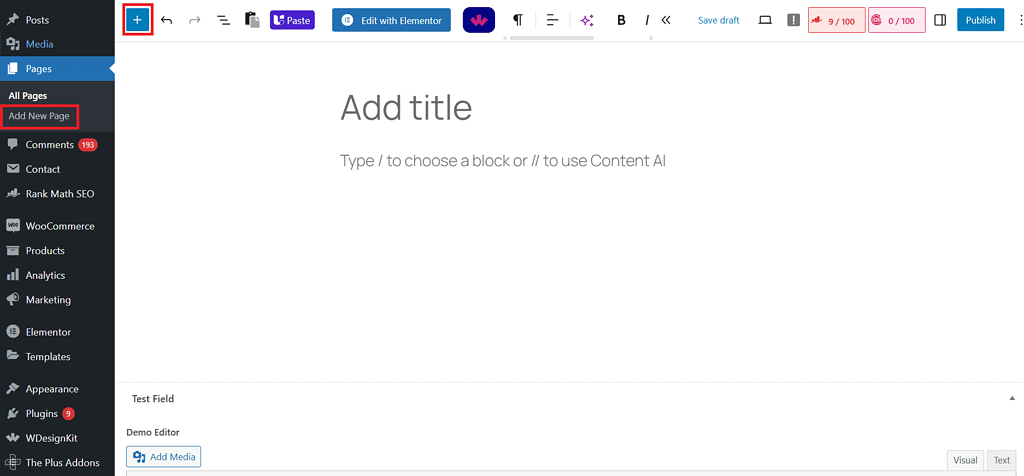
Let’s say you want to add a CTA at the end of every blog post on your website. So here, we will use the Paragraph block to create a reusable content block for the CTA.
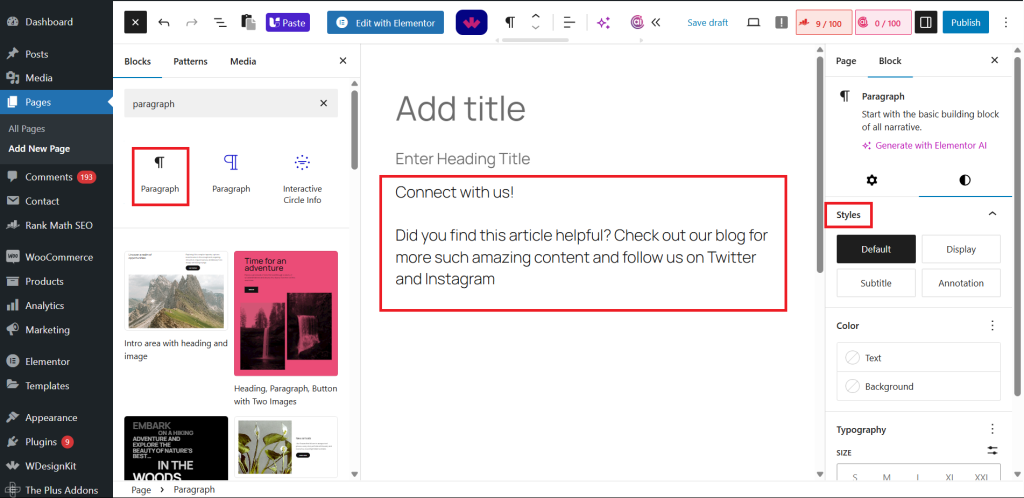
Add the block and write your content for the CTA- “Did you find this article helpful? Check out our blog for more such amazing content, and follow us on Twitter and Instagram.”
From the menu on the right, you can also customize the color and different typography elements for the reusable content block.
Step 2: Create the reusable block
Once you have added the content, click on the hamburger icon on the top left to open the Document Overview.
In the Paragraph section, click on the three dots and choose Create Pattern.
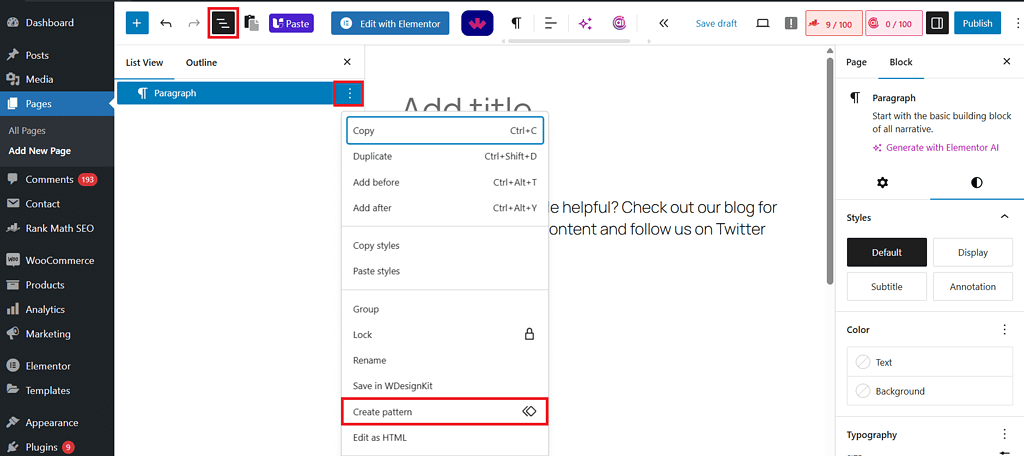
Here, you will be asked to create a name for the pattern.
Ideally, it should be something that helps you quickly identify the block and its function, such as a ‘Call to Action.’
Next, you have to select a default category for the block from the dropdown menu. This will make it easy to manage all reusable blocks on WordPress.
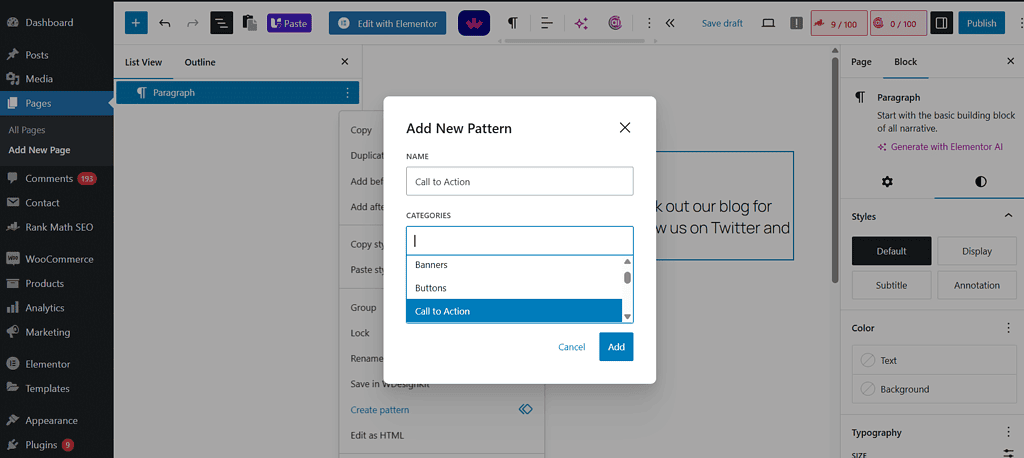
Click on Add to save your changes.
This will create a reusable CTA block for your website.
How to Use a Reusable Block Across Pages/Posts
Once you’ve created a reusable block, inserting it into other pages or posts is super straightforward. Here’s how to do it-
Step 1: Open an existing page/post
Back on your WordPress dashboard, open an existing page or post where you want to add the content block.
Click on the ‘+’ icon on the top left corner of the screen and switch to the Patterns tab.
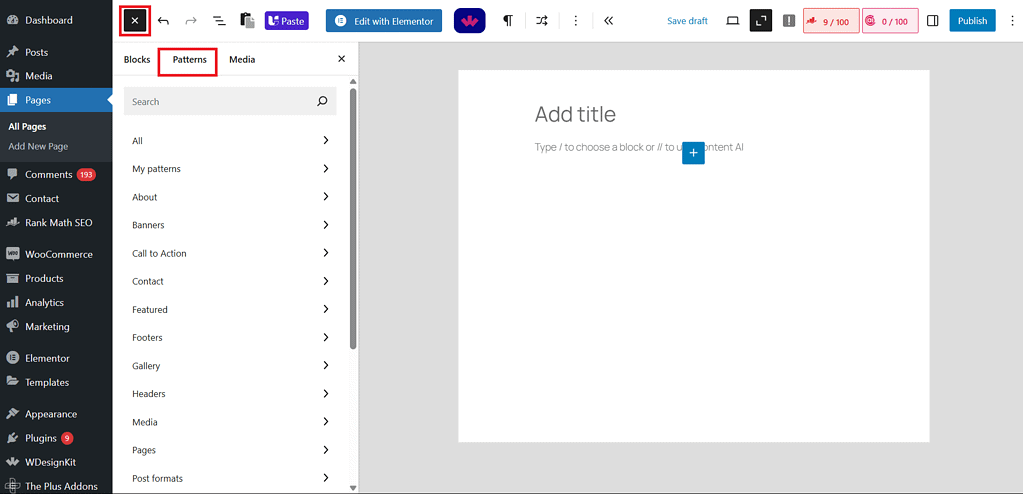
Step 2: Add the reusable block
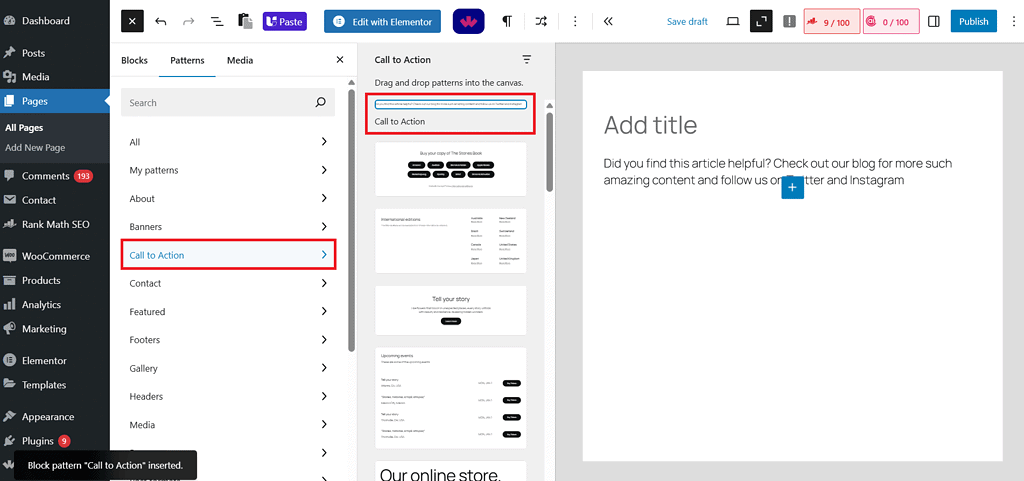
You will find a list of all default categories for reusable blocks. Click on the category – which is ‘Call to Action’ in this case.
If you haven’t selected any category while creating a new pattern, it will be stored in the Unrecognized tab.
Click on your category to open the list of patterns saved in that category.
Here, click on the reusable Gutenberg block you’ve created, and it will be added to your page or post.
How to Edit a Reusable Block in WordPress
One of the best things about reusable blocks is that you can edit them once, and those changes instantly reflect across every post or page where the block is used.
However, you can do that directly from the Gutenberg block editor. You will have to go to the Manage Patterns section to edit or duplicate the block.
Here’s how to edit a reusable block-
- Add the reusable block to any page or post.
- Click inside the block to select it.
- At the top of the editor, click on the three vertical dots on the right.
- Select Manage Patterns
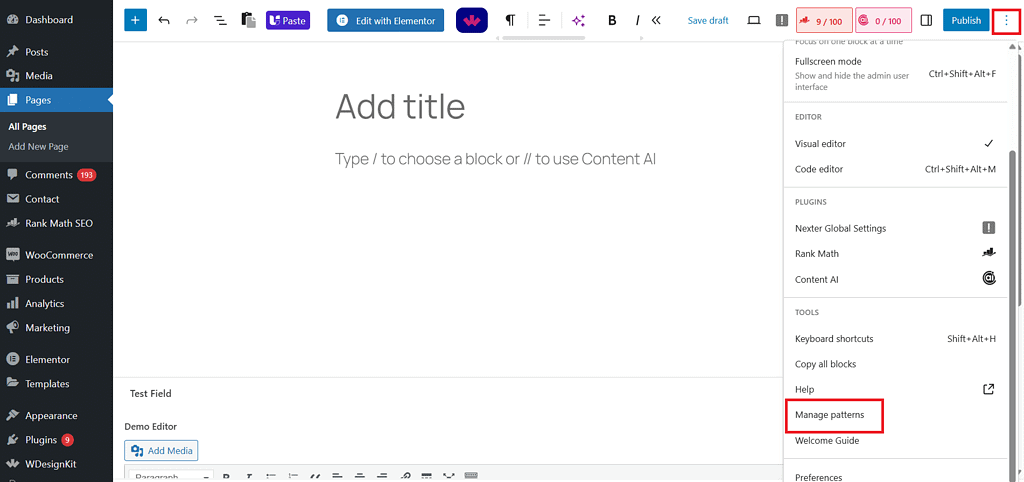
- This will take you to a new page where you will find all the pre-existing and newly created patterns.
- Choose the pattern you want to edit.
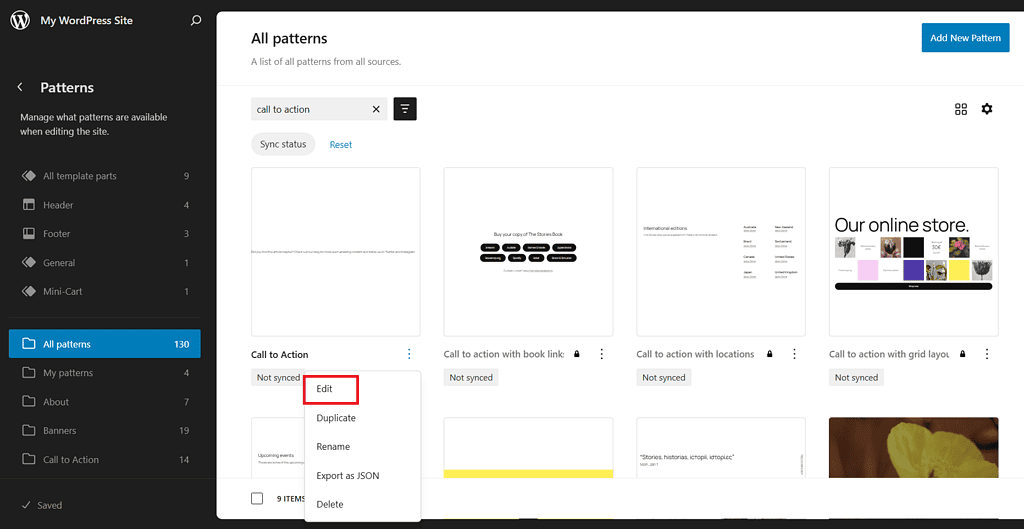
- You can make the necessary changes to the pattern content.
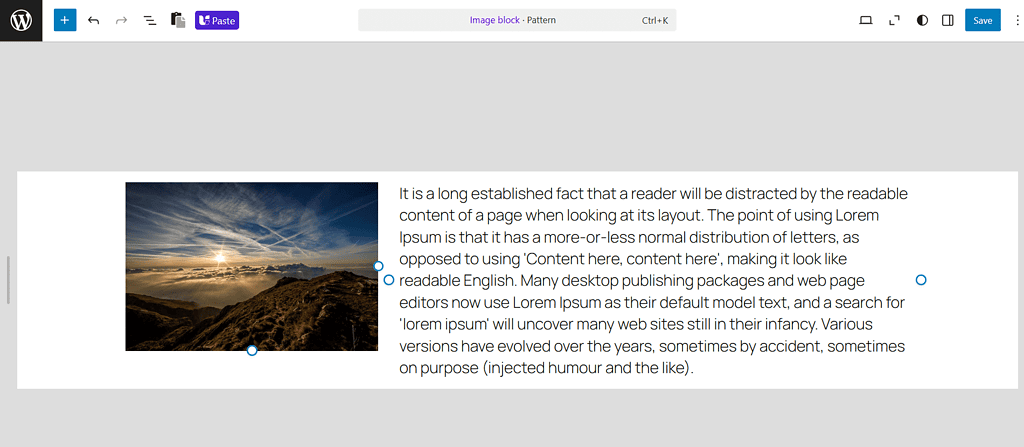
- Then click “Save” to apply the changes globally.
Once you open the post, you will see the updated pattern.
However, be careful while editing a reusable block. Since changes apply everywhere, you might unintentionally overwrite a design used in ten other places.
That’s why it is always a good idea to edit a reusable block if you want the change across the whole site.
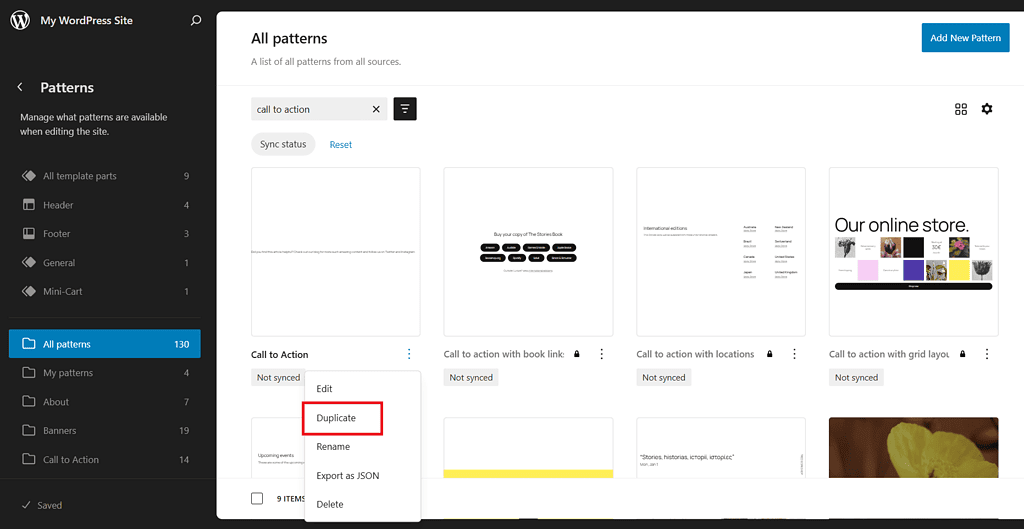
Otherwise, duplicate the block first if you want to customize it for just one page. You can also make changes to a pattern for a specific post by clicking on the three dots and choosing Detach.
This will convert the reusable block into a regular block, so any changes you make here will not affect the other patterns.
Create a stunning website with customizable design and theme layouts. Check out the Best 5 WordPress Theme Builders for your website.
Managing and Deleting Reusable Blocks
Once you start creating multiple reusable blocks, it helps to stay organized. Luckily, WordPress makes it easy to manage, rename, and delete reusable blocks from a central location.
If you’re using an older theme, simply go to Appearance > Patterns from your WordPress dashboard to edit, delete, import, or export all your blocks from one place.
However, if you’re using a block theme, you can manage reusable blocks in WordPress via Appearance > Editor from the WordPress dashboard.
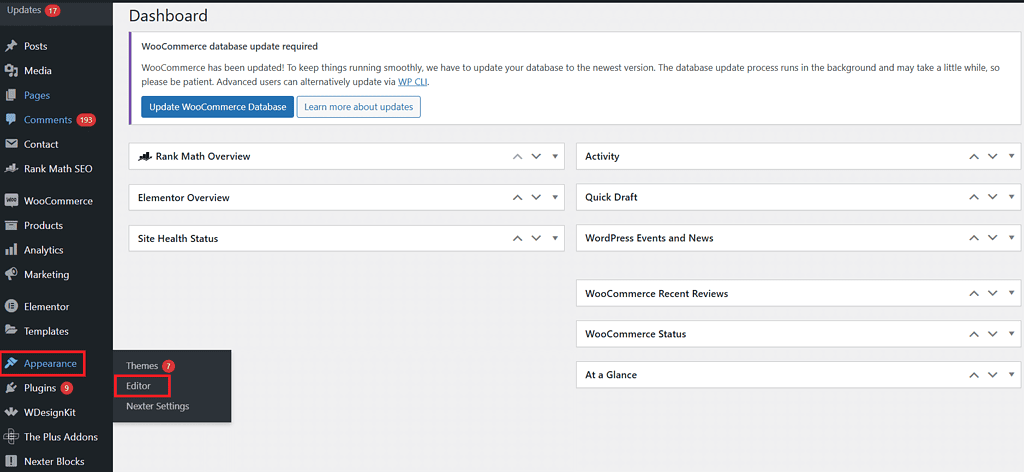
This will open the full site editor, where you can click on Patterns > All patterns to view and manage all your reusable blocks in one place.
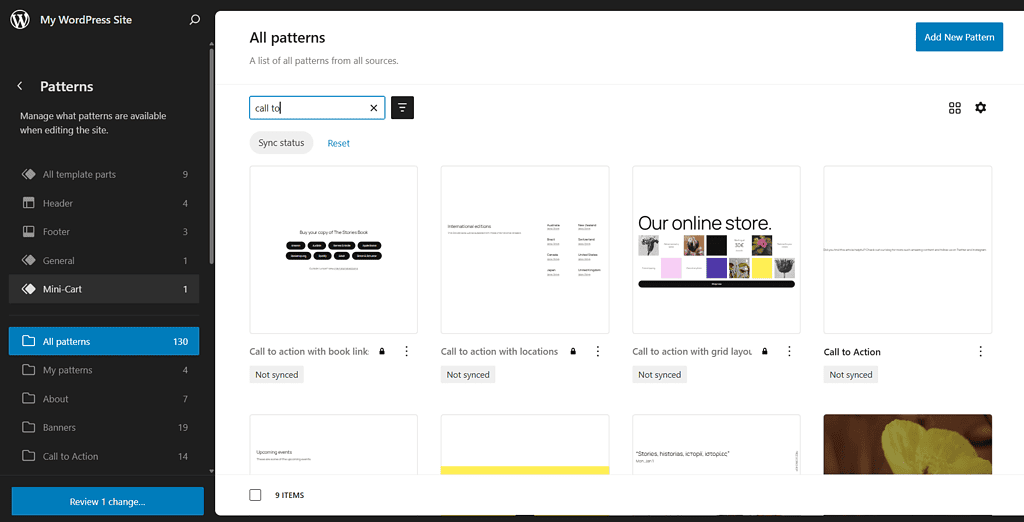
Create Advanced Reusable Templates with Nexter Blocks
While the native Gutenberg block editor lets you create basic reusable blocks, it can feel limiting if you’re managing more complex sections or custom layouts.
That’s where Nexter Blocks comes in.
Nexter Blocks allows you to save entire sections, templates, and design patterns as reusable layouts. Thus giving you more control over the structure, styling, and placement of the content.
Unlike basic Gutenberg reusable blocks, Nexter lets you-
- Save and reuse full-width hero sections, landing page blocks, footers, and more
- Visually manage templates with a drag-and-drop experience
- Create reusable designs that work across headers, footers, popups, and even archive pages
This way, you have more control over the type of content you can save as reusable blocks; you don’t need to recreate complex designs from scratch and customize and preview reusable sections without writing a single line of code.
Not sure how Nexter Blocks can help elevate your website’s design and functionality? Check out a detailed comparison of Nexter Blocks vs Other Blocks to learn about its capabilities.
Best Use Cases for Reusable Blocks
With reusable blocks in WordPress, you can create and reuse a wide range of content across your website. These include-
- Call-to-Actions (CTAs): These include the buttons, lead magnets, or contact sections you use repeatedly across pages and blog posts.
- Testimonials: Customer quotes that appear across landing pages or blog posts.
- Pricing tables: You can create consistent pricing tables across multiple services or plan pages.
- Newsletter signup forms: Reusable blocks can help add signup forms in multiple places, such as footers, blog posts, or popups.
- FAQs: You can use reusable blocks if you want to add similar questions across products or services
- Author bios: Add author profiles and links consistently across your blog content.
- Footer content: If you build custom footers using blocks, you will need to use a reusable block across pages.
Create a seamless website navigation and user experience with consistent website headers and footers. Know How to Create Header and Footer in WordPress.
Stay updated with Helpful WordPress Tips, Insider Insights, and Exclusive Updates – Subscribe now to keep up with Everything Happening on WordPress!
Wrapping Up
We’ve covered everything you need to know about how to create a reusable block in WordPress, from what they are, how they differ from normal blocks, and how to edit, manage, and use them across your site.
Reusable blocks are a simple yet powerful way to save time, maintain consistency, and streamline your content creation across the website. With reusable content blocks in WordPress, you can add CTAs, testimonials, pricing tables, or forms throughout the website and ensure you never have to start from scratch again.
And if you’re ready to supercharge your Gutenberg experience, install Nexter Blocks to take your website functionality to the next level.
With 90+ advanced Gutenberg blocks, Nexter Blocks lets you build stunning layouts, save reusable templates, and take full control of your website’s design without writing a single line of code.
FAQs on WordPress Reusable Blocks
Can I edit a reusable block without affecting other pages?
If you edit a reusable block, those changes will reflect across every post or page where it’s used. If you want to customize it for just one instance, insert it and then click “Convert to regular blocks” or “Detach” before editing.
Can I use reusable blocks in custom post types or theme templates?
Reusable blocks can be inserted into any content area that supports the block editor—including custom post types like portfolios, products, events, etc. For templates, you can use them via Full Site Editing or compatible theme builders.
Why is my reusable block not updating everywhere?
If you insert the block and then convert it to regular blocks, your changes will apply only to that instance and not site-wide. So, make sure you’re editing the actual reusable block, not just a single instance or regular block.
Is it possible to duplicate a reusable block?
Yes, to duplicate a reusable block, you can go to Manage Patterns from the Appearance > Editor and duplicate any of the reusable blocks on your website.
Can I export or import reusable blocks between websites?
Yes, you can go to Manage Patterns to export or import blocks between websites. Simply select the block you want to export and click on “Export as JSON.”
Can I rename a reusable block after creating it?
Yes, you can easily rename the reusable block by editing the reusable block from the Manage Patterns section.
