If you’re interested in white labeling the Nexter with your brand name, we’re here to guide you through the process.
The White Label feature is available with all the pricing plans (except the Starter plan).
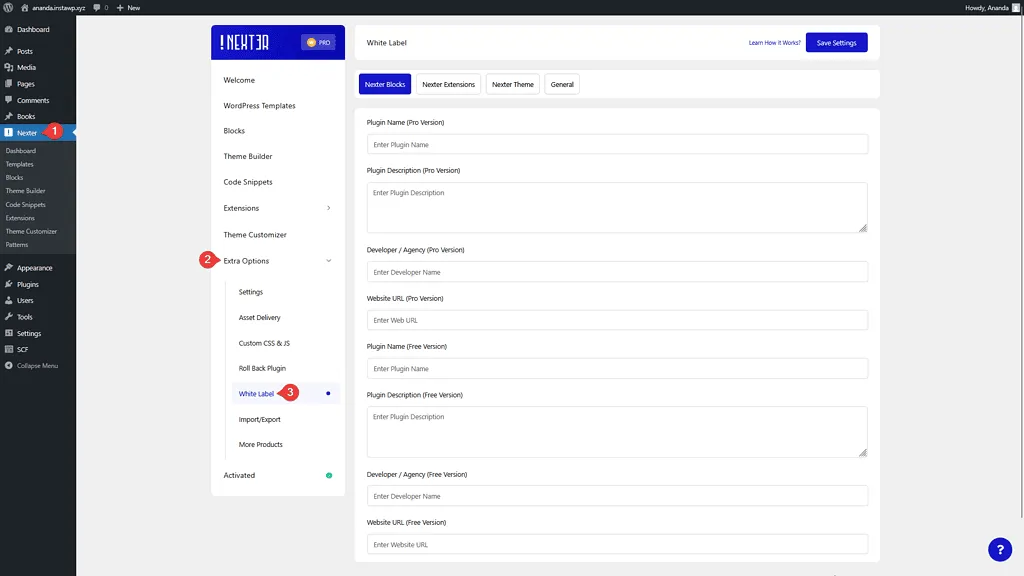
To White Label Nexter with your Brand Name, from the WordPress Dashboard, go to Nexter > Extra Options > White Label.

From here, you can white label Nexter Blocks, Nexter Extension, Nexter Theme and Nexter Dashboard separately.
- Nexter Blocks – From here, you can white label the Nexter Blocks free and pro plugins. You’ll see this tab only if you have the Nexter Blocks plugin installed and activated.
- Nexter Extensions – From here, you can white label the Nexter Extension free and pro plugins. You’ll see this tab only if you have the Nexter Extension plugin installed and activated.
- Nexter Theme – From here, you can white label the Nexter Blocks free and pro plugins. You’ll see this tab only if you have the Nexter theme installed and activated.
- General – From here, you can white label the Nexter Settings page.
White Label Nexter Blocks
To white label the Nexter Blocks plugin, go to the Nexter Blocks tab.
You’ll find a form that you need to fill out with your information.
In the form, you’ll find two sections, one for the Nexter Blocks Pro version and one for the Free version.
Plugin Name (Pro Version) – Here, you have to add your plugin name for the pro version. It will replace the plugin name in the plugin page.
Plugin Description (Pro Version) – Here, you can add the plugin description for the pro version, which will show on the plugin page.
Developer / Agency (Pro Version) – Here, you can add your brand name for the pro version, which will show on the plugin page.
Website URL (Pro Version) – Here, you can add the website URL of your brand name for the pro version.
Plugin Name (Free Version) – Here, you have to add your plugin name for the free version. It will replace the free version plugin name on the plugin page.
Plugin Description (Free Version) – Here you can add the plugin description for the free version, which will show on the plugin page.
Developer / Agency (Free Version) – Here, you can add your brand name for the free version, which will show on the plugin page.
Website URL (Free Version) – Here, you can add the website URL of your brand name for the free version.
Once done, click on the Save Settings button to save the changes. The page will reload, and you’ll see the changes in the plugin page.
Now, if you go to the Plugins section, you’ll see your custom plugin names along with other details such as plugin description, developer name, and website URL.

Note: Only the developer name and plugin website URL will change, the rest of the links associated with the plugin will remain unchanged.
White Label Nexter Extension
To white label the Nexter Extension plugin, go to the Nexter Extensions tab.
You’ll find a form that you need to fill out with your information.
Plugin Name (Free Version) – Here, you have to add your plugin name for the Nexter Extension free version. It will replace the plugin name in the plugin page.
Plugin Name (Pro Version) – Here, you have to add your plugin name for the Nexter Extension pro version. It will replace the plugin name in the plugin page.
Plugin Description (Free Version) – Here, you can add the plugin description for the Nexter Extension free version, which will show on the plugin page.
Plugin Description (Pro Version) – Here, you can add the plugin description for the Nexter Extension pro version, which will show on the plugin page.
Developer / Agency (Theme) – Here, you can add your brand name for both versions and Nexter Theme at once, which will show on the plugin page and in the Nexter Theme theme details section.
Website URL (Pro Version) – Here, you can add the website URL of your brand name for both versions at once.
Once done, click on the Save Settings button to save the changes. The page will reload, and you’ll see the changes in the plugin page.
Now, if you go to the Plugins section, you’ll see your custom plugin names along with other details such as plugin description, developer name, and website URL.

Note: Only the developer name and plugin website URL will change, the rest of the links associated with the plugin will remain unchanged.
White Label Nexter Theme
To white label the Nexter Extension plugin, go to the Nexter Theme tab.
You’ll find a form that you need to fill out with your information.
Theme Name – Add your theme name.
Theme Description – Add the theme description.
Developer / Agency (Theme) – Add the developer name. This will show in the theme details and plugins section.
Website URL (Pro Version) – Add your theme website URL.
Theme Screenshot – Add your theme screenshot, which will show in the theme section under Appearance > Themes.
Once done, click on the Save Settings button to save the changes. The page will reload, and you’ll see the changes in the plugin page.
Now, if you go to Appearance > Themes, you’ll see your custom theme name with your screenshot. Once you click on the Theme Details, you’ll find your custom theme description and developer name with the website URL.
White Label Nexter Dashboard
To white label the Nexter Dashboard, go to the General tab.
Brand Name – Add your brand name. This will replace the Nexter menu in the Dashboard.
Upload Logo / Icon – Add your brand logo or icon, which will show in the Dashboard menu and in the Nexter Settings page.
Then you’ll find some options to manage all the Nexter plugin settings.
Hide all Help Links? – Enable this checkbox to hide all the links (except brand name) from the plugin on the plugin page.
Hide all Plugin Updates related News? – Enable this checkbox to hide all the future (not the existing ones) Nexter Blocks news related banners.
Hide Our Recommended plugin Ads? – Enable this checkbox to hide the recommended plugins related ads for Nexter Blocks.
Hide Starter Templates Tab? – Enable this checkbox to hide the WordPress Templates option from the Nexter Blocks page.
Hide Licence Key Tab? – Enable this checkbox to hide the licence section. This is an ideal option if you don’t want your clients to access the licence section.
Hide Plugin RollBack Tab? – Enable this checkbox to hide the Roll Back option from the Nexter Blocks page.
Enable Force Disable Options – Enable this checkbox to completely remove the White Label option from the Nexter Settings page. This is an ideal option if you don’t want your clients to make any changes to the white label settings. If you want to get the White Label option back, simply deactivate and activate the plugins again. Once done, click on the Save Settings button to save the changes. The page will reload, and you’ll see the changes.
This is how easily you can white label Nexter with your brand name.
FAQs
How to Revert White Label?
In case you wish to remove your branding, go to Nexter > Extra Options > White Label and just remove the entries manually from the specific fields and click theSave Settings button. It will revert to the original plugin branding.
Will I Receive Updates After White Labelling?
Yes! You will continue to get updates even after white labelling. These updates will not affect your white label settings.
How to Hide the White Label Option?
To hide the white label option, go to Nexter Blocks > Extra Options > White Label, go to the General tab, and check the Enable Force Disable Options checkbox and click on the Save Settings button. This will remove the White Label option.
Can I Change the Block Name?
No, the White Label feature only allows you to change the plugin name, description, developer name and website URL.


