Adding Lottie animations to your website can elevate your design to the next level. These lightweight, scalable vector animations enhance the visual appeal of your site and offer a unique, interactive way to engage your audience.
With the LottieFiles Animation block from Nexter Blocks, you can easily add Lottie animation to your WordPress website.
Required Setup
- Make sure the default WordPress Block editor is active.
- You need to have the Nexter Blocks plugin installed and activated.
- This is a Premium block, and you need the PRO version of Nexter Blocks.
- Make sure the LottieFiles Animation block is activated, to verify this visit Nexter → Blocks → and Search for LottieFiles Animation and activate.
Learn via Video Tutorial:
How to activate the LottieFiles Animation Block?
Go to
- Nexter → Blocks
- Search the block name and turn on the toggle.

Key Features
- Auto Play – You can autoplay the Lottie animation.
- On Hover – You can play the Lottie animation on hover.
- On Click – You can play the Lottie animation on click.
- Column Hover – You can play the Lottie animation on column hover.
- Section Hover – You can play the Lottie animation on section hover.
- Mouse In and Out – You can play the Lottie animation on mouse in and out.
- Scroll Parallax – You can play the Lottie animation on page scroll.
- View Port Based – You can play the Lottie animation as it enters the viewport.
- Custom Start and End Points – You can set custom start and end points for the animation.
- Click Delay – You can add a click delay on Lottie animations.
How to Get the LottieFiles?
In order to use the LottieFiles Animation block from Nexter Blocks, you need to have the Lottie JSON file URL or JSON code of the LottieFile you want to use.
To do this, go to LottieFiles.com and create a free account there if you don’t have one.
Now log into your account and go to Featured here you’ll find all the free Lottie files.
Click on the animation you like, it will open in a popup, click on the Save to workspace to generate button.
It will open the Lottie animation in a new window.
From the right panel, enable the Enable Asset Link toggle.
Get JSON URL
In the Asset link field, you’ll get the Lottie file URL.
Get JSON Code
To get the JSON code, you have to download the JSON file.
To download the JSON file click on the Download & export button at the top.
Then click on the Download in the Lottie JSON section and the file will be downloaded.
After that, open the downloaded JSON file in a code editor and you’ll get the JSON code.
How to Use the LottieFiles Animation Block?
Add the LottieFiles Animation block to the page.
Then click on the Design from Scratch button to design the layout from scratch.

Note: By clicking on the Import Pre-Designed Template button, you can import a preset template and customize it as per your requirements.
Lottie Content
From the JSON Input section, you have to select the JSON input type. Here you’ll find two options –
- Code – With this option, you have to add the JSON file code directly.
- URL – With this option, you have to add the JSON file URL.
.
Note: With any option, you’ll get the same output.
Select the option as per your convenience, let’s select URL here.
In the JSON URL field, you have to add the JSON file URL.
By enabling the Load in Backend toggle, you can show the Lottie animation in the backend.
Main Settings
From the Play on dropdown, you have to select the Lottie animation trigger event. Here you’ll find nine options –
- Default – To use the Lottie as a static image.
- Auto Play – To play the Lottie animation automatically.
- On Hover – To play the Lottie animation on mouse hover.
- On Click – To play the Lottie animation on mouse click.
- Column Hover – To play the Lottie animation on column hover.
- Section Hover – To play the Lottie animation on section hover.
- Mouse In-Out Effect – To play the Lottie animation on mouse in and out.
- Scroll Parallax – To play the Lottie animation on page scroll.
- View Port Based – This will play the Lottie animation as it enters the viewport.
Select the option as per your requirements, let’s select Auto Play here.
By enabling the Loop Animation toggle, you can play the animation in a loop. When enabled, you can set the number of loops in the Total Loops field.
From the Animation Play Speed section, you can control the animation speed.
From the Animation Start Time and Animation End Time toggles, you can set custom start and end points for the Lottie animation.
Then from the URL toggle, you can add a link to the Lottie and add click delay as well.
From the Animation Renderer section, you can select the Lottie animation render type. Here you’ll find two options –
- SVG – This will output the Lottie animation as an SVG element in the browser.
- Canvas – This will output the Lottie animation as a canvas element in the browser.
Select the option as per your requirements.
By enabling the Heading toggle, you can add a heading for the Lottie animation.
From the Description toggle, you can add a description for the Lottie animation.
Layout Options
From the Content Alignment section, you can align the Lottie animation in the container for different devices.
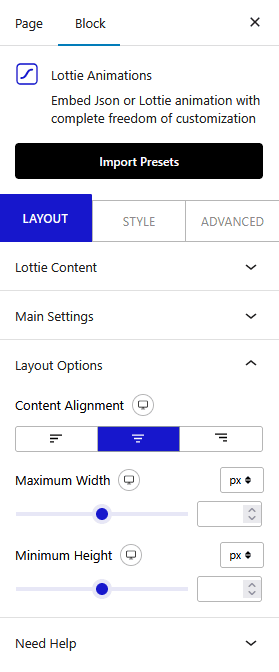
Then, from the Maximum Width section, you set a maximum width for the Lottie animation for responsive devices.
You can also set a minimum height for the Lottie animation for different devices from the Minimum Height section.
How to Style the LottieFiles Animation Block?
To style the LottieFiles Animation block, you’ll find all the options in the Style tab.
Heading Options – You’ll see this option when the Heading toggle is enabled from the Layout tab. From here you can style the heading.

Description Options – You’ll see this option when the Description toggle is enabled from the Layout tab. From here you can style the description.
Content Background – You’ll see this option when the Heading or the Description toggle is enabled from the Layout tab. From here you can style the background of the container.
Lottie Style – From here, you can add different CSS filters and opacity on the Lottie for normal and hover states. You can also set a transition duration in the normal tab for a smooth transition between normal and hover states CSS properties.
Advanced options remain common for all our blocks, you can explore all it options from here.

