This guide provides step-by-step instructions on how to install and activate the complete Nexter suite, including Nexter Blocks Pro, Nexter Extension Pro, and the Nexter Theme. You will learn how to install both free and pro versions of Nexter Blocks and Nexter Extension, activate their respective licenses, and set up the Nexter Theme.
Before we begin, we would like to thank you for joining the premium family of Nexter, we are excited to have you with us.
We wish to help you create amazing websites.
How to Install Nexter Blocks Pro?
To use the Nexter Blocks Pro you need to have both Nexter Blocks and Nexter Blocks Pro plugin installed and activated.
Nexter Blocks Free
To install the Nexter Blocks free version, follow the steps.
1. From the WordPress Dashboard, go to Plugins > Add New Plugin.
2. In the search field, search for “Nexter Blocks”, and you’ll find the Nexter Blocks plugin.
3. Click on Install Now and then Activate.

Nexter Blocks Pro
Once you have purchased Nexter Blocks Pro to install and activate, follow the steps.
1. Visit Posimyth Store and log in to your account. This is the same login details you used on the checkout page.
2. Click on the Dashboard link.
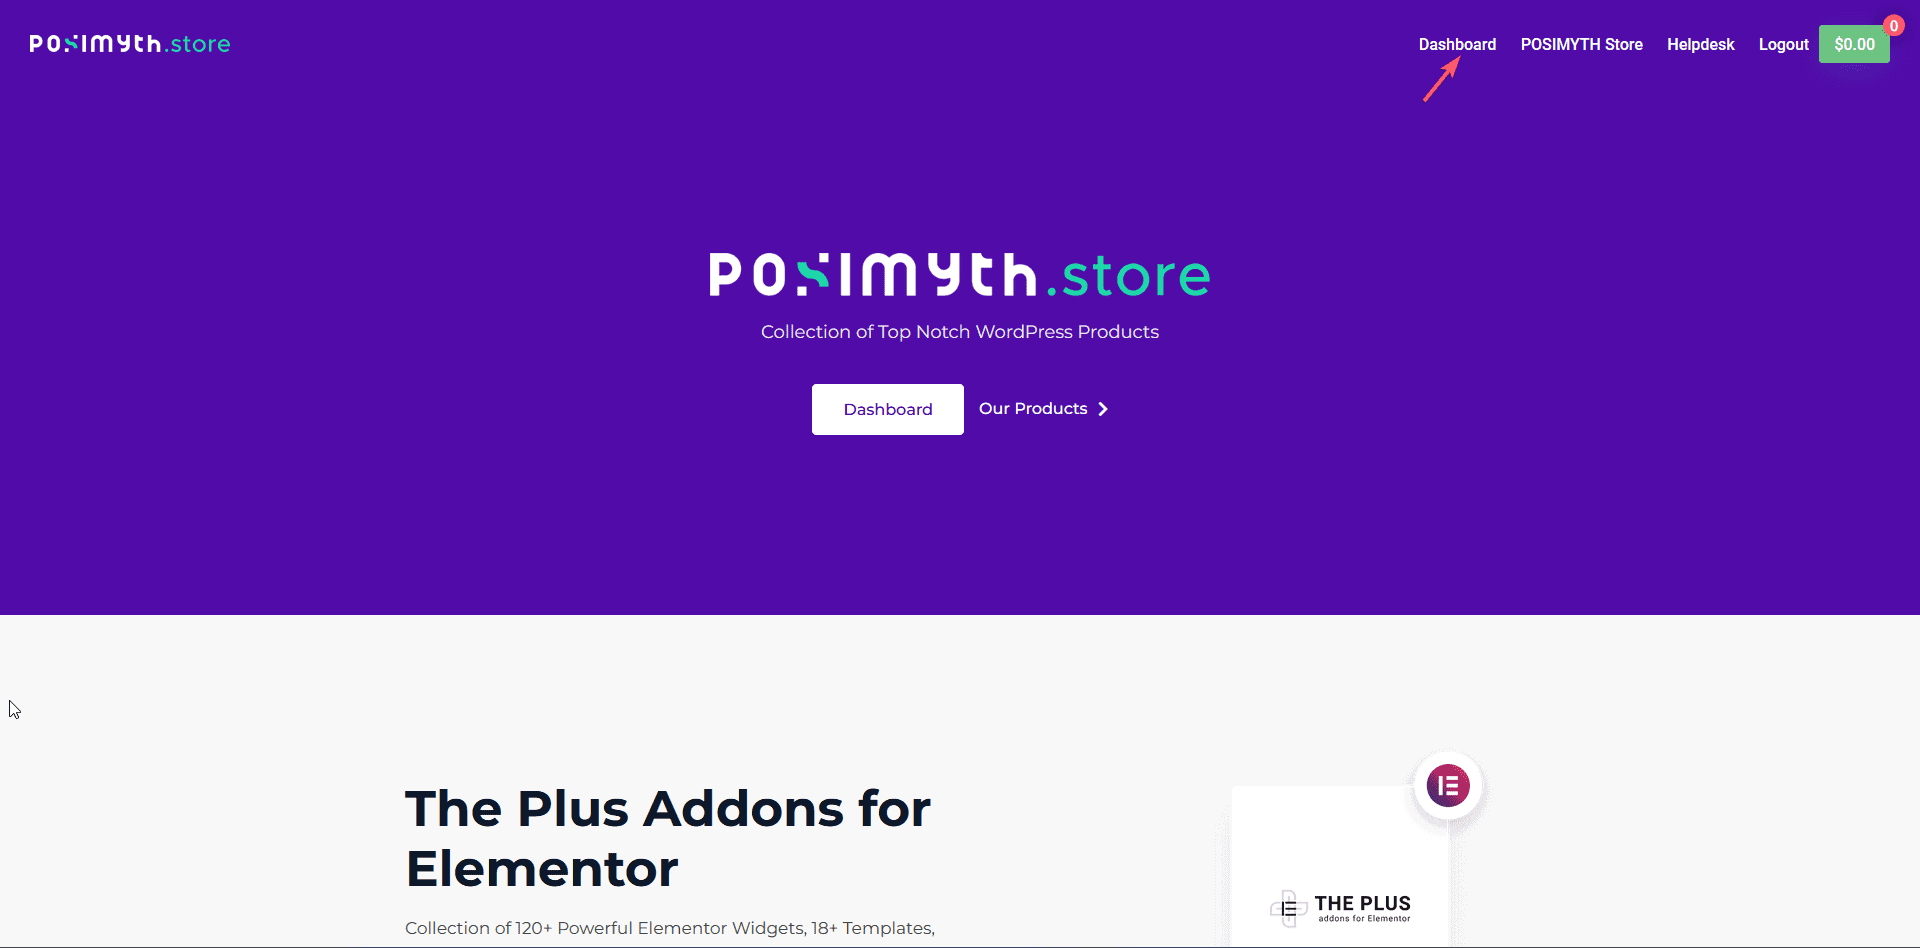
3. From the Dashboard, go to Download. You’ll see a list of plugins based on your purchase. Find Nexter Blocks and click on the Download button with the latest version. The plugin will be downloaded in your systems download folder.

Note: You can also download previous versions from here but we recommend using the latest version.
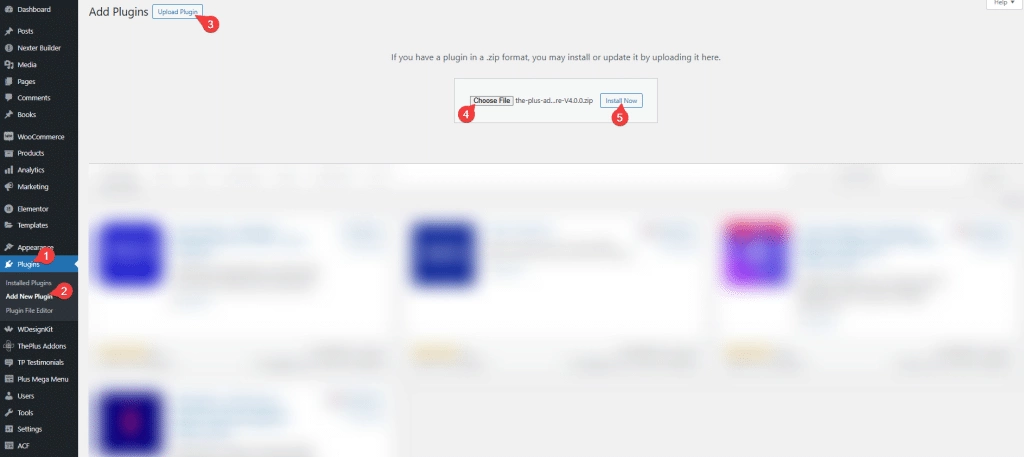
4. Now go to WordPress Dashboard from there, go to Plugins > Add New Plugin > Upload Plugin. Click Choose File and upload your plugin, then click Install Now.
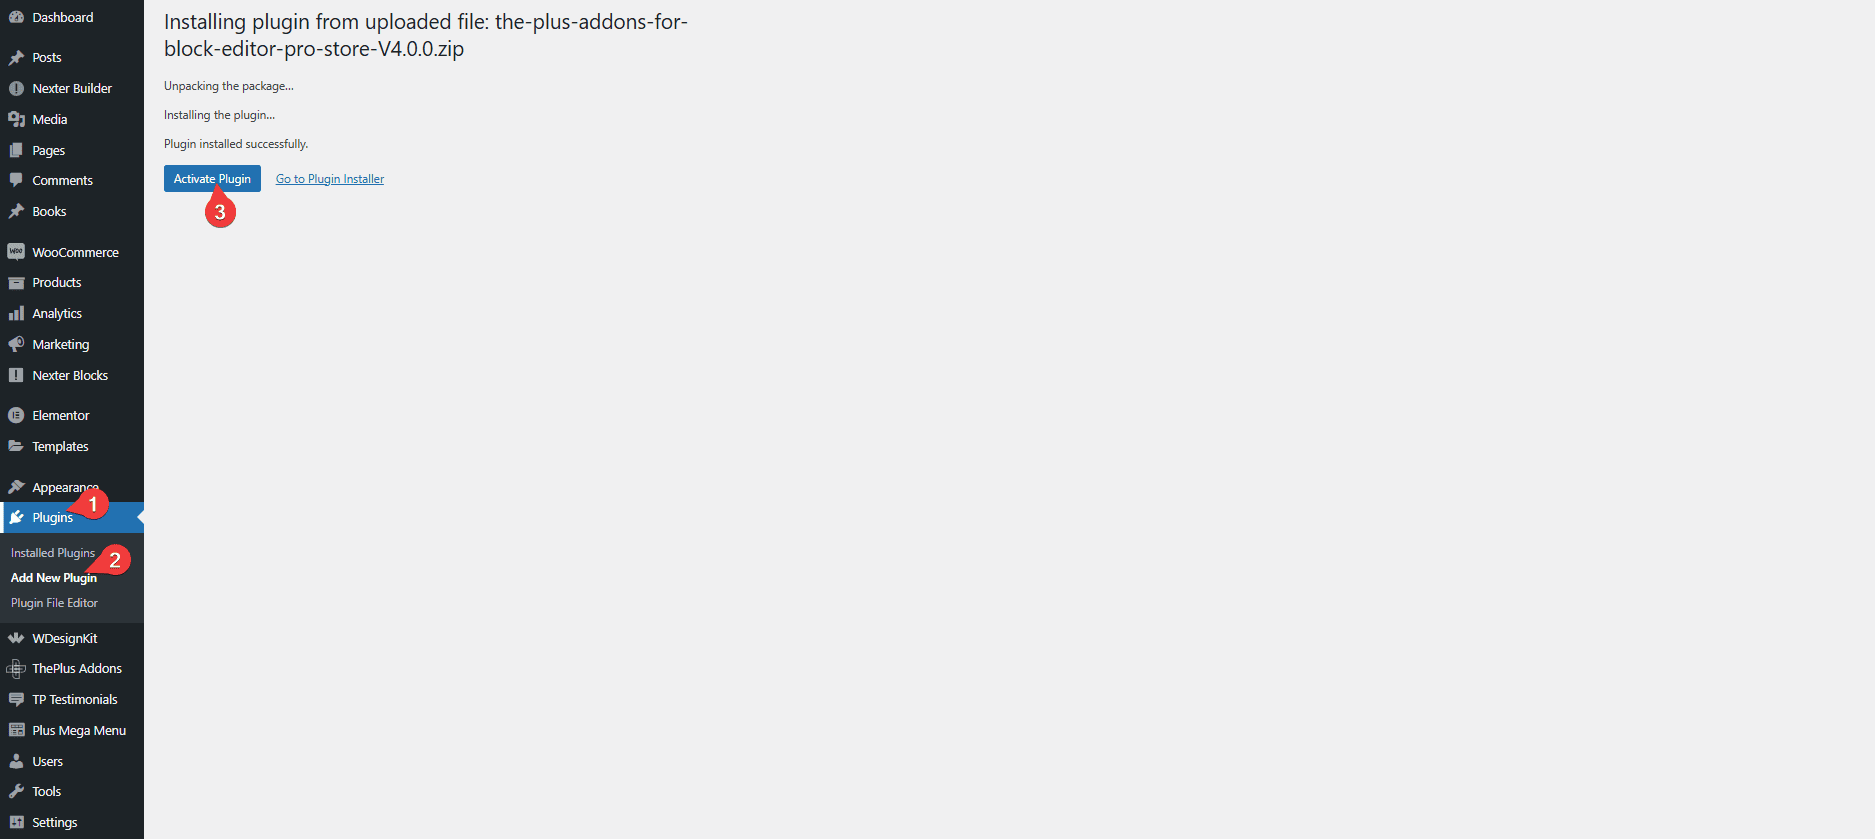
5. Once the plugin is installed, on the next page, click on Activate Plugin.
Note: Nexter Blocks has been rebranded from The Plus Blocks for Gutenberg.
How to Activate Nexter Blocks Pro Licence?
To activate the licence of the Nexter Blocks Pro after you have purchased it, follow the steps.
1. Visit Posimyth Store and log in to your account. This is the same login details you used on the checkout page.
2. Click on the Dashboard link.

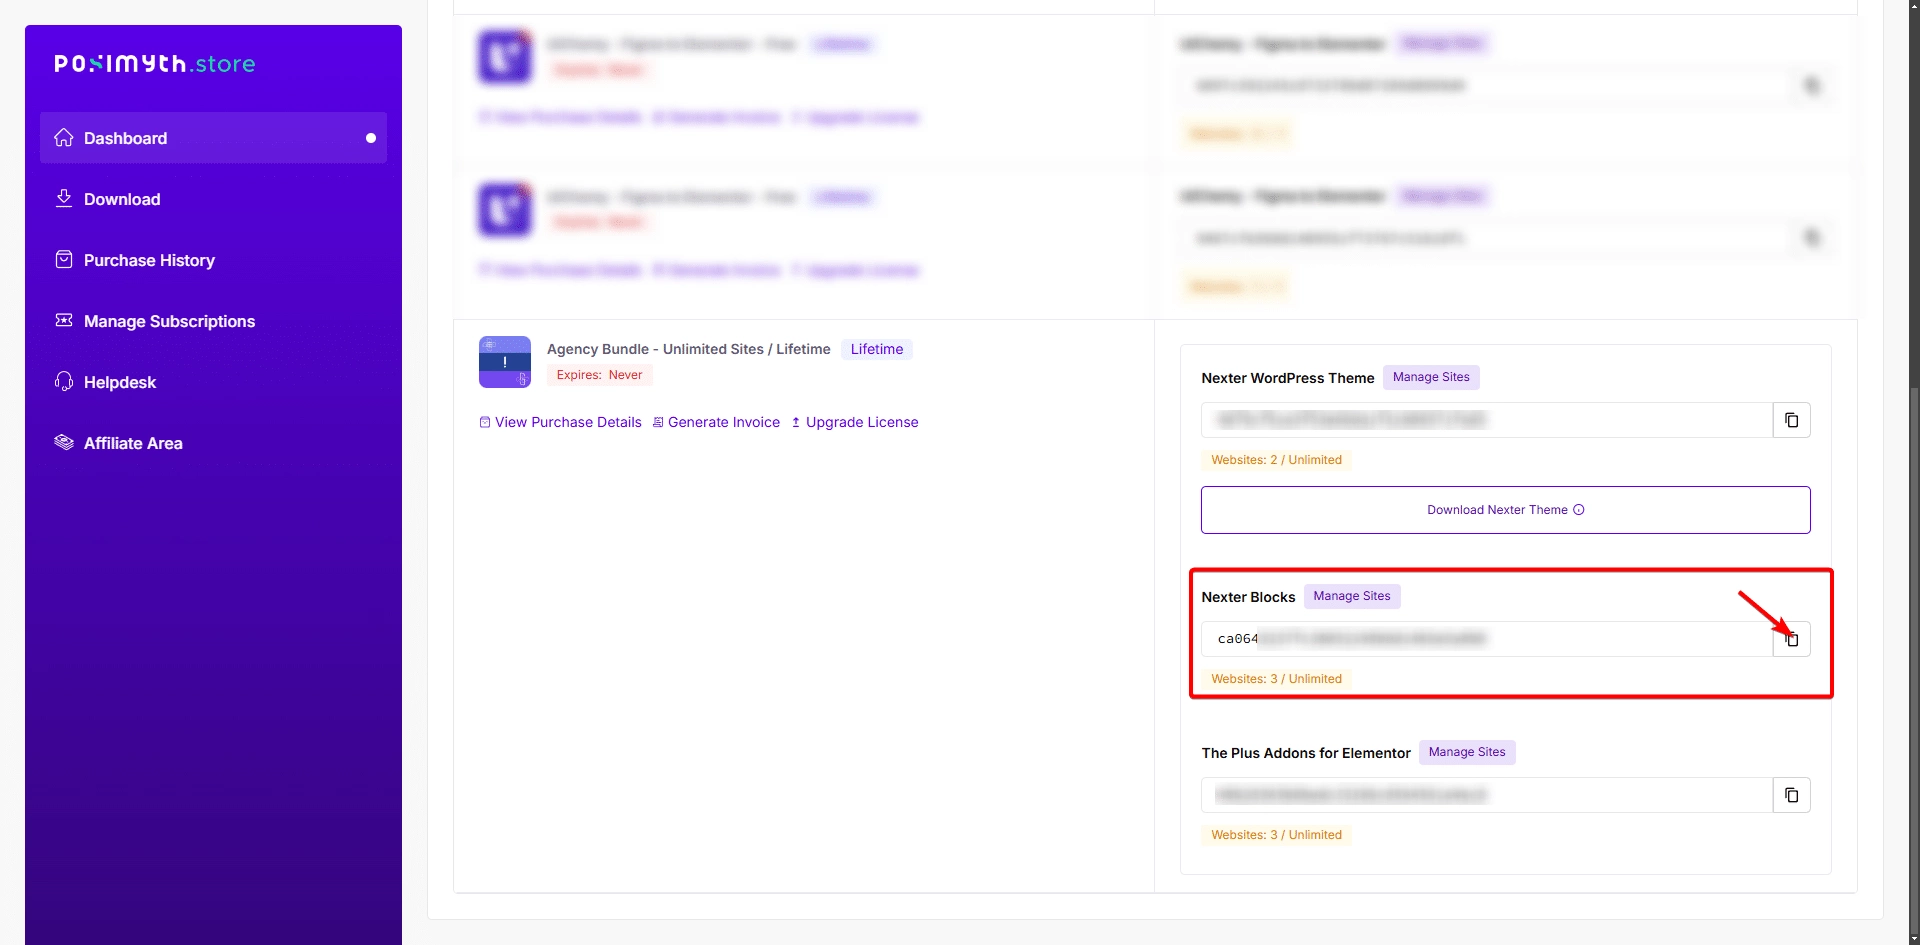
3. On your dashboard page, based on the purchase you made, you’ll see the items with their respective license key, find Nexter Blocks then click on the copy icon button and copy the key on your clipboard.
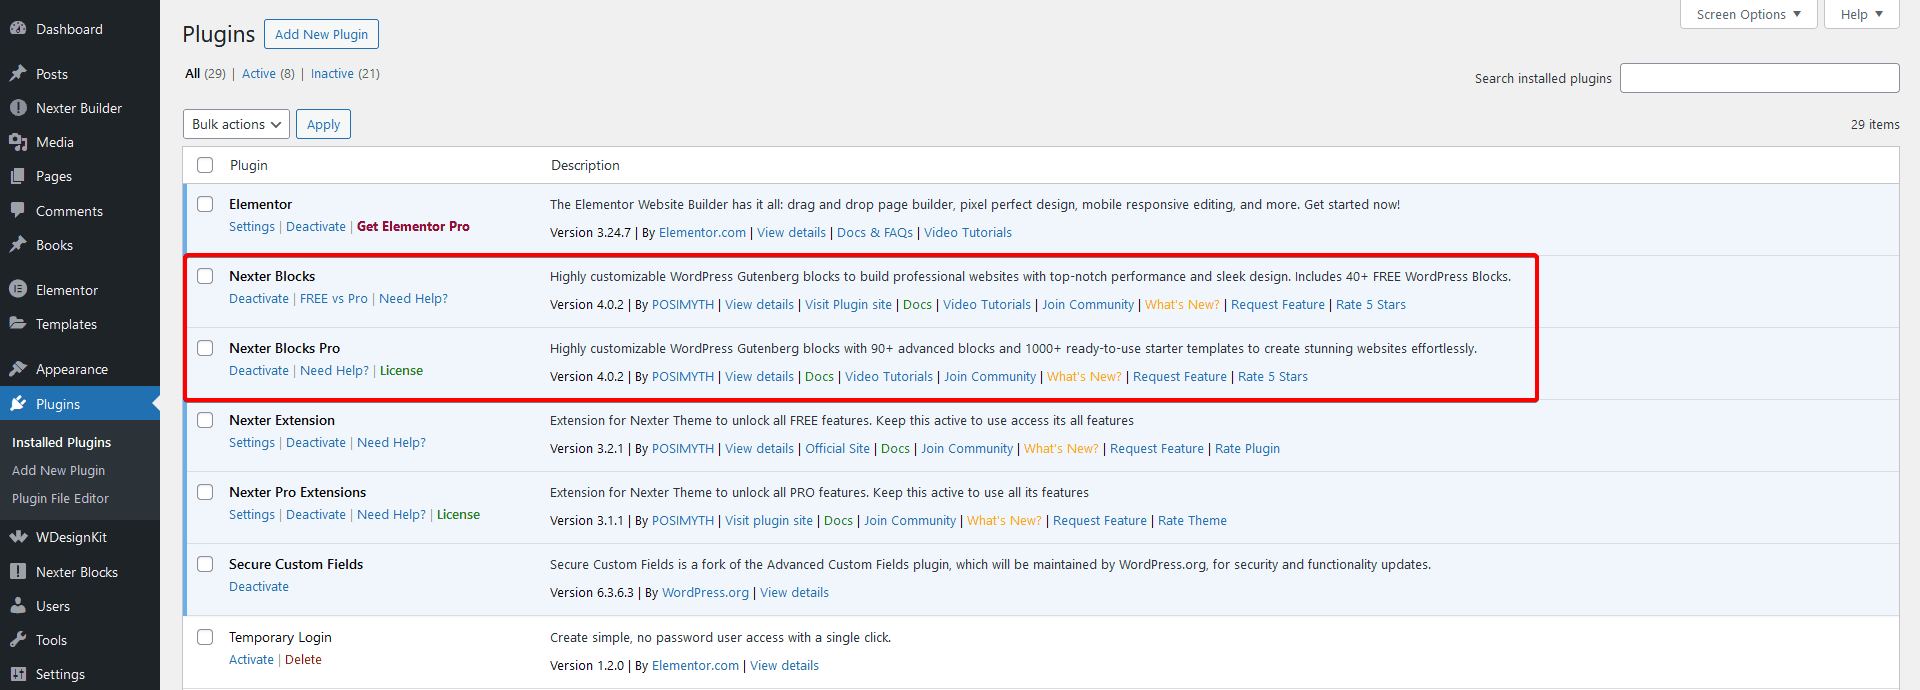
4. Now login to your WordPress website backend and visit Plugins > Installed Plugins and make sure you have both Nexter Blocks and Nexter Blocks Pro plugins installed and activated.
Note: Both the FREE and PRO versions of the plugin are required to access all the features.
5. Then go to Nexter > Activate PRO.
6. In the Enter your Activation Key field, paste your license key and click on Activate.
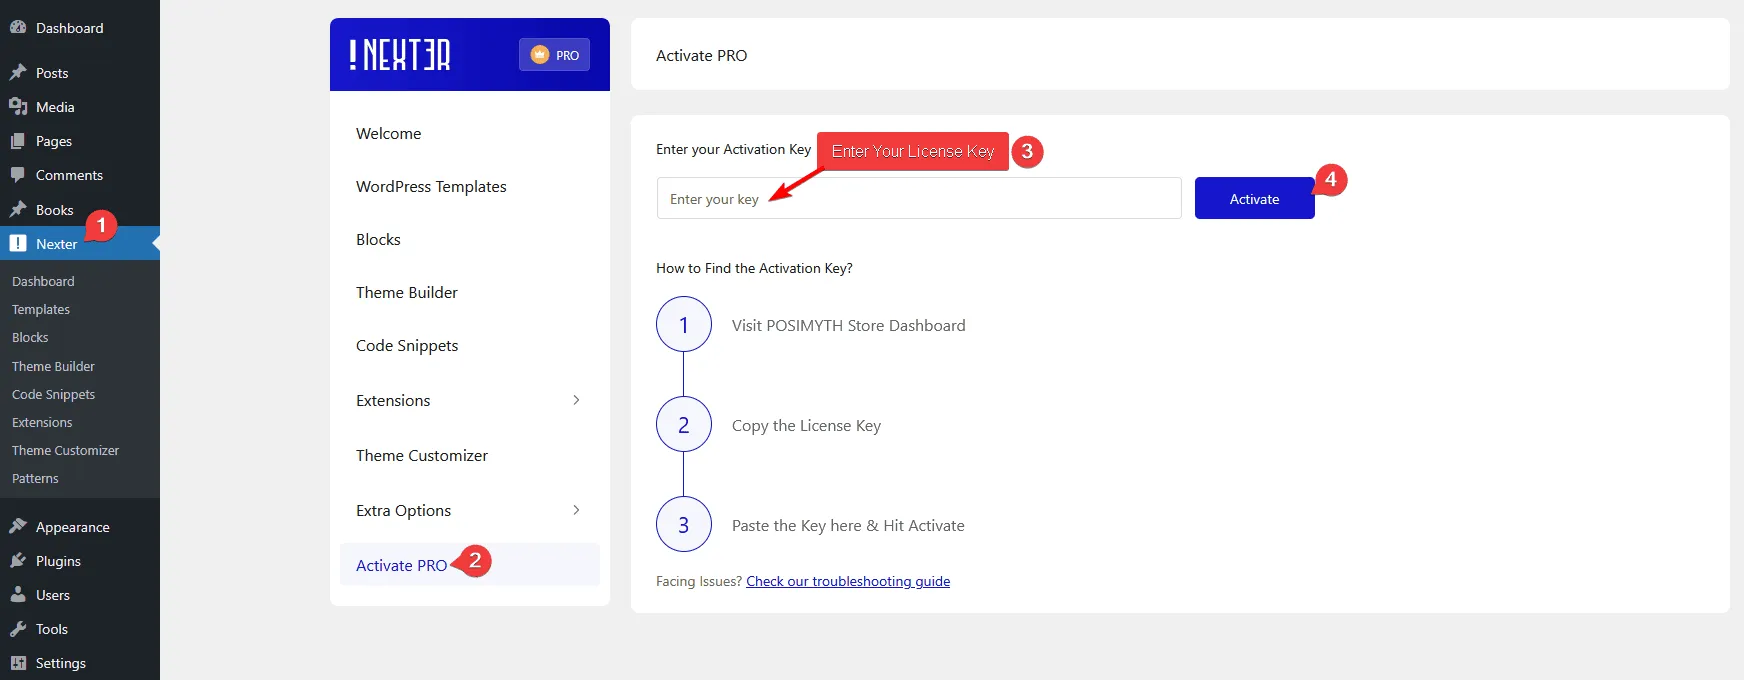
That’s it! Your licence is active now.
Congratulations on activating the Pro version of Nexter Blocks.
How to Install Nexter Extension Pro?
To use the Nexter Extension Pro you need to have both Nexter Extension and Nexter Extension Pro plugin installed and activated.
Nexter Extension Free
To install the Nexter Extension free version, follow the steps.
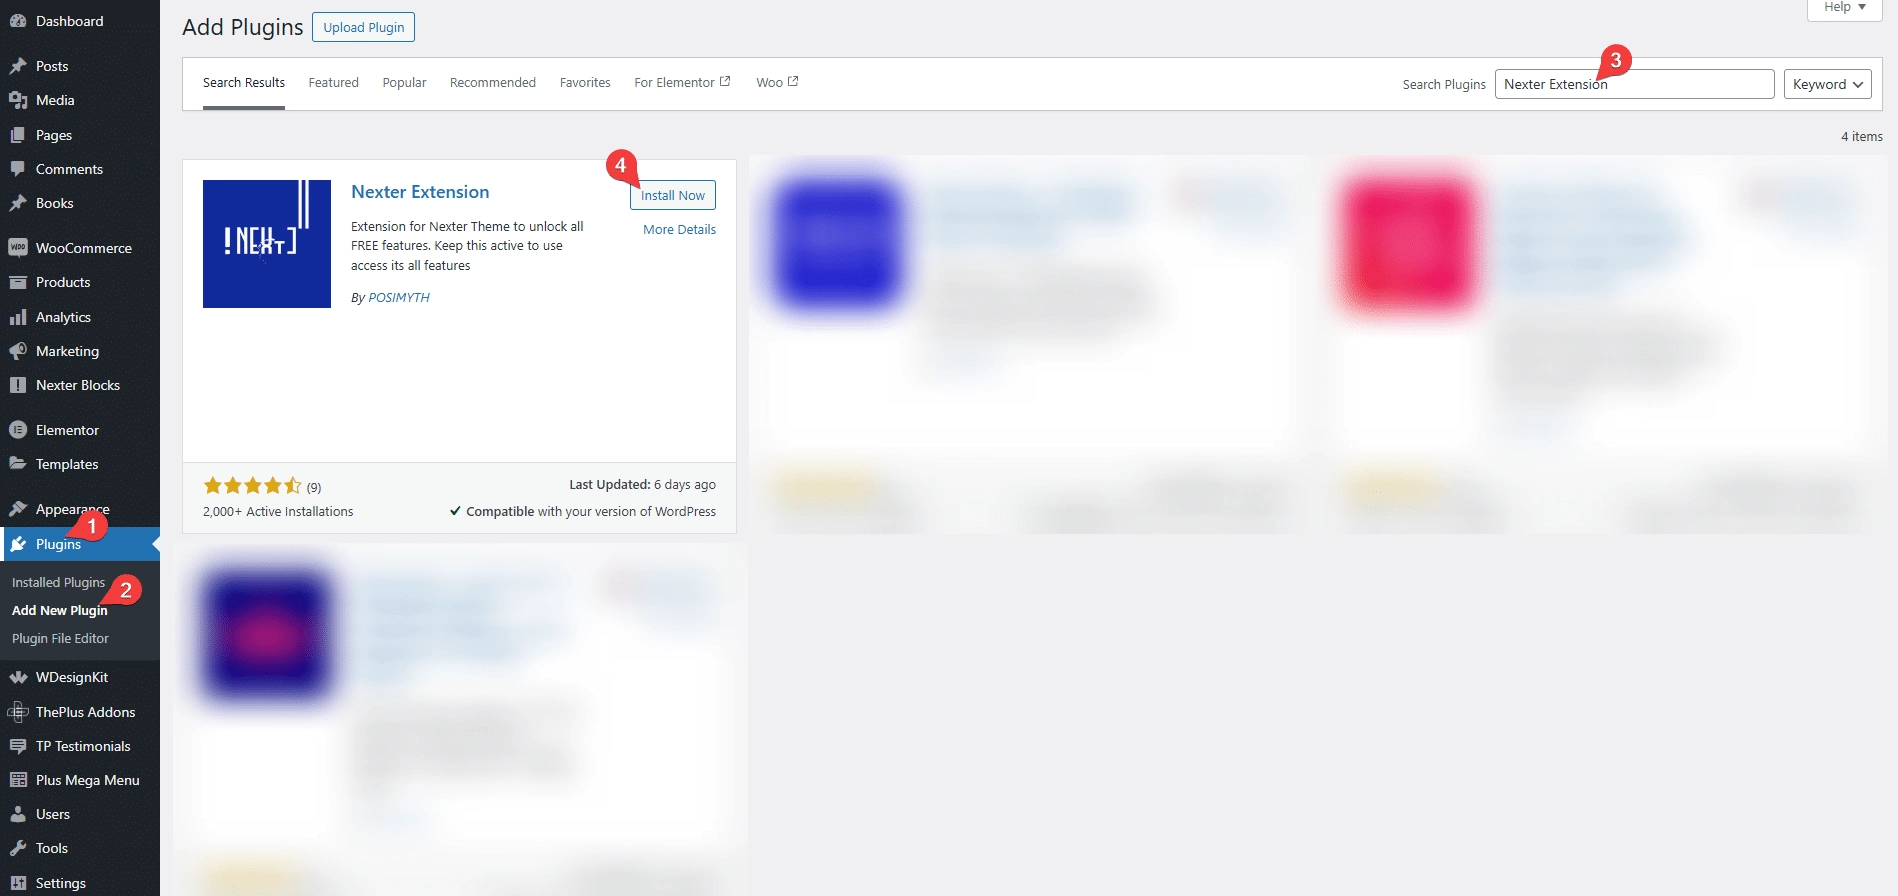
1. From the WordPress Dashboard, go to Plugins > Add New Plugins.
2. In the search field, search for “Nexter Extension”, you’ll find the Nexter Extension plugin.
3. Click on Install Now and then Activate.
Nexter Pro Extension
Once you have purchased Nexter Pro Extension to install and activate, follow the steps.
1. Visit Posimyth Store and log in to your account. This is the same login details you used on the checkout page.
2. Click on the Dashboard link.

3. From the Dashboard, go to Download. You’ll see a list of plugins based on your purchase. Find Nexter WordPress Theme and click on the Download button with the latest version. The plugin will be downloaded in your systems download folder.

Note: You can also download previous versions from here but we recommend using the latest version.
4. Now go to WordPress Dashboard from there, go to Plugins > Add New Plugin > Upload Plugin. Click Browse and upload your plugin, then click Install Now.
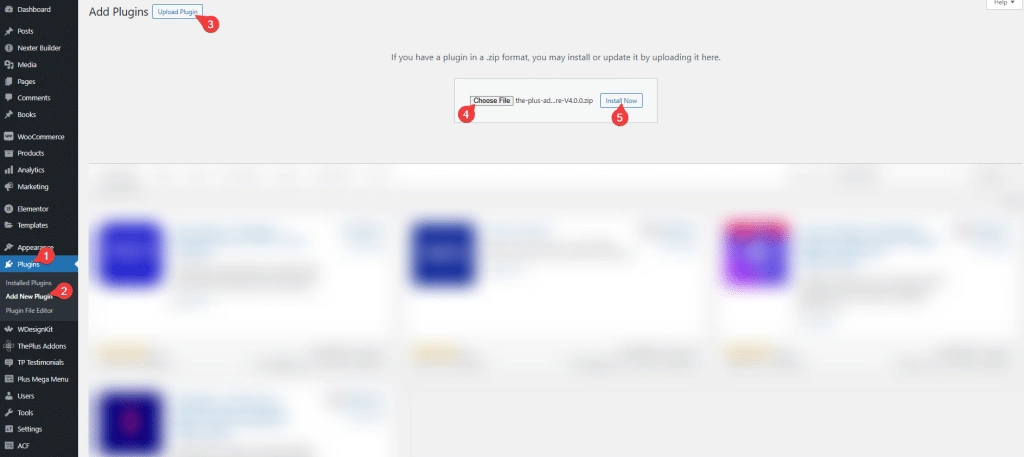
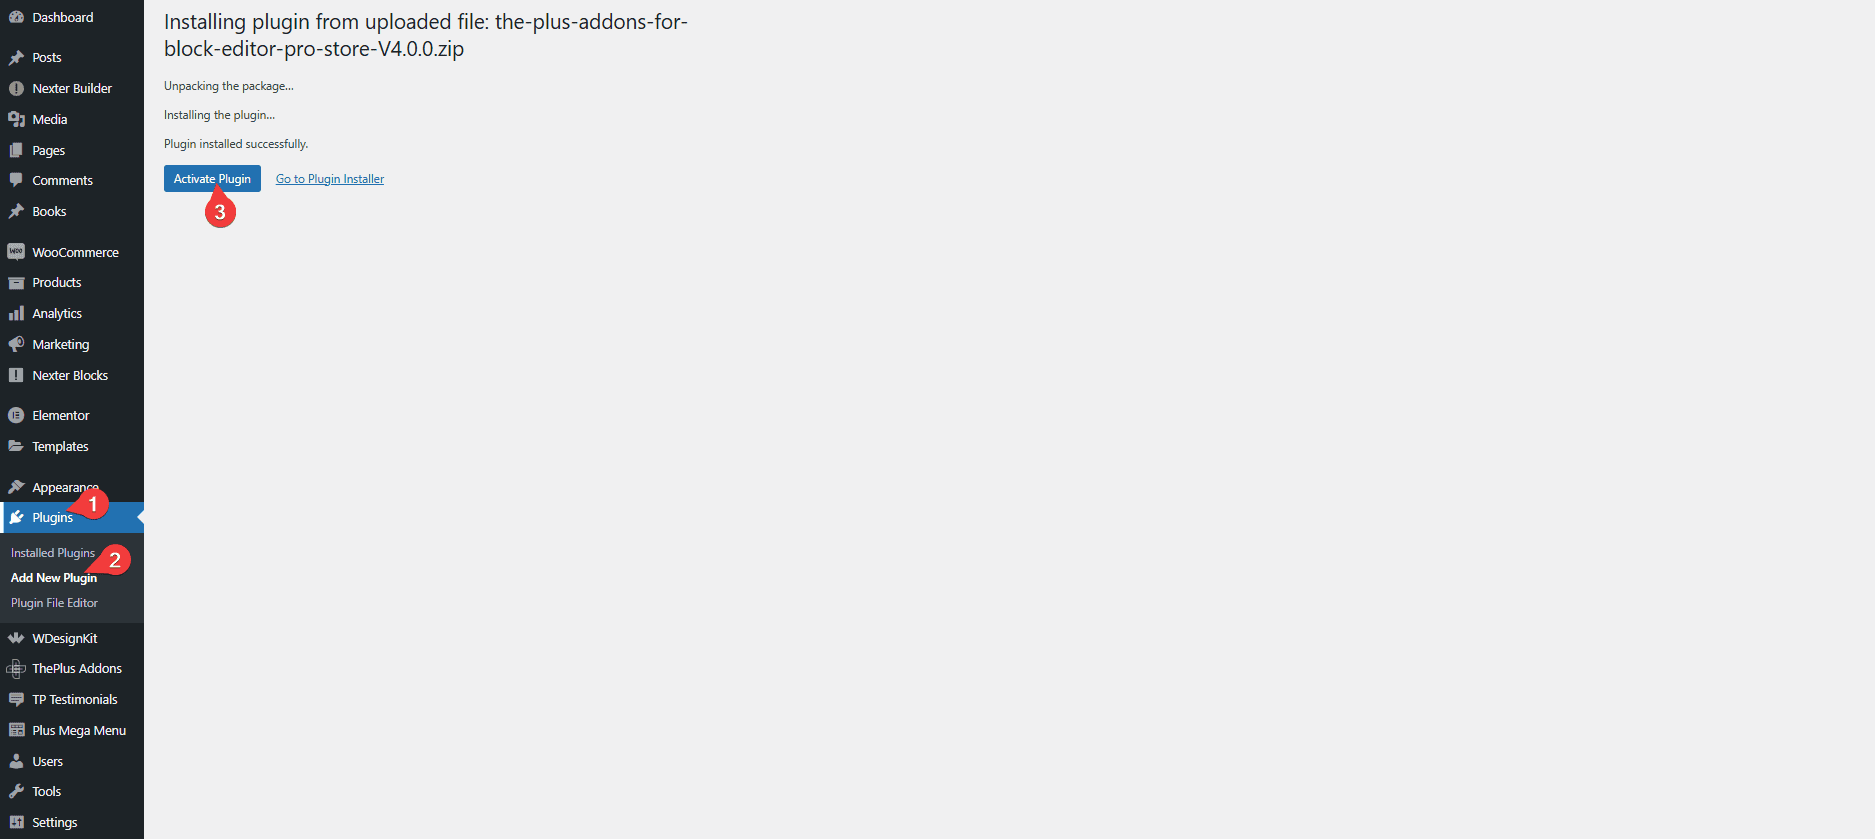
5. Once the plugin is installed, on the next page, click on Activate Plugin.
How to Activate Nexter Pro Extension Licence?
To activate the licence of the Nexter Pro Extension after you have purchased, follow the steps.
1. Visit Posimyth Store and log in to your account. This is the same login details you used on the checkout page.
2. Click on the Dashboard link.

3. On your dashboard page, based on the purchase you made, you’ll see the items with their respective license key, find Nexter WordPress Theme and click on the copy icon button and copy the key on your clipboard.

4. Now login to your WordPress website backend and visit Plugins > Installed Plugins and make sure you have both Nexter Extension and Nexter Pro Extension plugins installed and activated.
Note: Both the FREE and PRO versions of the plugin are required to access all the features.
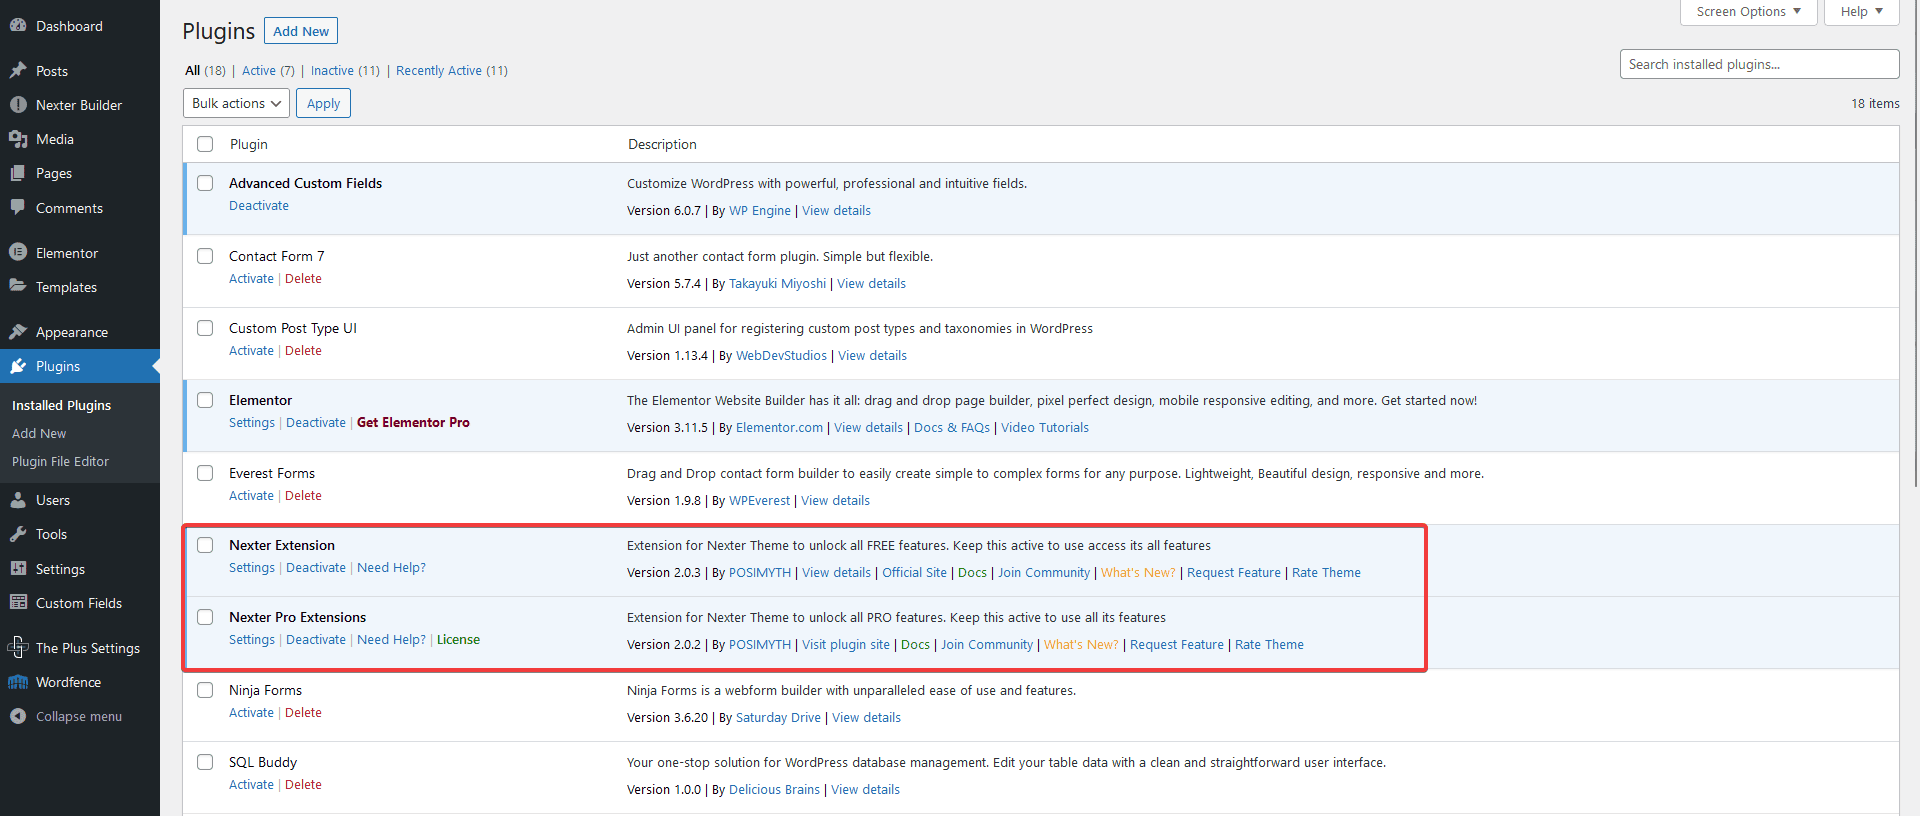
5. Then go to Nexter > Activate PRO.
6. Go to the Activate tab, in the Enter your key field, paste your licence key and click on Activate.

That’s it! Your licence is active now.
Congratulations on activating the PRO version of the Nexter Extension.
How to Install and Activate Nexter Theme?
To install the Nexter theme, follow the steps.
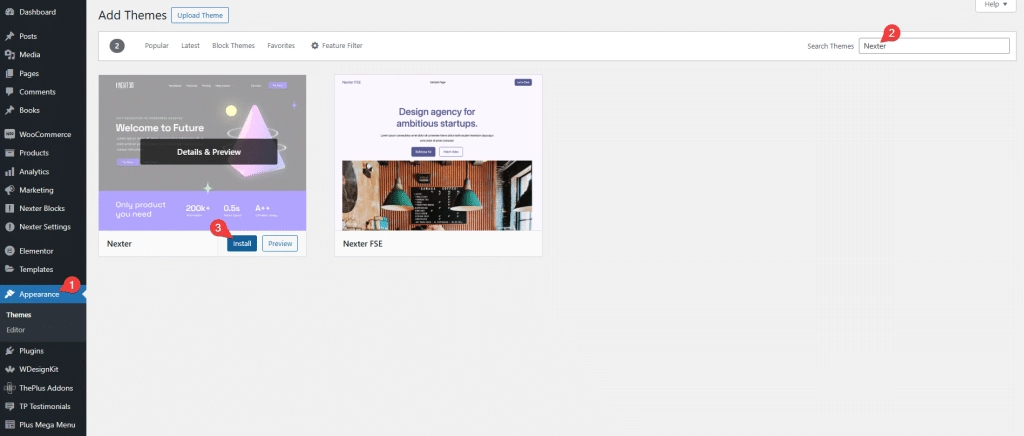
1. From the WordPress Dashboard, go to Appearance > Themes and click on Add New Theme.
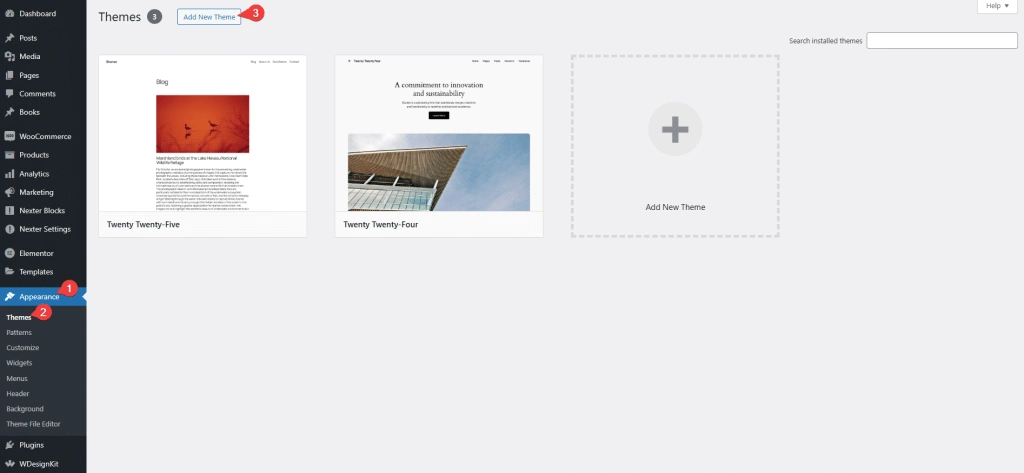
2. On the next page, search for “Nexter” In the search field, you’ll find the Nexter theme.
3. Hover over the item and click on Install and then Activate.
Common Licence Activation Issues
Some of the common issues users face while activating the Nexter Pro Extension licence.
Expired Licence
In some cases, if you’re not receiving updates and cannot activate Nexter Pro Extension, then your license might have expired.
To check this, visit the Store.
Go To Dashboard, and under the Manage Subscriptions, check if you see this.
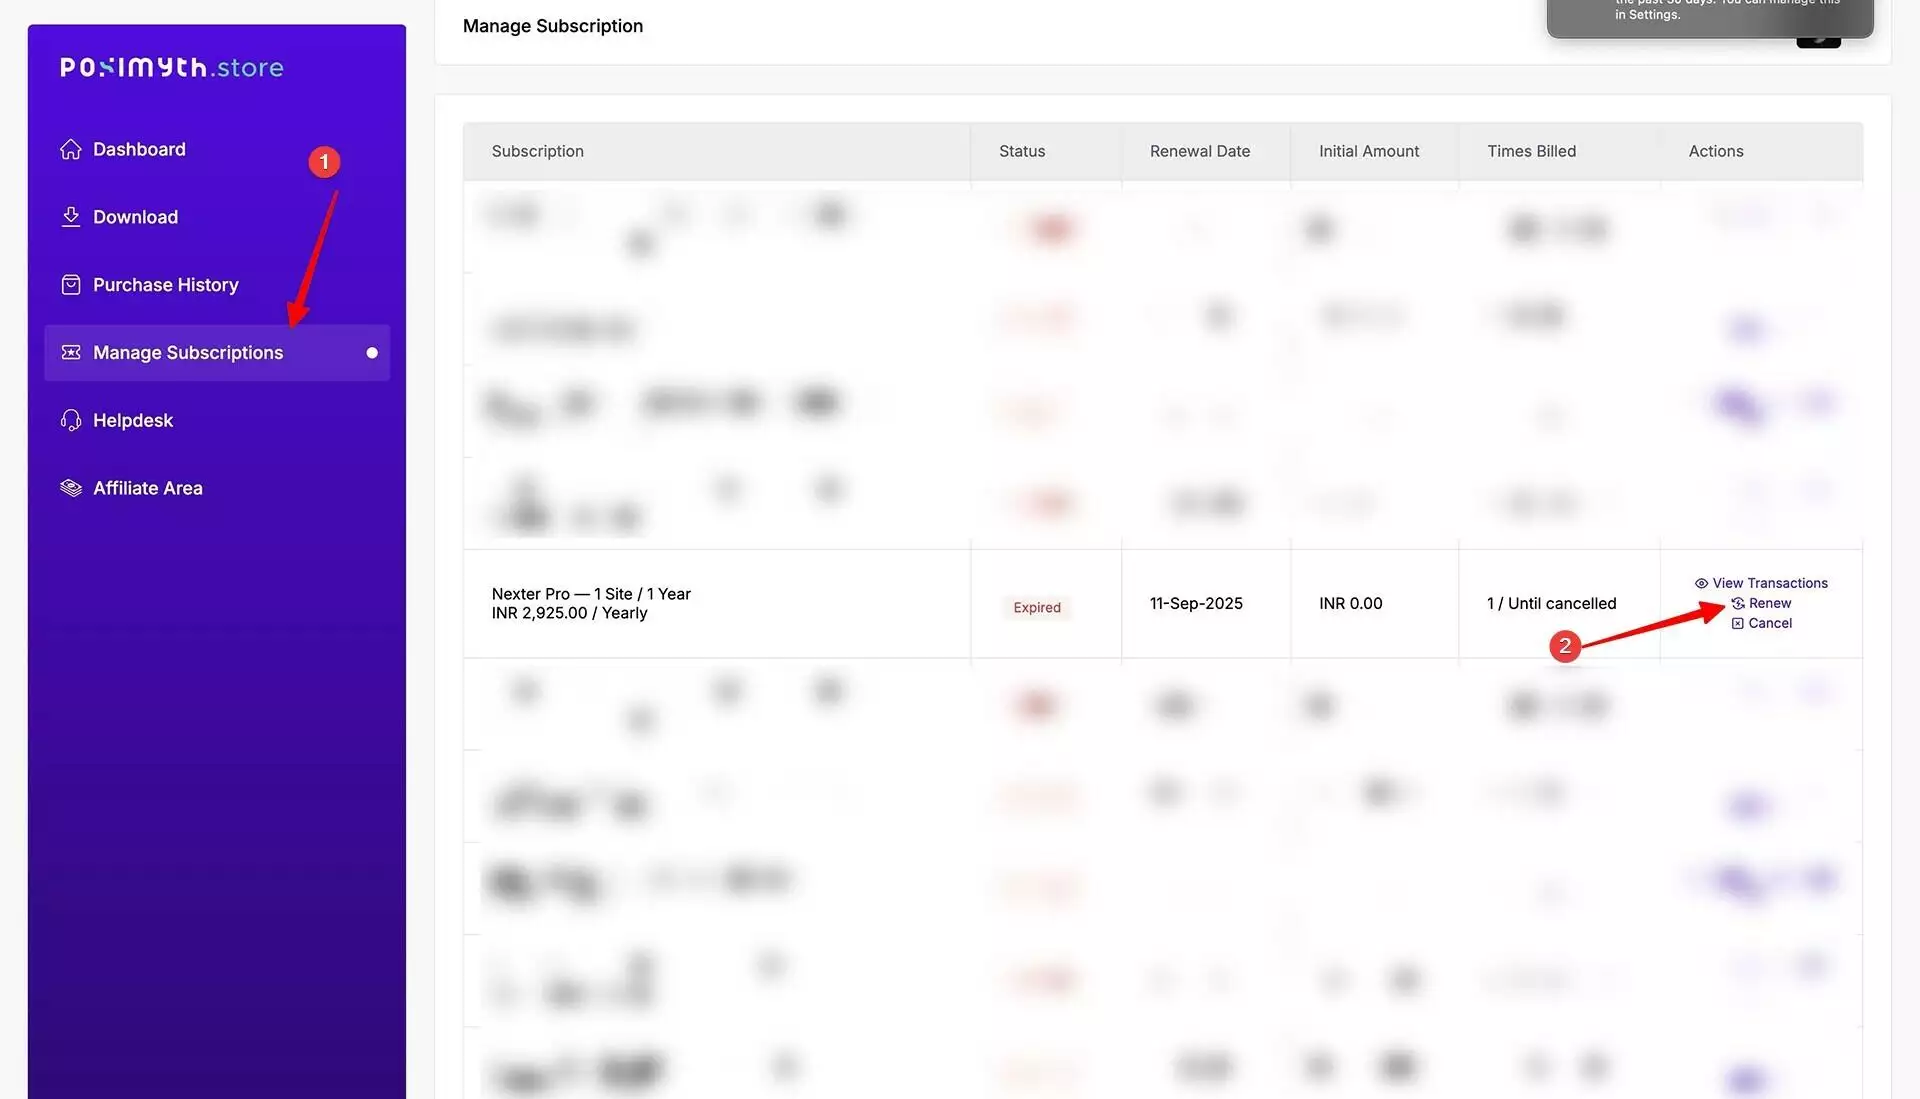
Learn How to Renew your license from here.
Make sure Site and Home URL are Same
Make sure your website WordPress Address (URL) and the Site Address (URL) are the same.
To check from the WordPress backend, go to Settings > General.
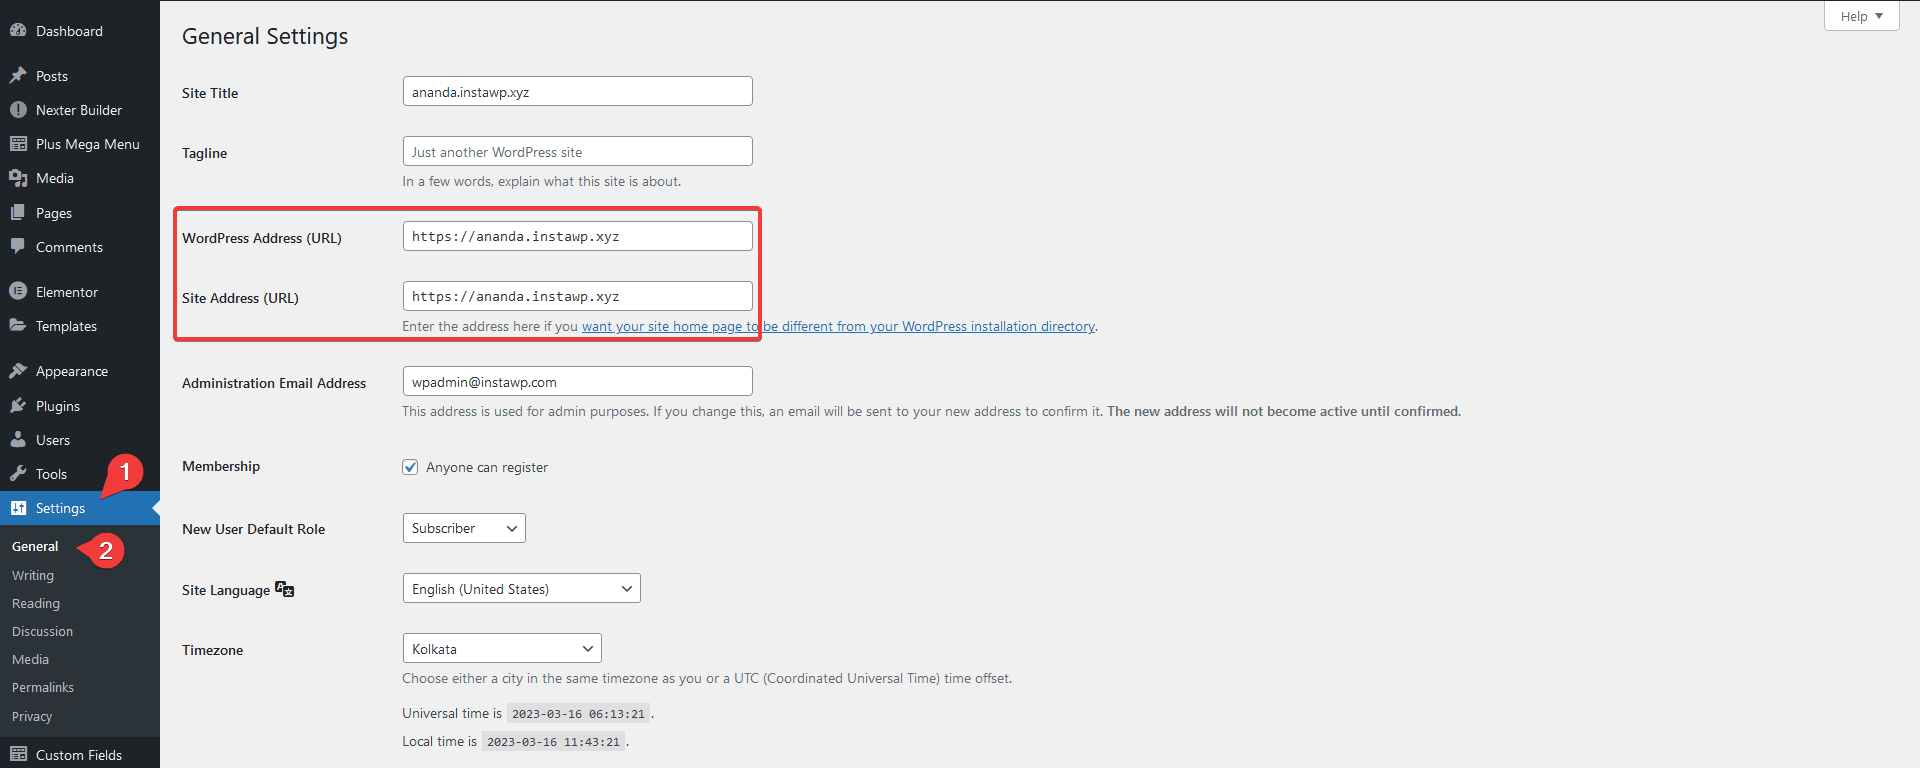
For example, if you installed and activated the plugin licence on a staging site and then you moved it to the production site, the homepage URL and Site URL could be different and this can cause the licence activation issue.
Security Firewall Blocking
There might be chances that your advanced Security firewall from a plugin or hosting is blocking access to our servers to verify the key. Please disable your Security firewall and try again.
You can use the licence on local-host and staging sites unlimited times, regardless of the limited website plan. Staging sites will be considered only if they:
- localhost
- 10.0.0.0/8
- 172.16.0.0/12
- 192.168.0.0/16
- yourdomain.dev
- yourdomain.local
- dev.yourdomain.TLDs
- staging.yourdomain.TLDs


