


Do you want to send an email confirmation to the user from a WordPress form? With the Form block from Nexter Blocks, you can easily send an email confirmation to users when they submit the WordPress form.
To check the complete feature overview documentation of the Nexter Blocks Form block, click here.
Requirement – This block is a part of the Nexter Blocks, make sure it’s installed & activated to enjoy all its powers.
Learn via Video Tutorial

To do this, add the Form block to the page and select the appropriate form type, then follow the steps –
1. Add the required form fields and customize them as per your requirements.
2. Then select the main form block and go to the Action After Submit tab and select Auto Respond Email from the Options dropdown.
3. Now you’ll see the Auto Respond Email tab, open it.
4. In the To tab, you can use this shortcode [nxt_user_email] in the To field to send an email notification to the user. If you keep it blank, then the website admin will get the email.
From the Email Heading field, you can change the email heading.
You can change the email subject from the Subject field.
In the Reply-To field, you can use this shortcode [nxt_user_email] to reply to the user’s email who has filled the form, or you can add a custom email for the email reply receiver.
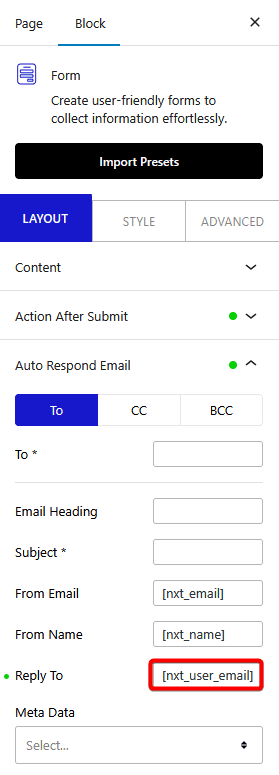
From the Meta Data dropdown, you can add additional information about the user in the email. Here you’ll find the following options –
- Date – To get the email sent date.
- Time – To get the email sent time.
- Page URL – To get the page link from where the email was sent.
- User Agent – To get the user’s browser name.
- Remote IP – To get the user’s IP address.
In the Validation Error Occurred field, you can add a custom message to show the user if the backend validation fails.
Then, in the Sender’s Message Send To Failed field, you can add a message if the email is not sent.
Similarly, you can send cc and bcc emails from the CC and BCC tabs.
Now the user will get an email notification to the email they have submitted in the form.
Note: You should set up SMTP (Simple Mail Transfer Protocol) to send emails properly. You can use the free SMTP feature of Nexter Extension.