


If you are using custom post types in WordPress, you may want to display them in a unique and visually appealing way on your website. One effective way to achieve this is by creating a custom loop skin. With a custom loop skin, you can customise the layout and design of your custom post types and make them stand out from other content on your site.
You can use the Post Listing block from the Nexter Blocks to easily create a custom loop skin that meets your needs and preferences.
To check the complete feature overview documentation of the Nexter Blocks Post Listing block, click here.
Requirement – This block is a part of the Nexter Blocks, make sure its installed & activated to enjoy all its powers.
To add a custom loop skin for a custom post type, you first need to have a custom post type with a corresponding taxonomy and a few posts assigned to it.
You can use any CPT plugins, such as Advanced Custom Fields (ACF), Custom Post Type UI, Pods, Custom post types etc. to create your custom post type and taxonomy.
To create a custom loop skin for a custom post type you have two options (if using pro) in the Post Listing block –
Pattern – With this option, you have to create a single item of the loop in a Pattern.
Custom Skin – With this option, you can inline edit and build the single item of the loop in the Post Listing block. Learn more.
Here we’ll look into the Pattern option.
To use Patterns, from the Dashboard, go to Nexter Blocks > Patterns and click on Add New Pattern.
On the next page, add a name to the block, then you can use different blocks to create the structure. But with the Nexter Blocks (Pro) you can use different single post related blocks and use its dynamic field option to create dynamic loop skin.

For instance, we have a custom post type called Books and taxonomy Book Authors with a custom field called Rating.
Note: To create custom fields, you can use free plugins like Advanced Custom Fields (ACF).
Now we want to show featured image then post title and then rating in our custom post type list item.
To create this layout, you can use the Nexter Blocks Post Image and Post Title blocks.
Then for the custom field, you can use the Paragraph block, click on the dynamic field icon and select the custom field from the list. From the Advance Settings toggle, you can add prefix, postfix and fallback text as well.
Use your creativity to create unique designs and once the layout is created publish the Pattern.
Once you have your custom loop skin ready, add the Post Listing block on the page or template.
Then select the appropriate listing type and select your custom post type from the Select Post Type section.
From the Select Style section, choose Custom, then select Pattern from the Content Type dropdown and from the Pattern dropdown, select your custom loop Pattern.
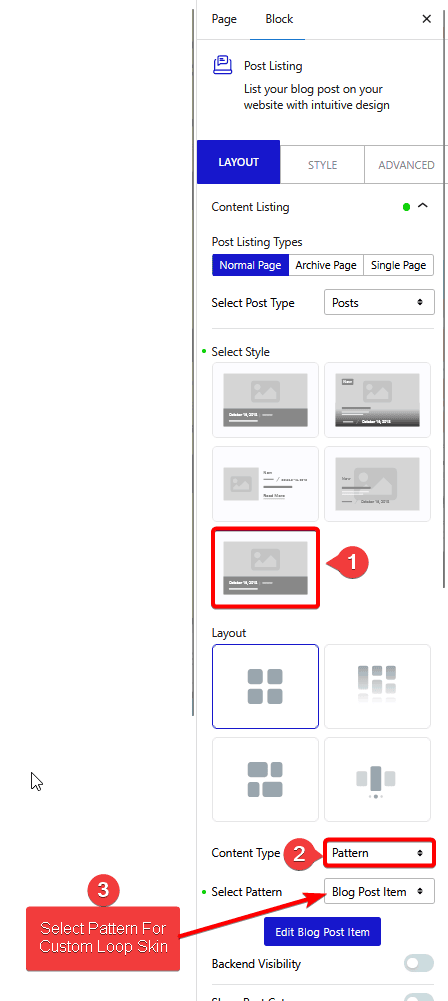
Once you choose a Pattern you will see a Backend Visibility toggle option, to keep the editing experience smooth by default the blocks won’t be visible on the page, turn on the toggle to see the block once done you can turn it off.
Now your custom post type listing items will have your custom design.
Also, check How to Create Custom Loop Skin for Blog Post in WordPress.