












You land on an article, glance at the scroll bar, and decide in about a second whether you have time for it right now. That tiny judgment call happens before anyone reads a word, and a reading time estimate is how you answer it for your visitors up front.
Estimated reading time shows how many minutes a post takes to finish. It sets expectations, which is why it tends to keep people on the page longer and lowers the odds they bounce out of a long article before they have given it a chance.
This guide covers the three practical ways to add reading time in WordPress, a plugin, a few lines of code, or a Gutenberg block, and which one fits your setup. You will also see how to style it, the common problems that trip people up, and how to make it actually useful instead of decorative.
What Is Estimated Reading Time and Why It Matters in WordPress
Estimated reading time is the number of minutes it takes an average person to read a post from start to finish. It is worked out from a fixed reading speed, usually somewhere between 200 and 275 words per minute, divided into the post word count.
The number itself is an estimate, not a stopwatch. Its job is to give a reader a quick decision point: a clear two minute read invites a casual click, while an honest twelve minute read tells someone to bookmark it for their commute instead of abandoning it halfway. Either way, you have respected their time and set the expectation correctly.
Benefits of Showing Reading Time on Your WordPress Blog
Reading time is a small UI element that quietly does a few useful things at once:
- Sets expectations. Visitors see the time commitment before they start, so they begin a post knowing what they are in for.
- Supports engagement. A short, visible commitment nudges hesitant readers to start scrolling instead of leaving.
- Reduces bounce on long posts. Uncertainty pushes people away. A clear estimate removes the guesswork that makes someone close the tab.
- Fits every post type. Tutorials, case studies, and long-form guides all benefit, and the estimate scales automatically with the length of each post.
Also Read: Gutenberg and Core Web Vitals because a reading time feature is only worth adding if it does not slow your pages down.
How to Add Estimated Reading Time in WordPress (3 Methods)
You do not need to be a developer to add reading time. There are three routes, and the right one depends on whether you would rather install a plugin, edit a little code, or build it into your post template with a block.
Method 1: Use a Reading Time Plugin (Best for Beginners)
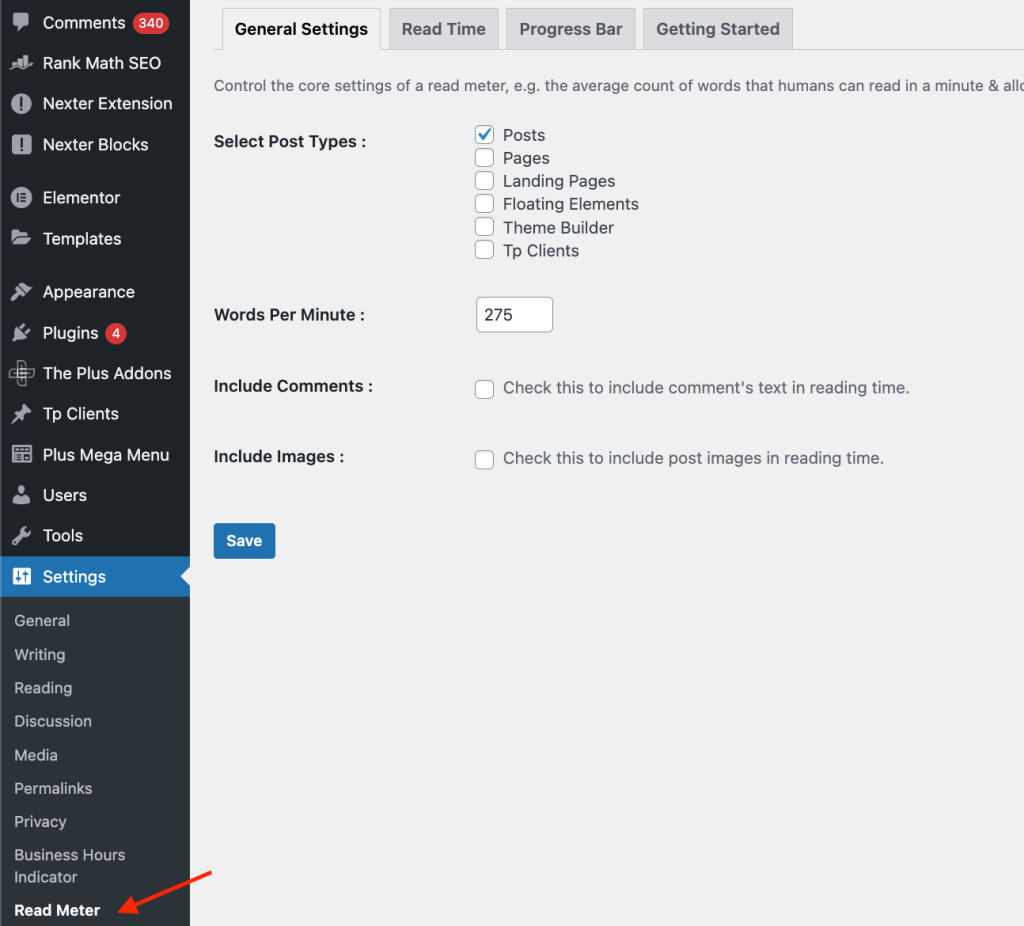
The fastest route is a dedicated plugin. Read Meter is a solid, widely used option with 10,000+ active installs that displays estimated reading time and an optional reading progress bar. Install it from Plugins > Add New, search for Read Meter, then activate it.
Once it is active, open Settings > Read Meter. In the General Settings tab you choose which post types it applies to, such as posts or pages, and set your words-per-minute rate. You can also include comments or images in the calculation if those usually take readers extra time.
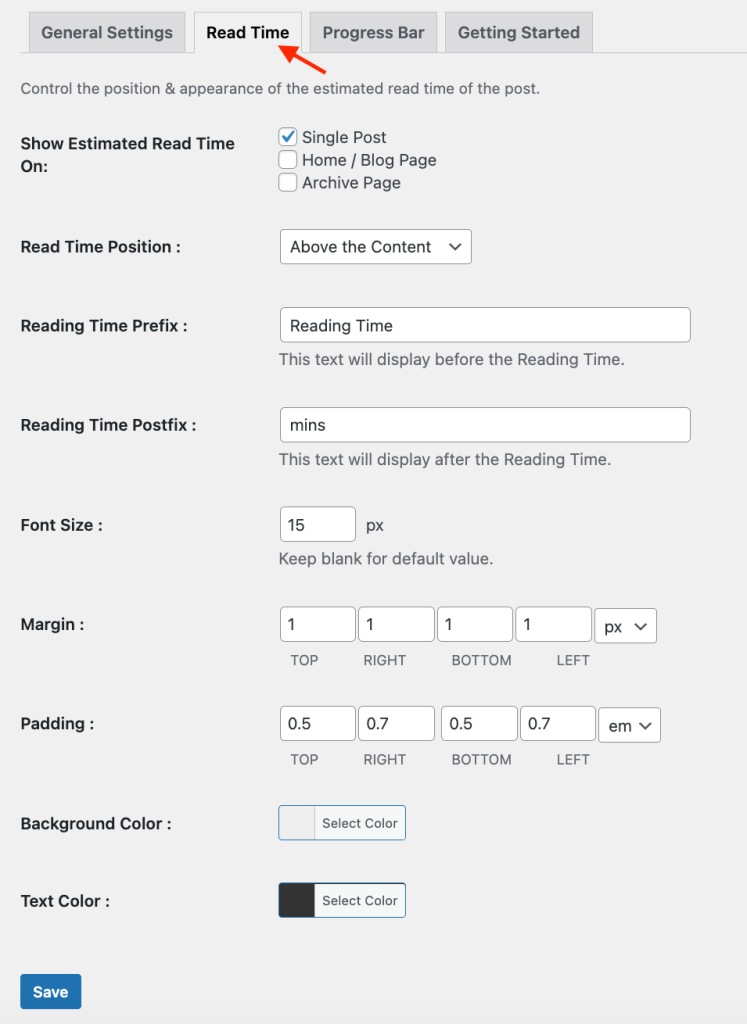
In the Read Time tab you decide where the estimate appears, above or below the content, and add prefix or suffix text such as Reading Time and mins. You can also adjust font size, spacing, and colors so it matches your theme.
Method 2: Add Reading Time with Code (No Plugin)
If you would rather not add another plugin, a short function in your theme does the same job. Add this to your child theme functions.php file (or use a code snippets plugin so a theme update does not wipe it):
function show_reading_time( $content ) {
    $word_count = str_word_count( strip_tags( $content ) );
    $minutes = ceil( $word_count / 200 );
    $label = '<p class="reading-time">' . $minutes . ' min read</p>';
    return $label . $content;
}
add_filter( 'the_content', 'show_reading_time' );
This counts the words in the post, divides by an average speed of 200 words per minute, rounds up, and prints a line like 3 min read above the content. It gives you full control, and you can style the output with the .reading-time class shown later in this guide.
Method 3: Use a Gutenberg Block (No Code, Cleanest for Builders)
If you build your post templates in the block editor, a block is the tidiest option because reading time lives right alongside your other post meta. The Post Meta Info block in Nexter Blocks handles this without any code.
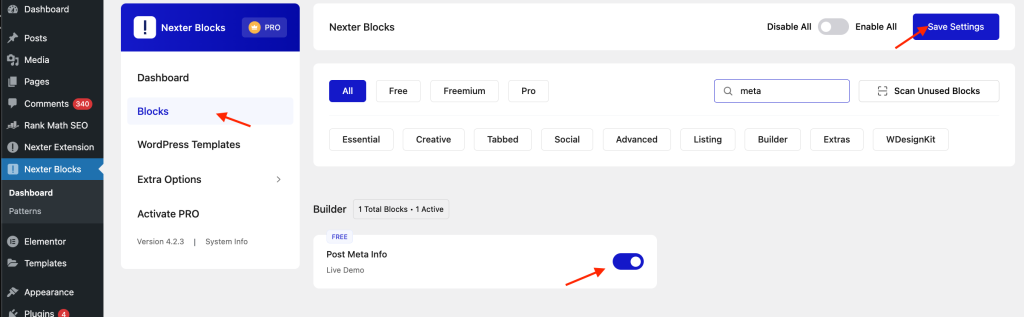
Install Nexter Blocks from Plugins > Add New, then go to Nexter Blocks > Blocks, find Post Meta Info under the Builder section, toggle it on, and save.
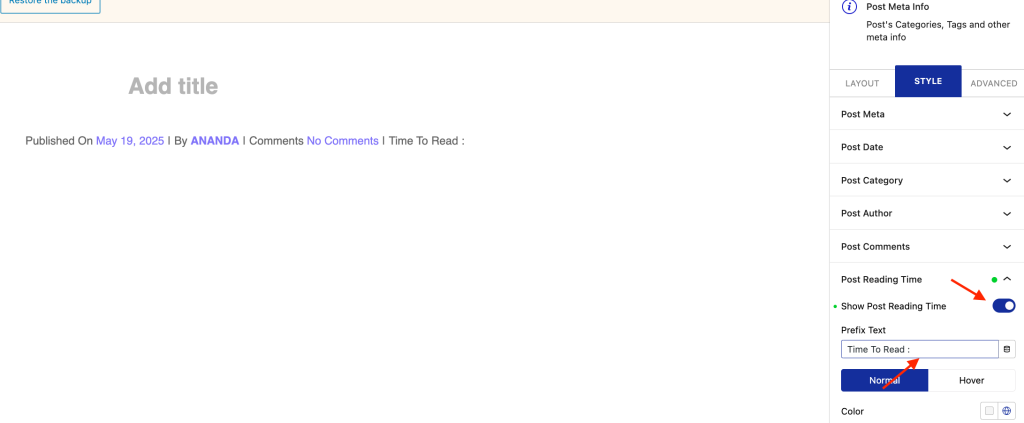
Open a post in the editor, add the Post Meta Info block, and in the block settings open the Style tab. Scroll to the Post Reading Time section, switch Show Post Reading Time to on, and set a prefix such as Time to Read.

The block also lets you control text color, font, and spacing, and toggle other meta like author, date, and categories, so reading time sits in a consistent meta row instead of floating on its own.
To round out the reading experience, pair it with the Scroll Reading Progress Bar block. It tracks how far down the post a reader has scrolled and works on every device.
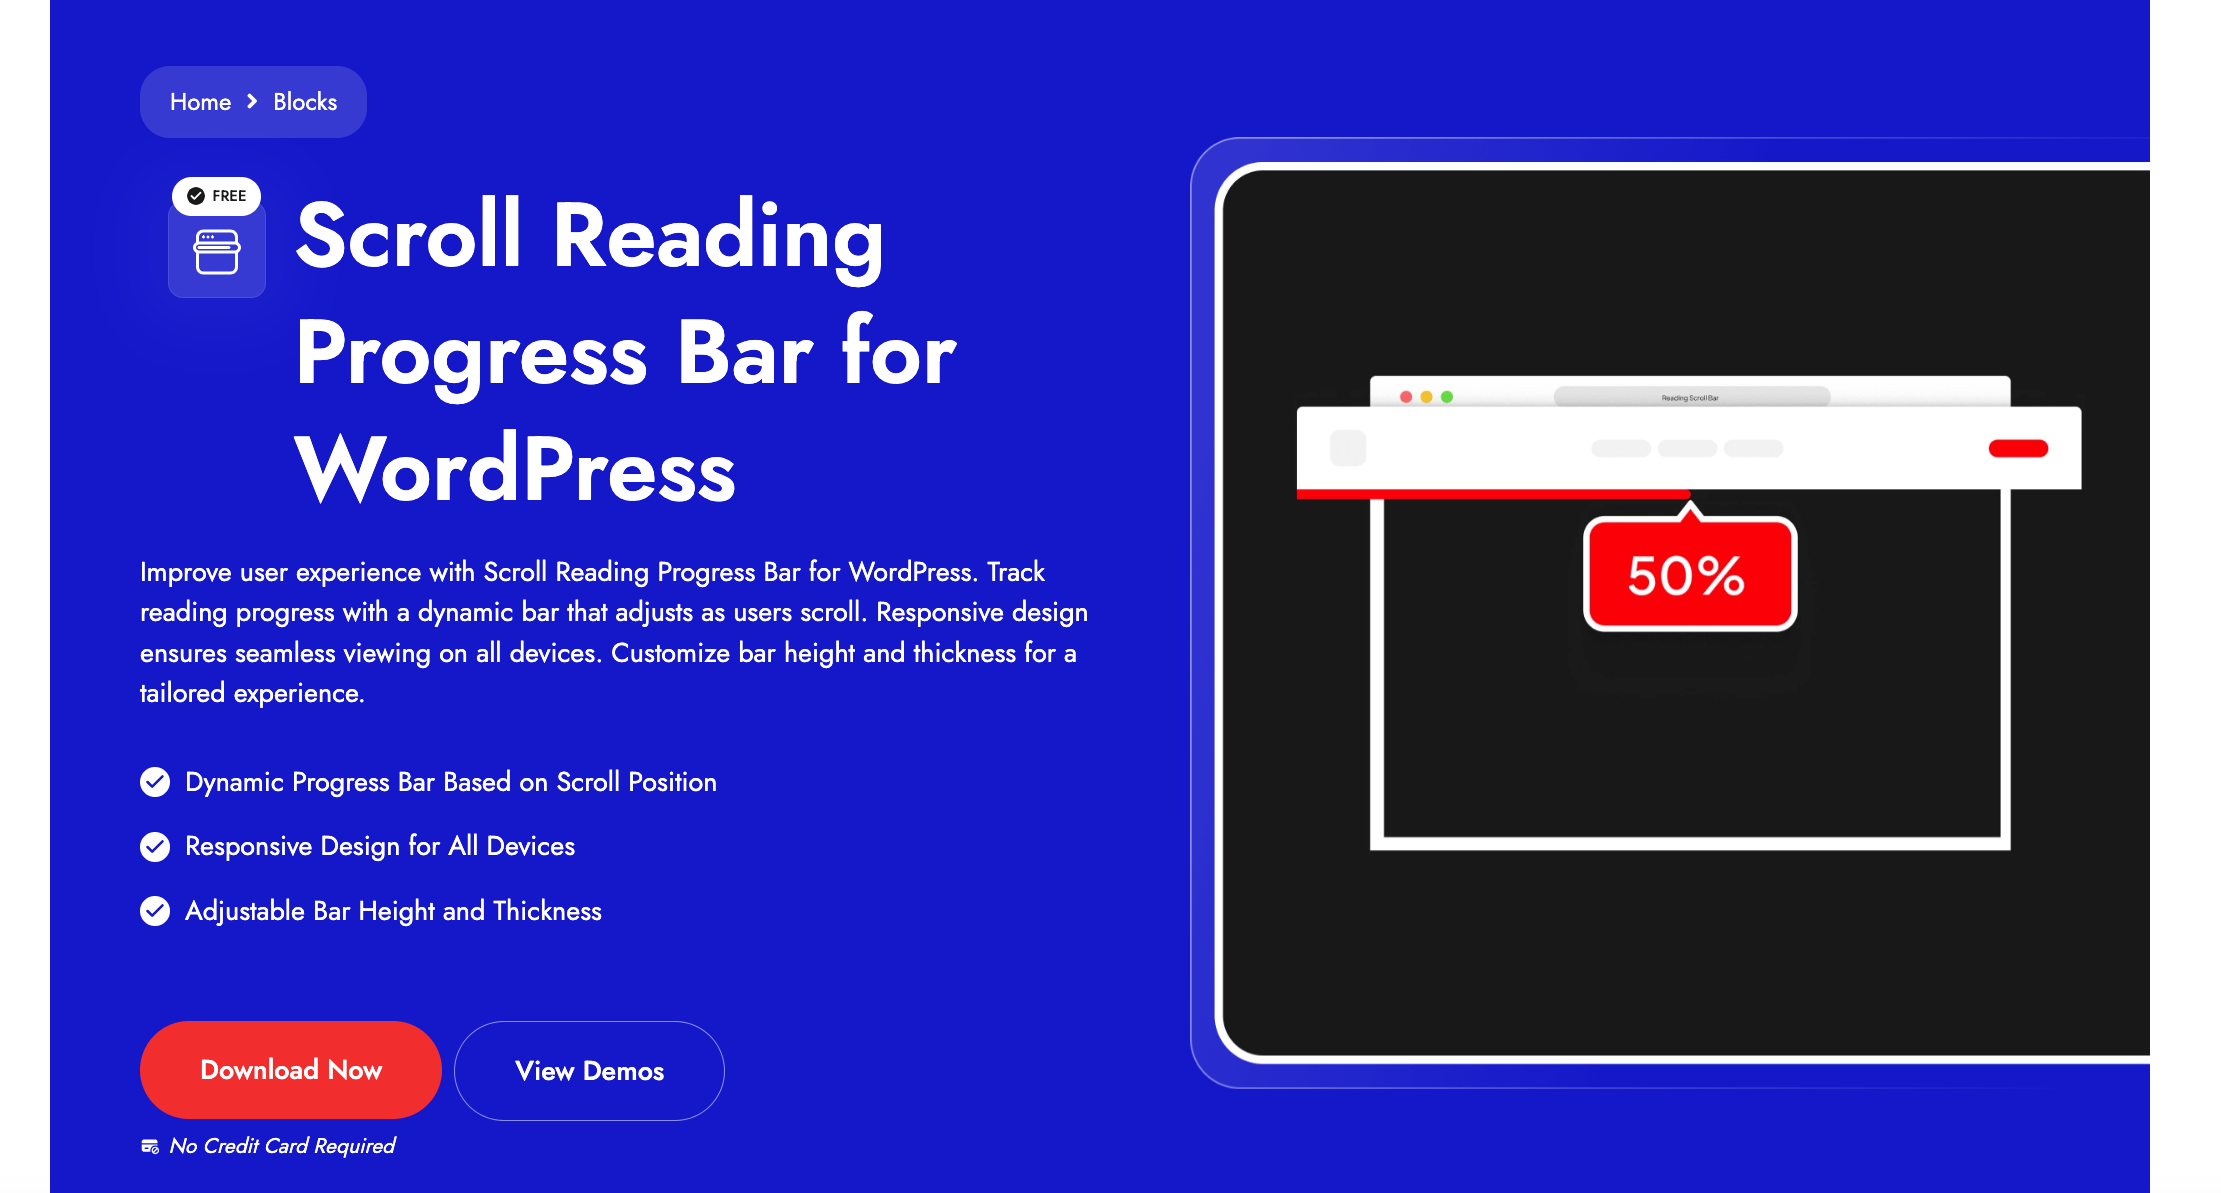
You can place the bar at the top, bottom, or as a floating line, and adjust its height, animation, and color without writing CSS. Here is how it looks on a live post:

Read Meter vs Nexter Blocks: Which to Use
Both routes work. The plugin is the quickest way to switch reading time on across a whole site, and the block is the better fit if you design your own post templates and want reading time to match the rest of your layout. Here is the side-by-side:
| What matters | Read Meter plugin | Nexter Blocks Post Meta Info block |
|---|---|---|
| How it works | Standalone plugin with a settings panel | Gutenberg block you drop into the editor |
| Time calculation | Automatic, sitewide | Automatic inside the post template |
| Styling | Built-in options in plugin settings | Full control in the editor: text, color, spacing, icon |
| Placement | Above or below content | Anywhere in your template or layout |
| Extras | Includes a reading progress bar | Part of a 90+ block suite, pairs with a scroll progress bar |
| Best for | Beginners who want a quick set-and-forget option | Site builders who design their own post templates |
How to Customize the Look of Reading Time
However you add reading time, you will want it to blend into your design while staying easy to spot. Here are your options.
Styling a Plugin
Most reading time plugins, Read Meter included, ship with built-in styling. On the plugin settings page you can usually adjust font size, text and background color, margins and padding, the prefix and suffix text, and where the estimate appears.
Styling the Nexter Post Meta Info Block
With the Post Meta Info block you style everything from the editor: set a custom prefix like Time to Read, pick the font weight, color, and size, and adjust spacing, alignment, and whether an icon shows. No settings page, no code.
Styling Reading Time with CSS
If you need more control, or your theme overrides the plugin styles, add your own CSS under Appearance > Customize > Additional CSS:
.reading-time {
    font-size: 14px;
    color: #333;
    font-style: italic;
    margin-bottom: 10px;
}
This assumes your plugin outputs an element with a .reading-time class. Use your browser developer tools to inspect the element and confirm the exact class name your tool uses.
Common Reading Time Problems and How to Fix Them
- The estimate looks wrong. Fixed words-per-minute rates do not account for code, tables, or heavy images. Adjust the reading speed in your plugin settings, or tweak the divisor in your function.
- It does not show up. Usually the feature is not enabled for that post type, or the theme is suppressing it. Confirm the plugin or block is active for the right post type, and test with a default theme if it still will not appear.
- It appears everywhere. Some plugins apply to every post type by default. Limit it in the settings, or wrap your code in a conditional like is_single() so it only runs on single posts.
- The styling clashes. Themes can override plugin CSS. Use the built-in styling options, or add custom CSS so it matches your design.
Also Read: how to add custom fields in Gutenberg for more ways to enrich your post meta beyond reading time.
Best Practices for Displaying Reading Time
- Put it where readers pause. Near the title or in the meta row, where people scan before they commit.
- Keep the format consistent. Pick one wording, like 3 min read, and use it on every post so readers learn to recognize it.
- Match the speed to the content. A general blog can use 200 to 250 WPM; technical pieces read slower, so a lower rate is more honest.
- Pair it with a progress bar. A scroll progress indicator alongside the estimate gives readers ongoing feedback and encourages them to finish.
- Keep it lightweight. Whether you use a plugin or a block, make sure it does not drag down your page speed.
Wrapping Up
Estimated reading time is a small touch that helps readers decide to stay, especially on longer posts. It sets clear expectations, improves the reading experience, and can cut your bounce rate on in-depth content.
Pick the method that matches how you work: a plugin like Read Meter for a quick sitewide setup, a code snippet for full control, or a block if you build your own templates. If you are already working in the block editor, the Post Meta Info block in Nexter Blocks adds reading time and pairs with a scroll progress bar, alongside 90+ other WordPress blocks, all without code.
Suggested Reading
- Gutenberg vs Elementor: Which Should You Use
- What Is a WordPress Block Theme
- WordPress 7.0: What Is Changing for Block Builders
- How to Monetize a WordPress Blog
- Best Popup Plugins for WordPress
How is estimated reading time calculated in WordPress?
Estimated reading time is usually calculated by dividing the total word count of a post by an average reading speed, typically 200 to 250 words per minute. Some tools also factor in image count or allow you to adjust the words-per-minute rate.
Do reading time plugins affect page speed?
Most lightweight plugins have minimal impact on performance. However, plugins that rely on JavaScript or load extra stylesheets may slightly increase page load time. Choosing a server-side or block-based tool helps maintain speed while still adding the feature.
Can I manually change the reading time on posts?
Yes, if you’re using a custom function or a plugin that supports overrides. Some plugins let you manually edit the displayed time, while others calculate it automatically based on content length. Custom code offers the most flexibility for manual control.
Is there a way to show reading time only on blog posts?
Yes, most plugins let you choose which post types to include. If you’re using code, you can wrap the function inside a conditional like is_single() or is_singular(‘post’) to display it only on blog posts, not pages or other types.
How can I style the reading time with CSS?
You can style the reading time text by targeting its class in your theme’s custom CSS section. Adjust font size, color, spacing, or add effects using simple rules. For example: .reading-time { font-size: 14px; color: #333; }
Can I use Nexter Blocks to show reading time in my blog layout?
Yes, Nexter Blocks includes a Post Meta Info block that lets you display reading time in your blog layout. You can turn the option on in the block settings and fully customize the text, style, and placement, directly inside the Gutenberg editor.
[inarticle_subscribe id=”28477″]
