You upload a crisp, high-resolution photo, hit publish, and then check your site on the front end. The image looks soft. Blurry. Nothing like the sharp file you started with. This is one of the most common frustrations for WordPress site owners, and it happens even when you start with a good original.
The cause is rarely the image itself. WordPress automatically compresses every JPEG you upload to 82% quality by default. Your theme then generates its own thumbnail sizes. An image optimization plugin may compress it a second time. Your CDN might serve a cached older version. Any one of these steps can cause blurriness, and when they stack, the result can look far from what you intended. This guide is for WordPress 6.x users building with Gutenberg, Elementor, or any page builder who need to identify and fix the specific cause affecting their site.
Why Are My WordPress Images Blurry? (8 Common Causes)
WordPress processes images in multiple stages between upload and display. Blurriness can enter at any stage. Before applying a fix, identify which stage is the problem by right-clicking the blurry image on your page and opening it in a new browser tab. If it looks blurry in the new tab, the issue is compression or wrong size. If it looks sharp in the new tab but blurry on the page, it is a display or thumbnail size issue. Test in incognito first as well. If the image looks sharp there, a cached older version is the culprit (Fix 7).
Also Read: how to fix featured images showing twice in WordPress.
| Cause | Type | Quick Fix Reference |
|---|---|---|
| WordPress 82% JPEG compression on upload | Upload | Fix 1 |
| Image uploaded smaller than its display size | Upload | Fix 2 |
| WordPress auto-scaling images larger than 2560px on upload | Upload | Fix 2 |
| Wrong file format (PNG auto-converted to JPEG) | Format | Fix 3 |
| Image optimization plugin using aggressive lossy compression | Plugin | Fix 6 |
| Incorrect thumbnail size selected in block settings | Display | Fix 4 |
| Thumbnails not regenerated after theme or plugin change | Display | Fix 5 |
| CDN or browser cache serving an older, compressed version | Delivery | Fix 7 |
Also Read: find and replace in WordPress if you need to update the same text or image path across hundreds of posts at once.
Fix 1: Disable WordPress’s Default JPEG Compression
This is the most common cause of blurry images that most tutorials skip. Every JPEG image uploaded to your site is automatically compressed to 82% quality by WordPress by default. That means every photo, product image, and hero shot loses quality the moment it hits your media library, before any plugin even touches it.
For most general-purpose photos, 82% looks fine. For high-detail product photos, photography portfolios, or images with text, the compression creates visible softness and artifacts.
Method A: Use a Code Snippet to Override the Compression
Add this filter to your theme’s functions.php file, or better, paste it into a code snippet plugin so it survives theme updates:
add_filter( 'jpeg_quality', function( $arg ) { return 90; } );Replace 90 with your preferred quality level. 100 applies no compression. 90 is a good balance between quality and file size for most sites. This change only affects images uploaded after the filter is added. For existing images, you will also need to run thumbnail regeneration (Fix 5).
The jpeg_quality filter only affects JPEG files. If you also serve WebP or AVIF, use wp_editor_set_quality instead. It sets the quality WordPress applies whenever it generates image sizes, across every format:
add_filter( 'wp_editor_set_quality', function( $quality ) { return 90; } );Method B: Switch to WebP with Nexter Extension (No Code)
A more effective alternative to tweaking JPEG quality is to stop using JPEG for new uploads altogether. WebP achieves higher visual quality than JPEG at the same or smaller file size, which removes the compression problem at the source. Nexter Extension (Pro) includes an Image Upload Optimization module that automatically converts images to WebP in the background on every upload, with original files preserved as fallbacks for older browsers. No settings to configure, no code required.
Slow images cause far more problems than blurriness alone. See all the ways to speed things up: 20+ Tips to Speed Up WordPress Websites
Fix 2: Upload Images at the Correct Resolution
If you upload an image at 400×400 pixels and your theme or block displays it at 800×800 pixels, WordPress has to stretch it. The browser interpolates the missing pixels, and the result looks soft and blurry. No compression setting can fix this. The original file simply does not have enough data.
The rule is: upload images at least as large as the maximum size they will be displayed on screen. For Retina displays, upload at 2x that size (covered in Fix 8).
- Full-width hero images: Minimum 1920px wide (2560px for large monitors).
- Blog post content images: 1200px to 1600px wide covers most column widths.
- WooCommerce product images: 800x800px minimum. Check your theme’s requirements in Appearance > Customize > WooCommerce > Product Images.
- Gallery thumbnails: Match the largest size your gallery renders. The Nexter Blocks Image Gallery (Pro) uses WordPress registered sizes, so the block’s size setting determines what gets served.
Keep file sizes between 100KB and 1MB for web images. If your original is 10MB, resize it in an editor before uploading. To verify scaling, right-click the image on your page, select Inspect, and hover over the image tag. Chrome and Firefox both show the natural size and the displayed size. If the displayed size is larger, re-upload a bigger version of the original.
One catch with very large uploads: since WordPress 5.3, any image whose width or height is over 2560px is automatically scaled down to 2560px on upload, and that resized copy, not your original, is what gets served. This “big image” threshold helps most sites, but if you deliberately need larger images, for example a full-bleed 4K hero, or the scaled version looks soft, raise or disable the threshold with a filter:
add_filter( 'big_image_size_threshold', '__return_false' );Return false to turn scaling off completely, or return a number in pixels to set a higher limit. WordPress keeps your original file either way, so this only changes which version is displayed.
Fix 3: Choose the Right Image File Format
Each file format handles compression differently, and choosing the wrong one for the image type is a frequent cause of blurriness, especially for logos and graphics.
- JPEG: Best for photographs and complex images with many colors. Uses lossy compression, which means some data is permanently removed on each save. Good for photos, bad for logos, text-heavy images, or screenshots.
- PNG: Uses lossless compression, so no image data is removed. Best for logos, icons, screenshots, and any image requiring a transparent background. Larger file sizes than JPEG, but no quality loss.
- WebP: The modern standard for web images. Better compression than JPEG and PNG with no quality loss. WordPress accepts WebP uploads natively, and most image optimization plugins can convert your existing library to WebP automatically.
- AVIF: The newest format, supported natively in WordPress since version 6.5. AVIF images can be up to 50% smaller than JPEGs while keeping the same quality, and they produce sharper results in high-detail areas with wider color support. It is the most efficient of the widely supported formats. Your host needs AVIF support in its image library (Imagick or LibGD), which you can check under Tools > Site Health. Like other formats, AVIF still gets WordPress’s automatic srcset, so it works with the Retina fix below.
- GIF: Limited to 256 colors. Use only for simple animations. For static images, PNG or WebP is always better.
Why Is My WordPress Logo Blurry?
The short answer: a WordPress logo looks blurry either because the file is smaller than the space it displays in, or because an optimization plugin converted a transparent PNG into a JPEG. Both are quick to fix.
When the logo is too small for its display size, follow Fix 2 and upload a larger file. When a plugin converts the PNG to JPEG, the problem is transparency: JPEG does not support it, so the plugin fills the transparent background with white and applies lossy compression. Go into your plugin settings and disable PNG-to-JPEG conversion.
For a logo, always upload a PNG or an SVG. SVG is vector based, so it stays perfectly sharp at any size and on any Retina screen with no compression. WordPress does not allow SVG uploads by default for security reasons, so enable them with a plugin that sanitizes the file first, such as Safe SVG. If your header still looks soft after switching formats, it is usually a resolution problem: upload the logo at 2x the width your theme displays it, then clear your cache (Fix 7).
Fix 4: Set the Correct Image Thumbnail Size in WordPress
When you insert an image into a WordPress post or page, you choose which registered size to use: thumbnail, medium, large, or full size. If you select “thumbnail” for an image that is displayed at a large size, WordPress serves a small file and the browser scales it up, causing blurriness. The fix is to select the size that matches how the image will actually display.
In the Gutenberg block editor, click the image block and look for the “Image Size” dropdown in the right sidebar under “Block” settings. Set this to “Full Size” if the image should display at its original dimensions, or choose the size that matches the area.

Featured images blurry after a theme switch? Themes register their own thumbnail sizes, and when you switch themes those sizes change. Existing images are not regenerated automatically, so WordPress serves the old size at the new dimensions. Run Fix 5 (regenerate thumbnails) after any theme or template change.
Fixing Blurry WooCommerce Product Images
WooCommerce defines its own set of image sizes separate from the WordPress defaults. If product images look blurry, go to Appearance > Customize > WooCommerce > Product Images and check the Main Image Width setting. Increase the value to match the largest size your theme’s product layout displays images at.
After changing this setting, you also need to regenerate thumbnails (Fix 5) so all existing product images are resized to the new dimensions. New uploads will use the new settings automatically.
You can also use Nexter Extension’s Disable Image Sizes module (Pro) to turn off WordPress’s default intermediate sizes that your theme never uses. This reduces storage and prevents older, smaller-size versions from being served when a plugin or block accidentally selects the wrong size.
Fix 5: Regenerate Image Thumbnails in WordPress
When you change your WordPress theme, update a plugin that registers custom image sizes, or change any media settings, the images already in your library are not automatically updated. They still exist in the sizes generated under the old settings. Regenerating thumbnails forces WordPress to recreate every size variation from the original files using the current settings.
This is one of the most effective fixes for widespread blurriness that appears after a theme change or plugin switch.
Method A: Regenerate Thumbnails with Nexter Extension (No Plugin)
Nexter Extension (Pro) includes a built-in Regenerate Thumbnails tool in its dashboard, so you do not need to install a separate plugin. Open the Nexter Extension dashboard and run bulk thumbnail regeneration for your entire media library from there.
Method B: Regenerate Thumbnails with the Standalone Plugin
If you are not using Nexter Extension, the Regenerate Thumbnails plugin is the standard tool for this task.
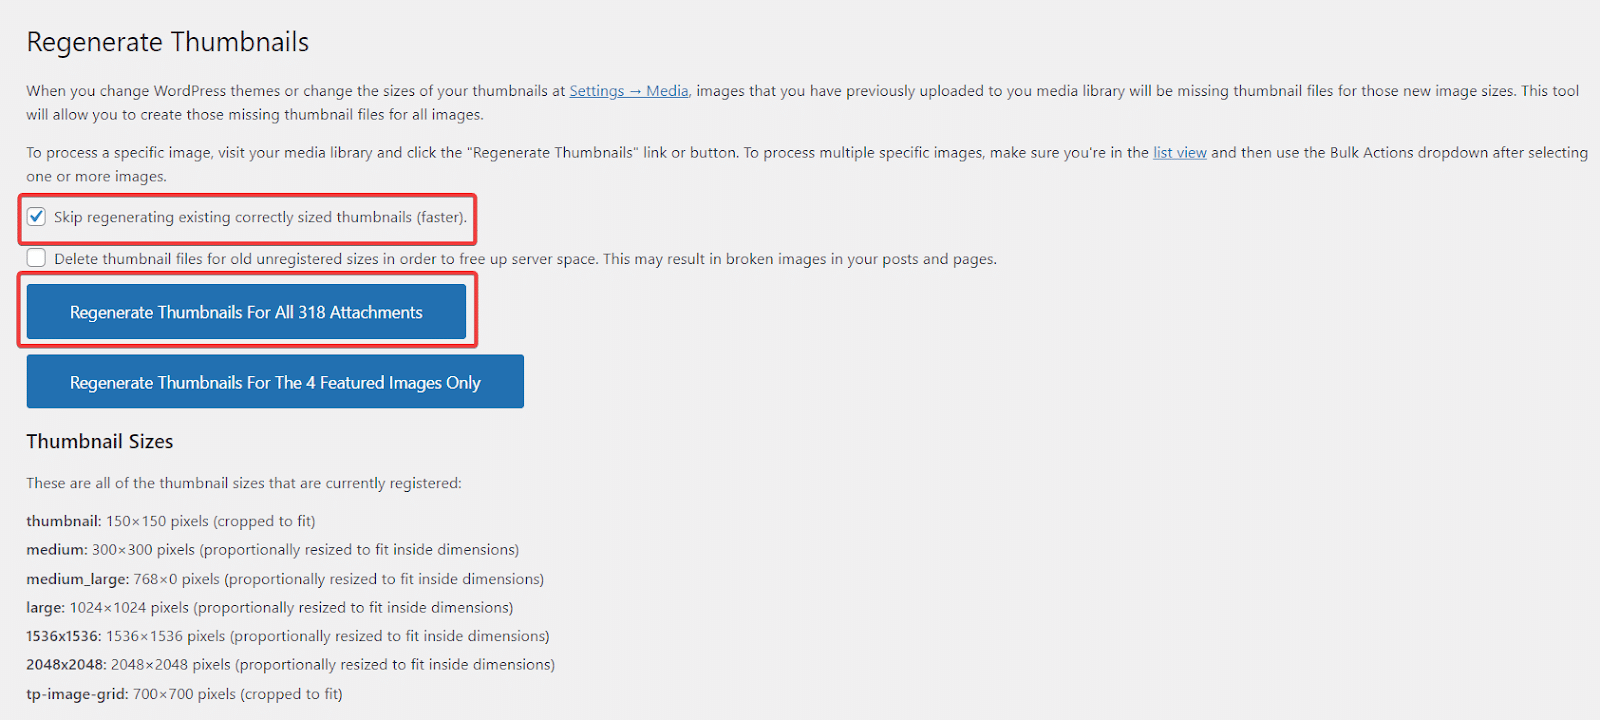
Install and activate the plugin from Plugins > Add New.

Go to Tools > Regenerate Thumbnails.

Check the box to include previously attached images and click Regenerate Thumbnails For All Attachments. Do not close the tab while it runs.
Thumbnails sharp and ready? See how to display them beautifully: How to Create a WordPress Image Gallery Using Gutenberg
Fix 6: Adjust Your Image Optimization Plugin Settings
Image optimization plugins (Smush, EWWW Image Optimizer, Imagify, ShortPixel) compress your images to reduce file size and improve page load speed. The problem is that if the compression setting is too aggressive, or if you are running two plugins that each compress images, you end up layering lossy compression on top of lossy compression. Each pass degrades the image further.
Here is what to check and adjust:
- Compression type: Most plugins offer Lossy, Lossless, or Glossy (a mid-point). If your images look blurry, switch from Lossy to Lossless or Glossy. Lossless removes no image data at all. Glossy applies only the compression that does not noticeably affect visual quality.
- Deactivate one plugin: Run only one image optimization plugin at a time. If you have both Smush and EWWW active, they may both be compressing the same image. Deactivate all but one.
- Last resort: deactivate the plugin temporarily: Deactivate your optimization plugin entirely and check whether images clear up. If they do, the plugin’s compression settings were the cause. Reconfigure it with lower compression or try a different plugin.
Fix 7: Clear CDN and Browser Cache to Show Updated Images
After applying any of the fixes above, you may still see blurry images if your CDN or browser is serving a cached older version. Caches store copies of your images to serve them faster to visitors. But if the cached copy was taken before you fixed the compression settings, visitors see the blurry cached version even though the live file is now sharp.
Test first: Open the page in an incognito window. Incognito bypasses your local browser cache. If the image looks sharp there, press Ctrl+Shift+R (Cmd+Shift+R on Mac) to hard-refresh your regular browser tab.
If it is still blurry in incognito, clear your CDN and server cache. In Cloudflare, go to the Caching section and use Purge Everything (or Custom Purge for a single image URL). For WP Rocket: Dashboard > Clear Cache. LiteSpeed Cache: LiteSpeed > Toolbox > Purge All. WP Super Cache: Settings > Delete Cache. After clearing, reload the page in incognito to confirm.
Gallery images still looking off after clearing cache? Here are the best tools for the job: 6 Best Photo Image Gallery WordPress Plugins
Fix 8: Serve 2x Images for Retina and HiDPI Displays
High-DPI displays, including Retina screens on MacBooks and iPhones and many modern Android phones, render at 2x or 3x the pixel density of a standard monitor. An image that looks sharp on a standard 1080p screen looks blurry on a Retina screen because the display has more physical pixels than the image has data for.
This is why many WordPress users report that images look sharp on their desktop but blurry when they check their site on a smartphone.
How WordPress Handles Retina Images Automatically
WordPress automatically generates multiple image sizes on upload and adds srcset attributes to images inserted through the block editor. The srcset tells the browser which size to load based on the screen’s pixel density. This means if you upload an image large enough, WordPress serves the correct size to Retina screens automatically.
The key is the upload size. If your blog column is 800px wide and you upload an 800px image, Retina screens will still be served the 800px version, which gets scaled up and looks blurry. Upload at 1600px wide (2x the display size) and WordPress will serve the 800px version to standard screens and the full 1600px version to Retina screens via srcset.
CSS background images are not covered by WordPress’s srcset system since they are set in stylesheets, not content. Upload background images at 2x resolution and use SVG for geometric patterns and icons, which scale perfectly at any resolution. If you are converting a Figma design to WordPress, UiChemy preserves your original Figma image dimensions during conversion and maps them to the correct WordPress sizes, preventing the upscaling that causes blurriness.
Stay updated with Helpful WordPress Tips, Insider Insights, and Exclusive Updates – Subscribe now to keep up with Everything Happening on WordPress!
Wrapping Up: Which Fix Should You Try First?
Most blurry image problems in WordPress trace back to three root causes: WordPress’s default 82% JPEG compression, images uploaded at the wrong size, or thumbnails that were never regenerated after a theme change. Fix 1, Fix 2, and Fix 5 solve the majority of cases. If your images are only blurry on mobile, go to Fix 8. If images looked fine and suddenly look blurry without any changes on your end, go to Fix 7 first.
If you want to manage JPEG compression settings, regenerate thumbnails, and disable unused image sizes from a single dashboard, Nexter Extension by POSIMYTH Innovations covers all three without installing separate plugins for each. The Image Upload Optimization, Regenerate Thumbnails, and Disable Image Sizes modules are included in Nexter Extension Pro alongside 50+ extensions for security, performance, fonts, and admin. See Nexter pricing for full plan details.